
If you use your vehicle to tow large loads and/or drive on steep roads, monitoring your vehicle's transmission temperature is important. This article describes how to set up a customized dashboard gauge with a built-in warning for high transmission temperature and a corresponding alert that is captured in Trip details.
Before you begin, you must complete the tasks in the Get Started with Your OBDLink® Adapter (iOS and Android) article to configure the app for your vehicle, download the latest firmware to your adapter, and install enhanced diagnostics for your vehicle.
Note: The Alerts option was recently added to the OBDLink app. If you don't see this option, download the latest version of the OBDLink app from the App Store (iOS) or Google Play (Android).
TABLE OF CONTENTS
- Example 1: 2012 Ford Escape using iOS device
- Example 2: 2023 Chevrolet Malibu using Android device
- Troubleshooting
- Learn more
- Need more help?
Note: This article is focused on the OBDLink® MX+ adapter, because enhanced diagnostics for many vehicles are included free of charge in the OBDLink app with your purchase. Add-ons that are exclusive to OBDLink MX+ include: GM; Honda, Acura; and Hyundai, Kia. If you have another OBDLink adapter model, then you can purchase add-on diagnostics, but they are not guaranteed to access all OEM-specific PIDs/DTCs. For example, if you have an OBDLink LX adapter and a Ford vehicle, you can purchase the Ford add-on, however, you will not be able to read certain Ford PIDs that come from the MS-CAN network.
Example 1: 2012 Ford Escape using iOS device
Before you begin, be sure to:
- Start your vehicle.
- On your phone/tablet, open the OBDLink app and connect to your OBDLink adapter.
- Make sure your phone/tablet is not streaming to any other Bluetooth/BLE devices.
Add transmission temperature gauge
In our example, we added a transmission temperature gauge for a Ford vehicle.
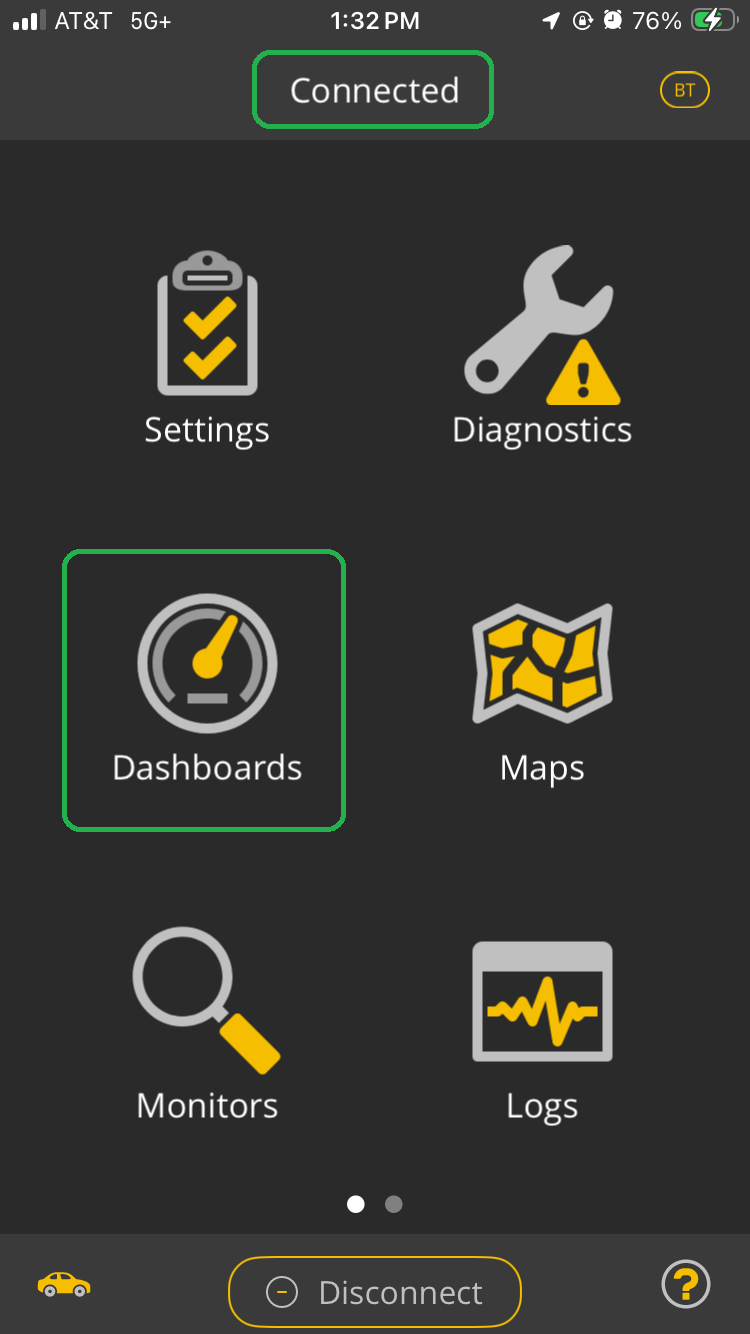
- In the OBDLink app home screen, confirm that your adapter is Connected and tap the Dashboards icon.
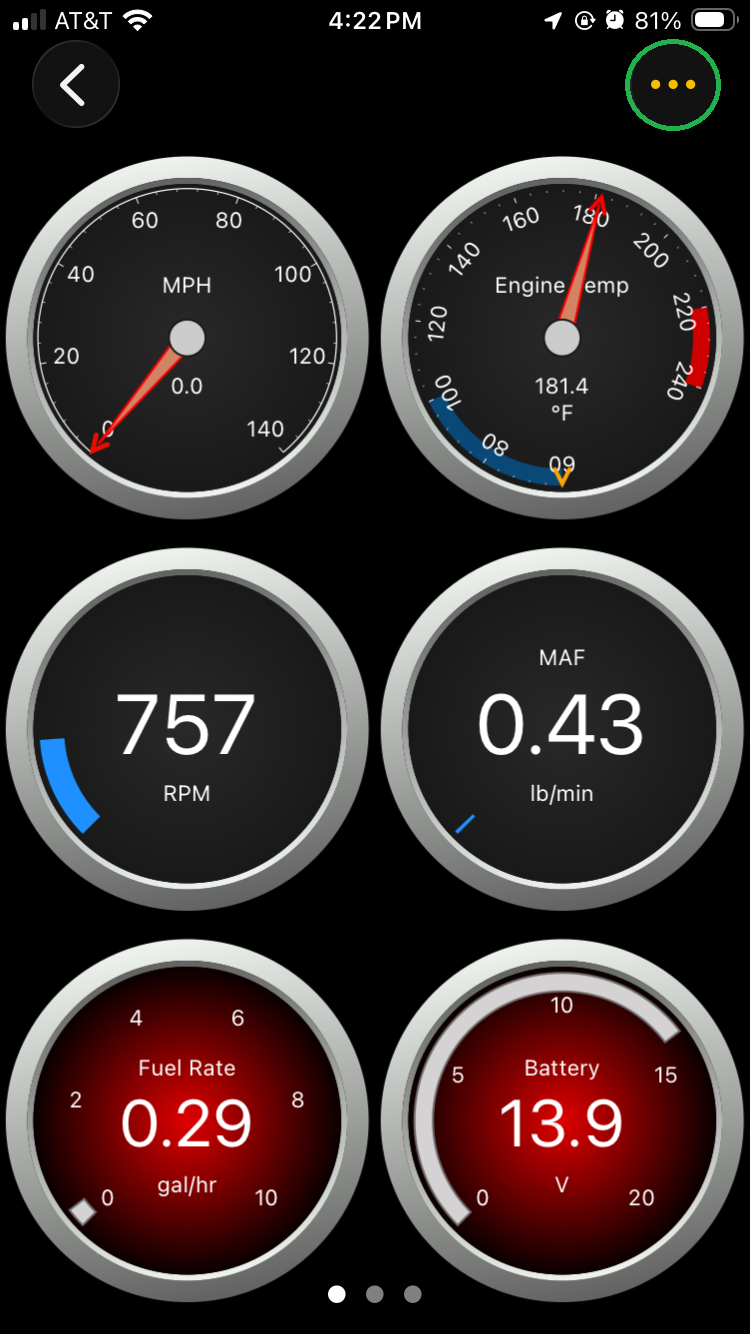
Tap the 3 dots menu button in the upper right corner.
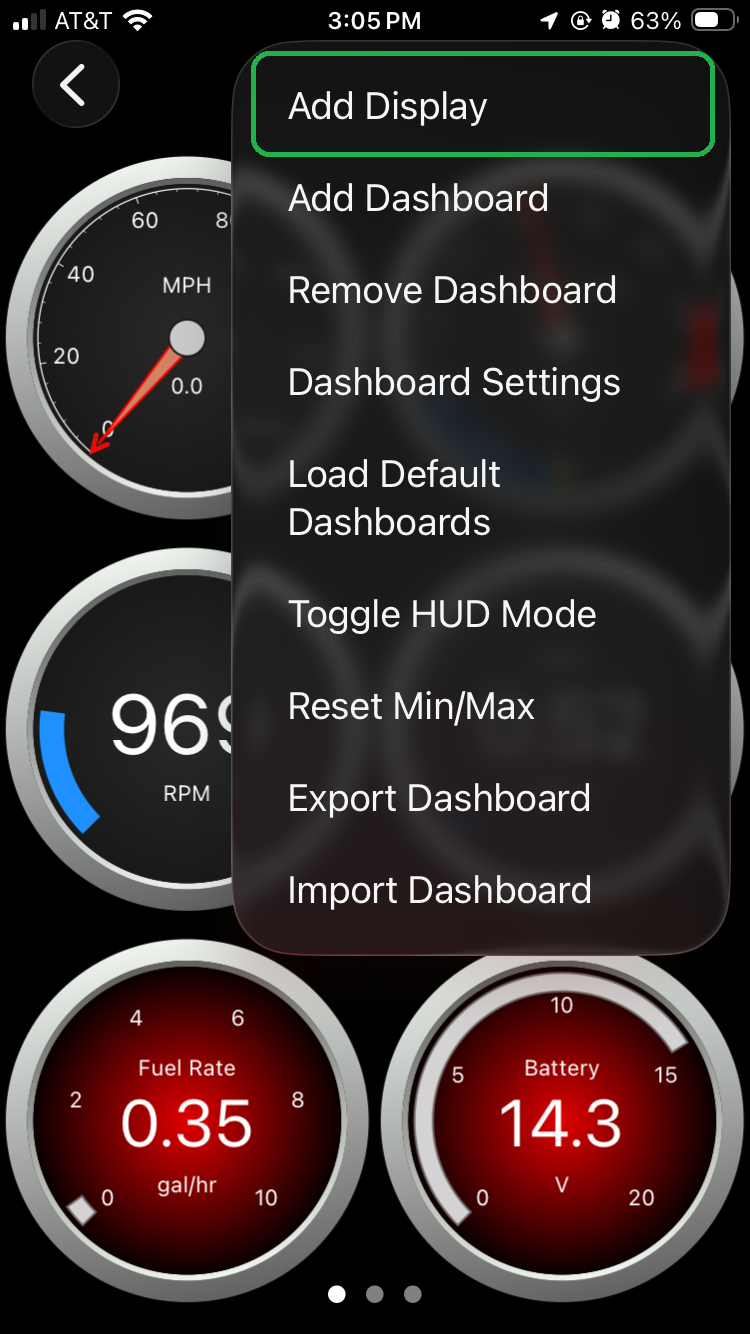
Tap Add Display to add a new gauge to the current dashboard page.
Select the gauge type on the Display Type menu, then tap the forward arrow (>).
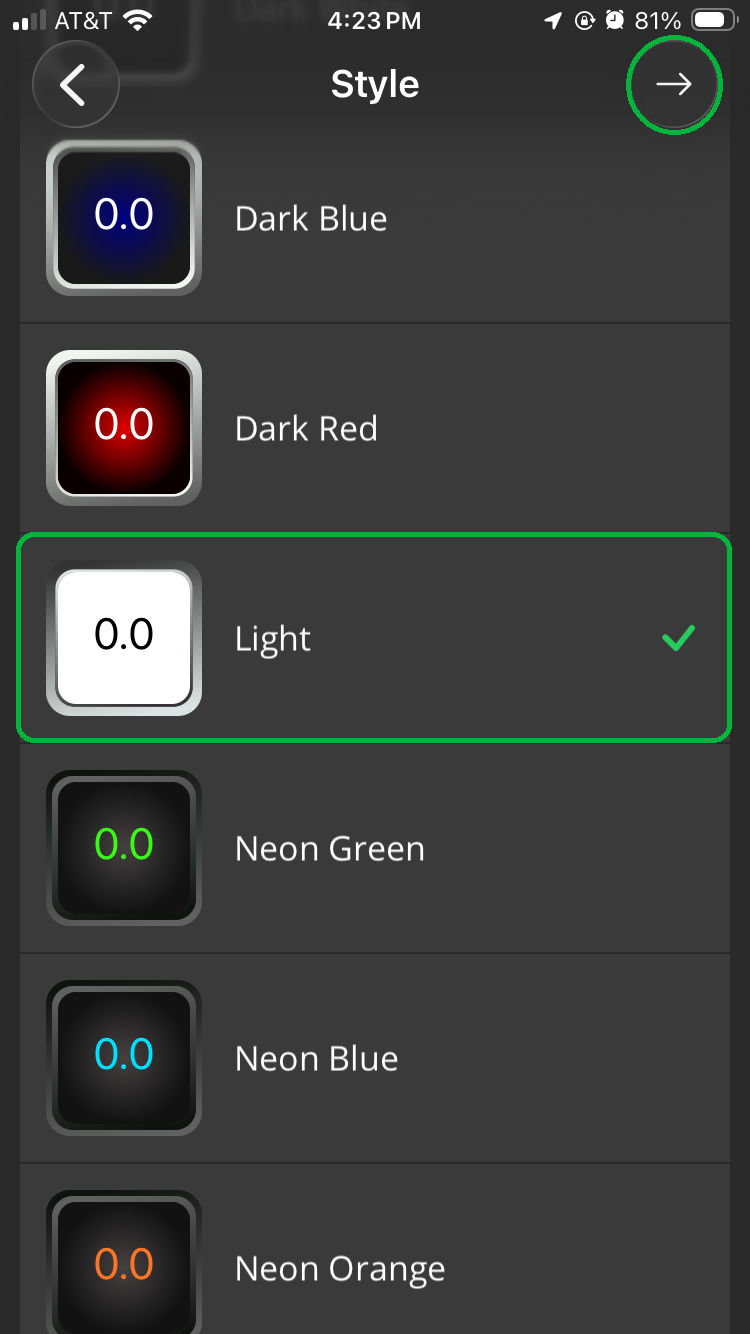
Select the gauge color on the Style menu, then tap the forward arrow (>).
In our example, we selected Digital Gauge and Light.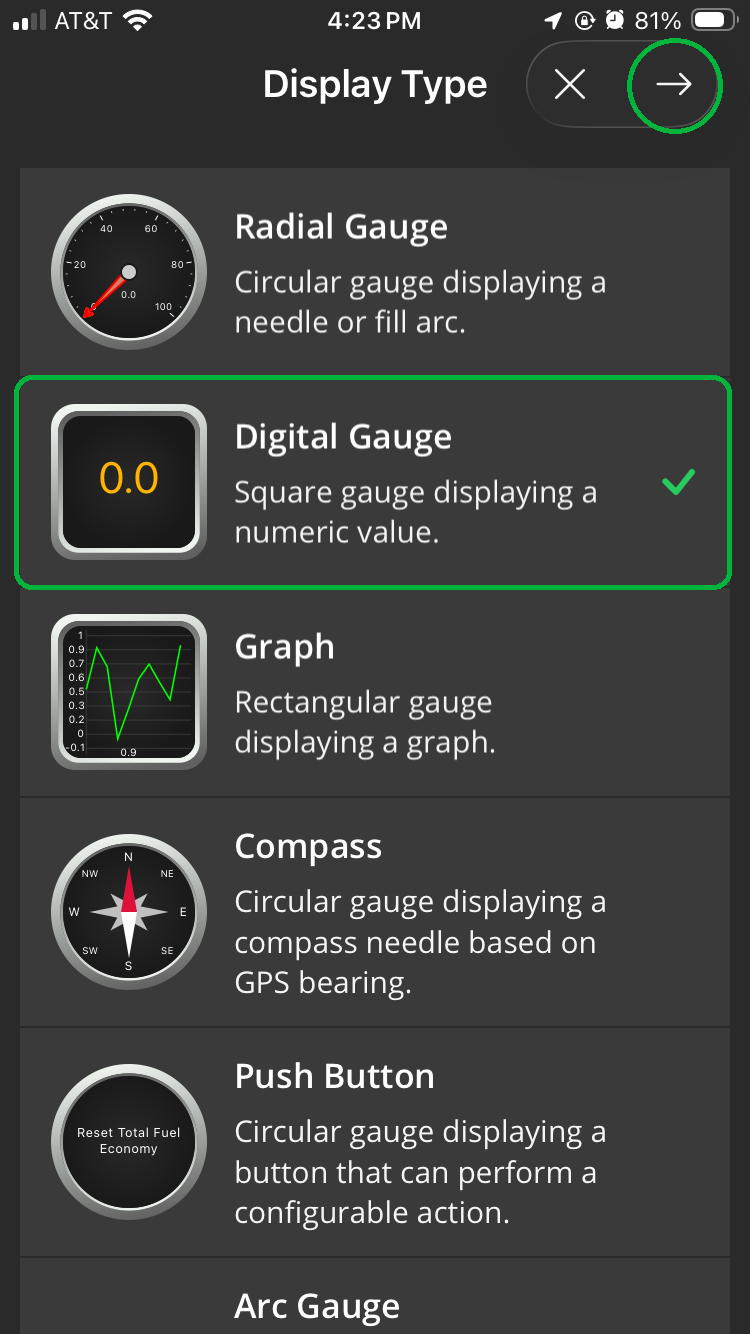
On the Display Configuration menu, tap the forward arrow in the PID section to open the Select PIDs menu.
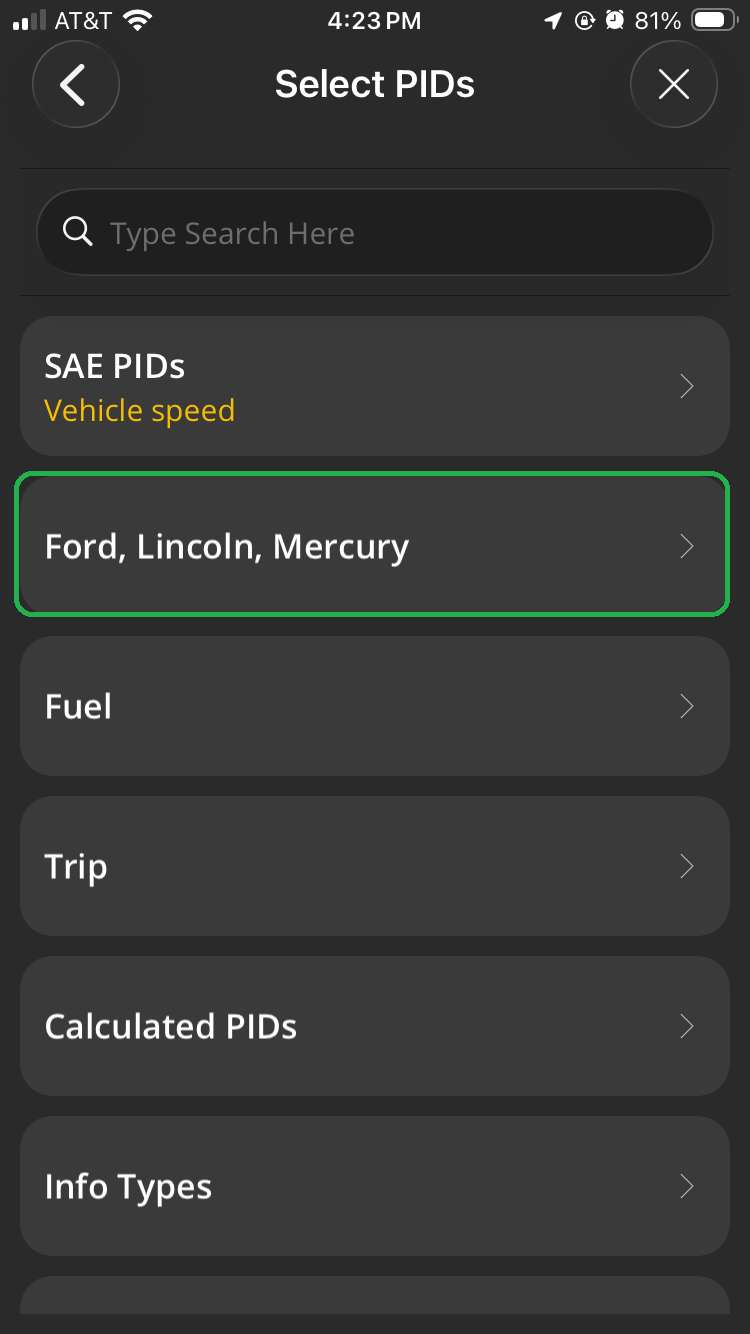
On the Select PIDs menu, tap Ford, Lincoln, Mercury.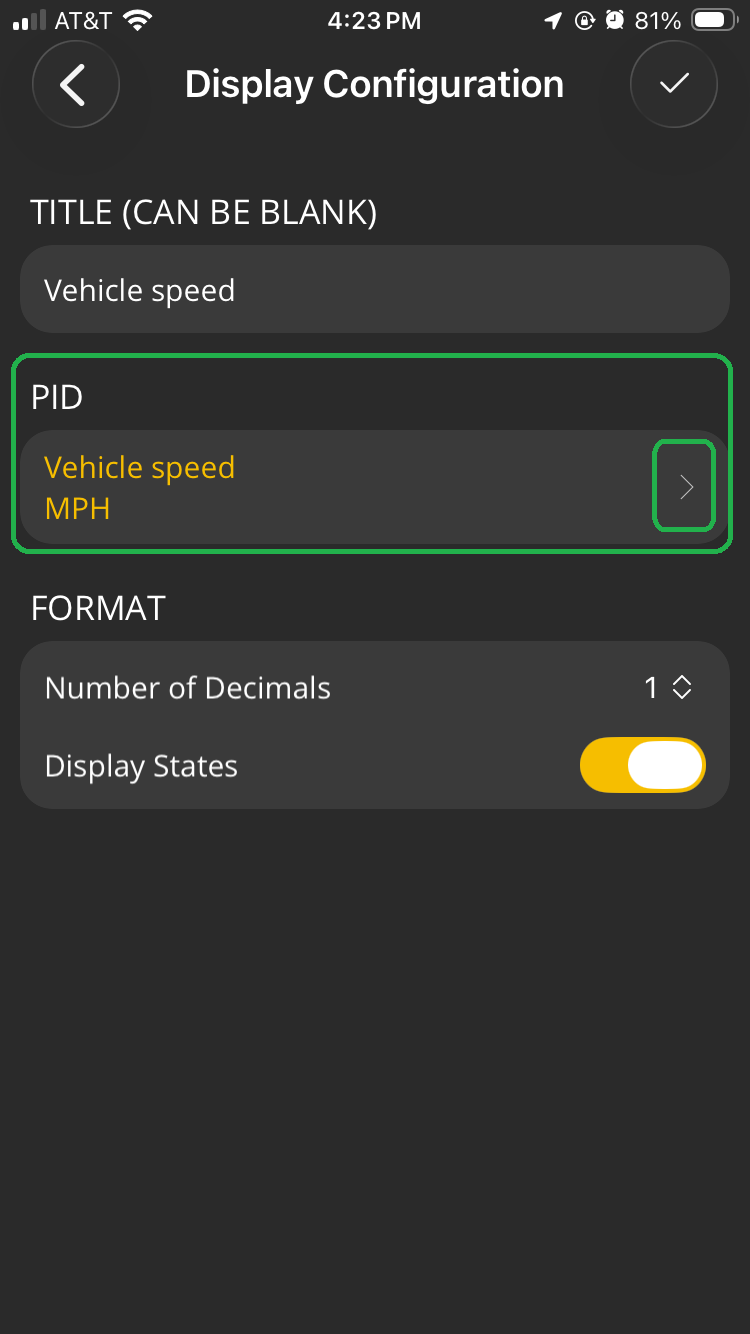
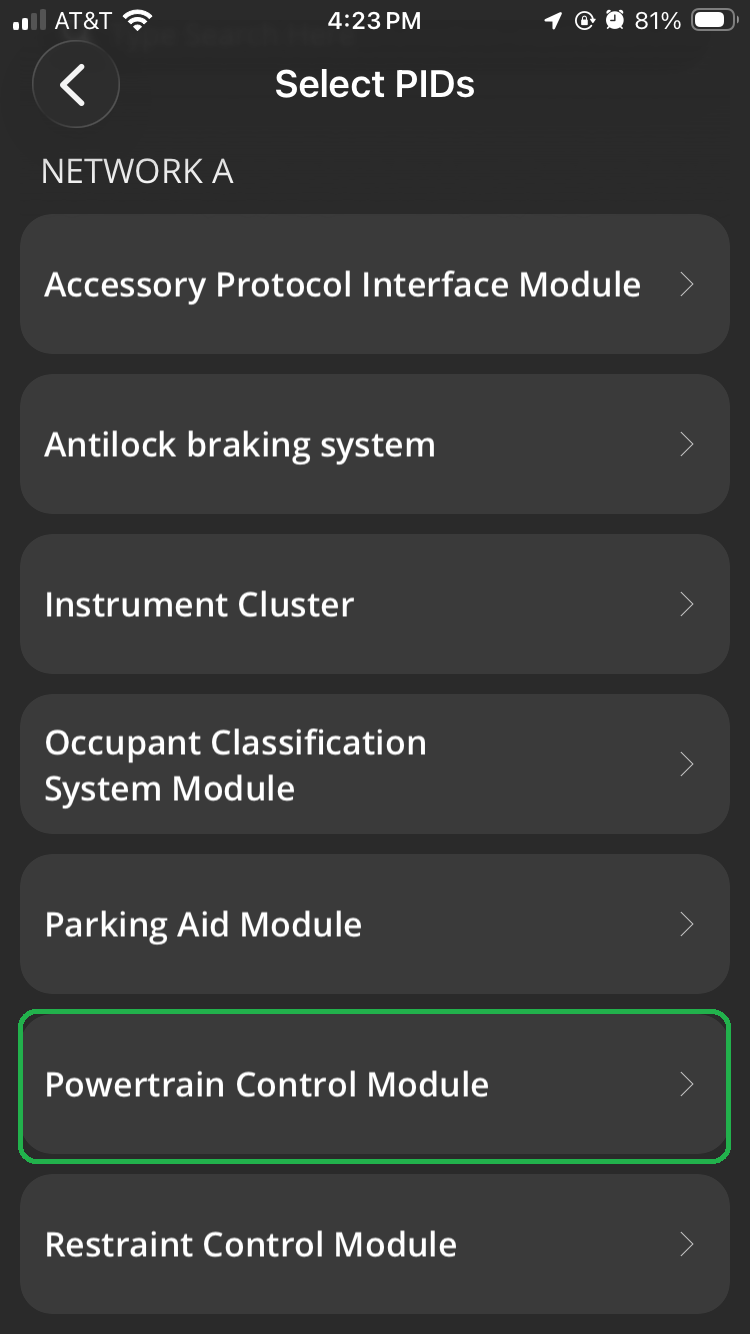
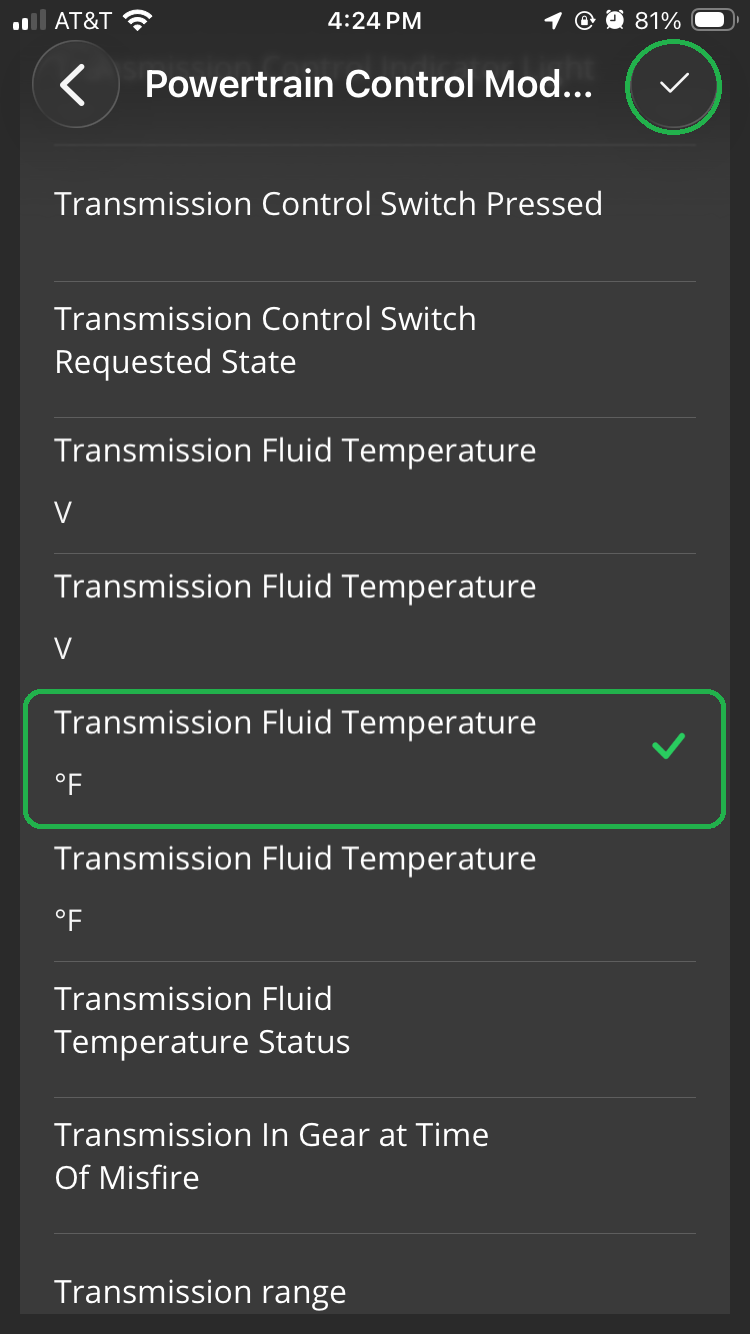
Tap Powertrain Control Module, select Transmission Fluid Temperature °F, and tap the checkmark (✓) in the upper right corner to save the display.
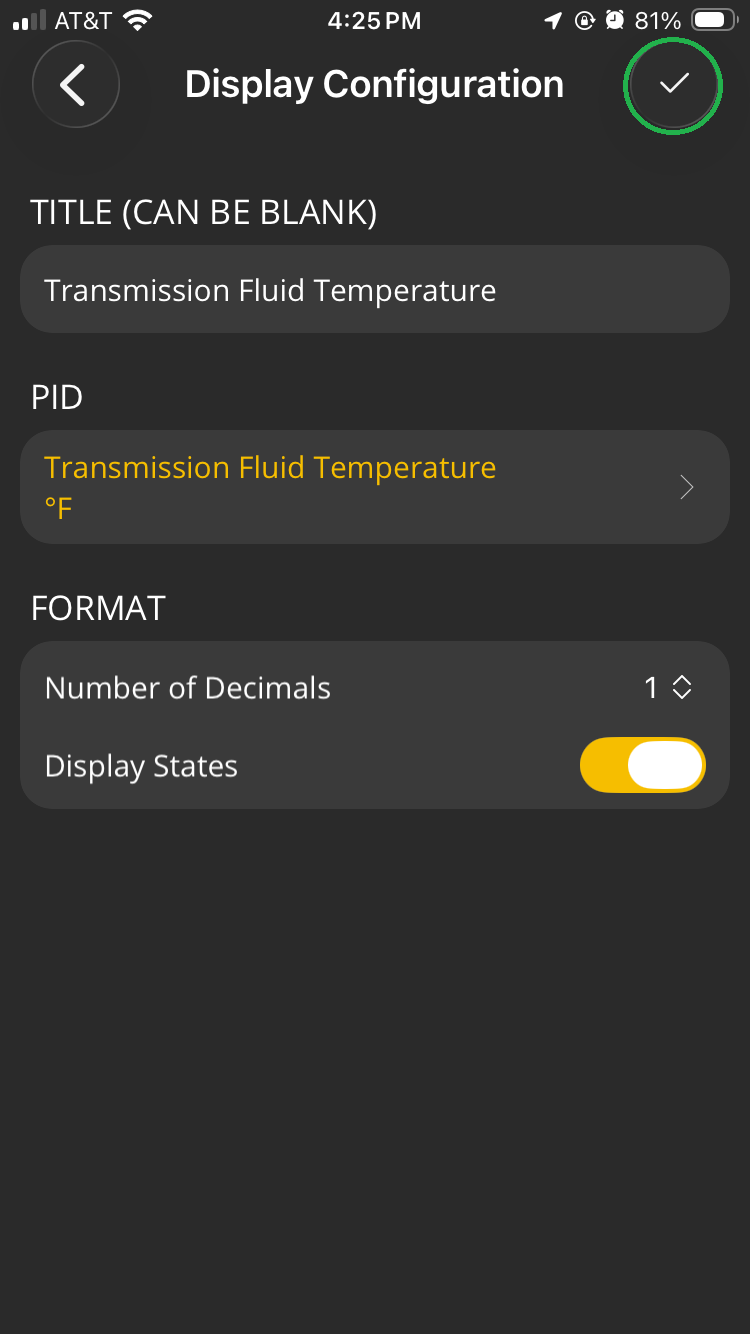
You can edit the gauge title if you’d like, then tap the checkmark (✓) in the upper right corner to save the display.
You will see the new gauge displayed on the dashboard. Tap and hold the gauge to open the Edit Display menu and tap Drag and Move to move the gauge on the dashboard screen.
In our example, we moved the Transmission Fluid Temperature gauge on top of the MAF gauge.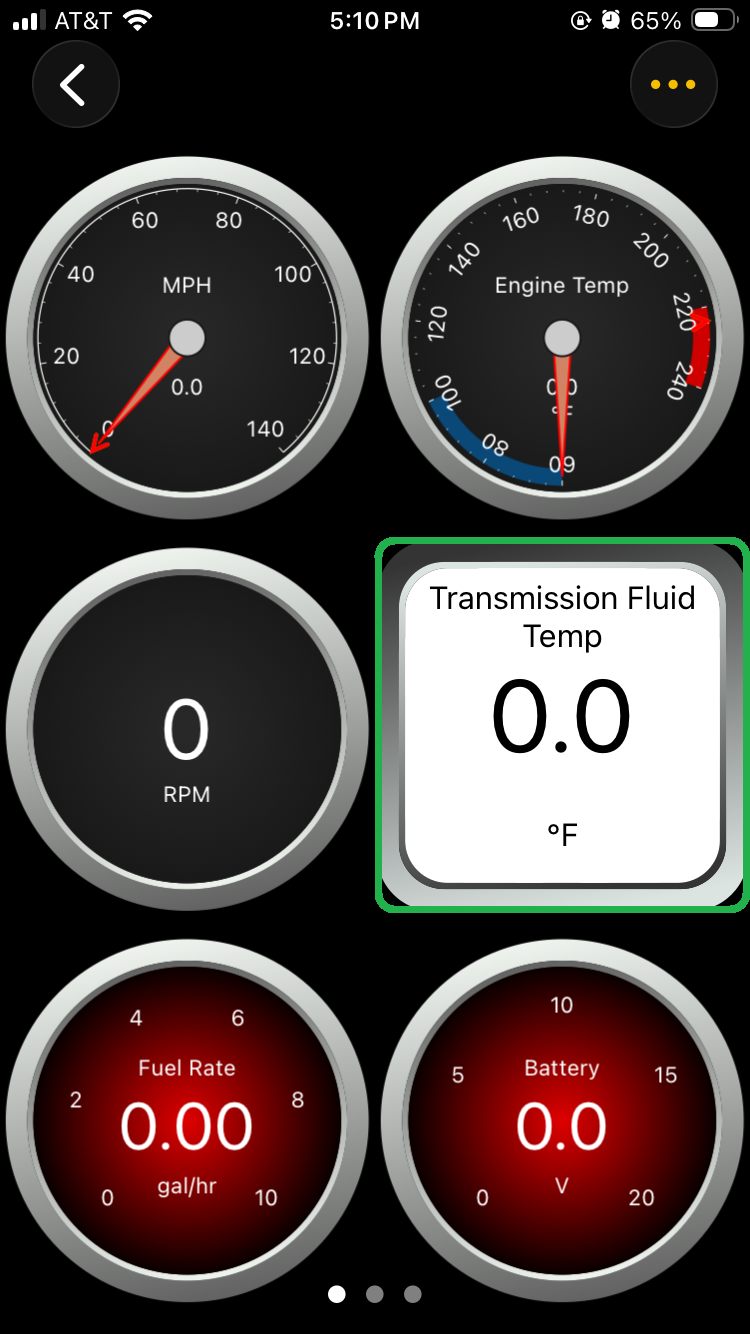
Tip: If the new gauge shows 0.0, try swiping to a different dashboard page, then swipe back. The OBDLink app may load values in the new gauge when it refreshes the page.
For more help, see the Troubleshooting section.
Add visual warning to the new gauge
In our example, we changed the transmission temperature gauge to show an orange background when the PID value is greater than 200 °F.
- Press and hold the transmission temperature gauge until the Edit Display menu is shown. Tap Style.
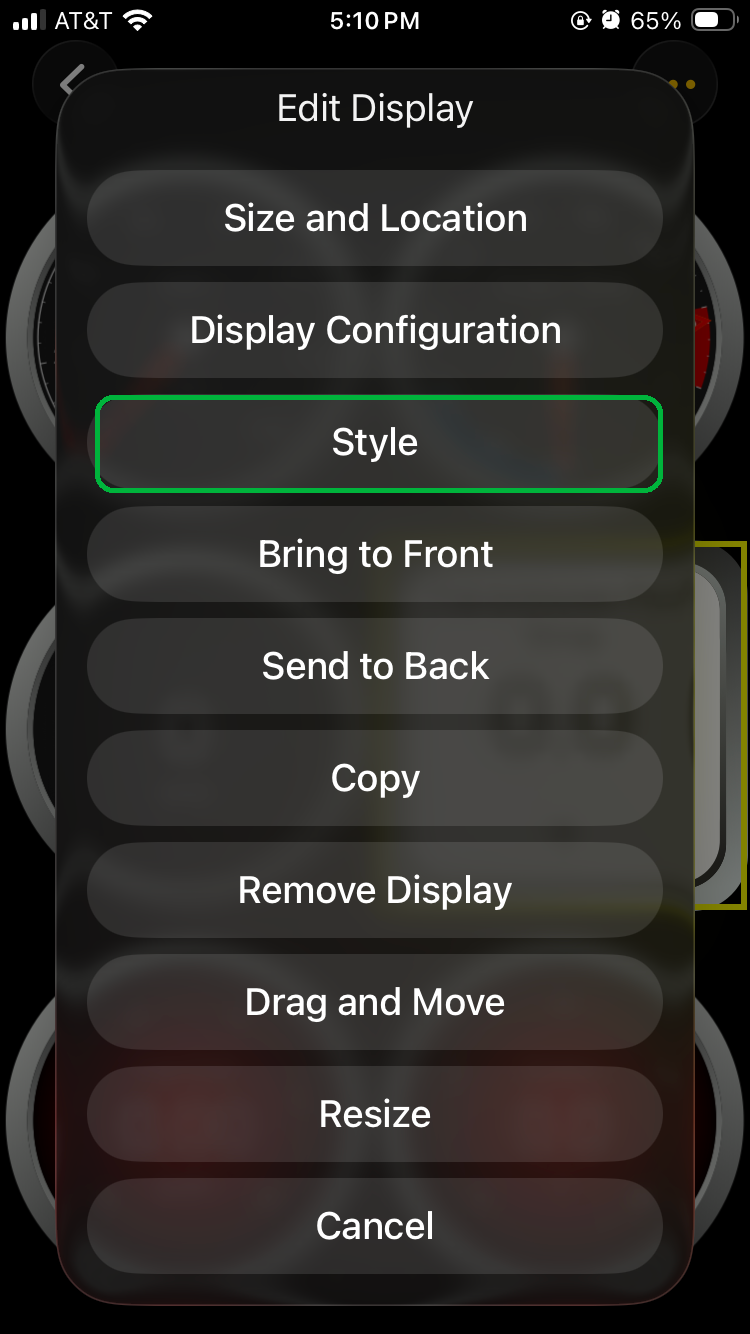
- You will see the Frame tab on the Style menu with the current display settings. Tap the Warnings tab.
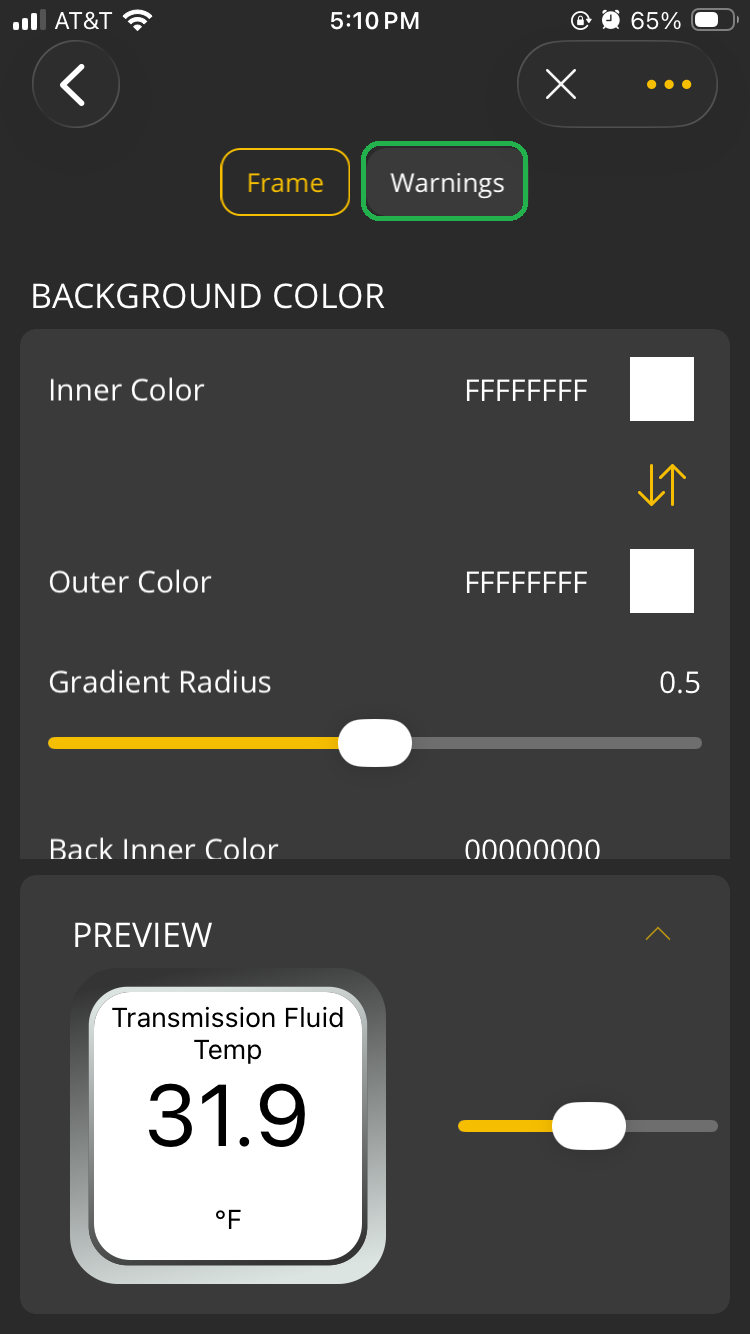
- Tap Add Warning to open the Warnings screen.
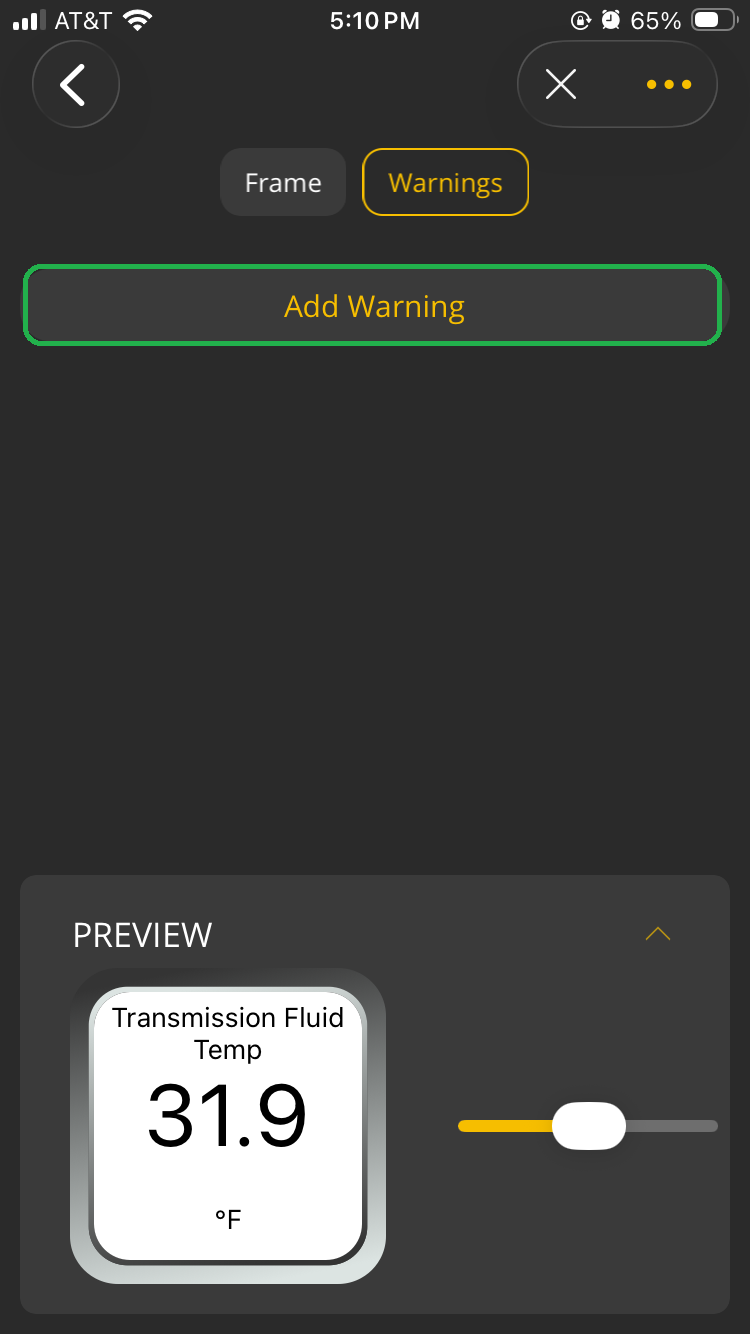
- In the Warnings screen, enter the values you want to use, the comparison type (if needed), and the gauge color.
You can move the slider in the Preview section to see how the gauge will behave.
Tap the back arrow (<) to save your selection.
Note: Check your vehicle manufacturer’s guidelines for the recommended range of transmission temperature values.
In our example, we set up a visual warning for a transmission temperature greater than 200 °F. We chose orange for the display color.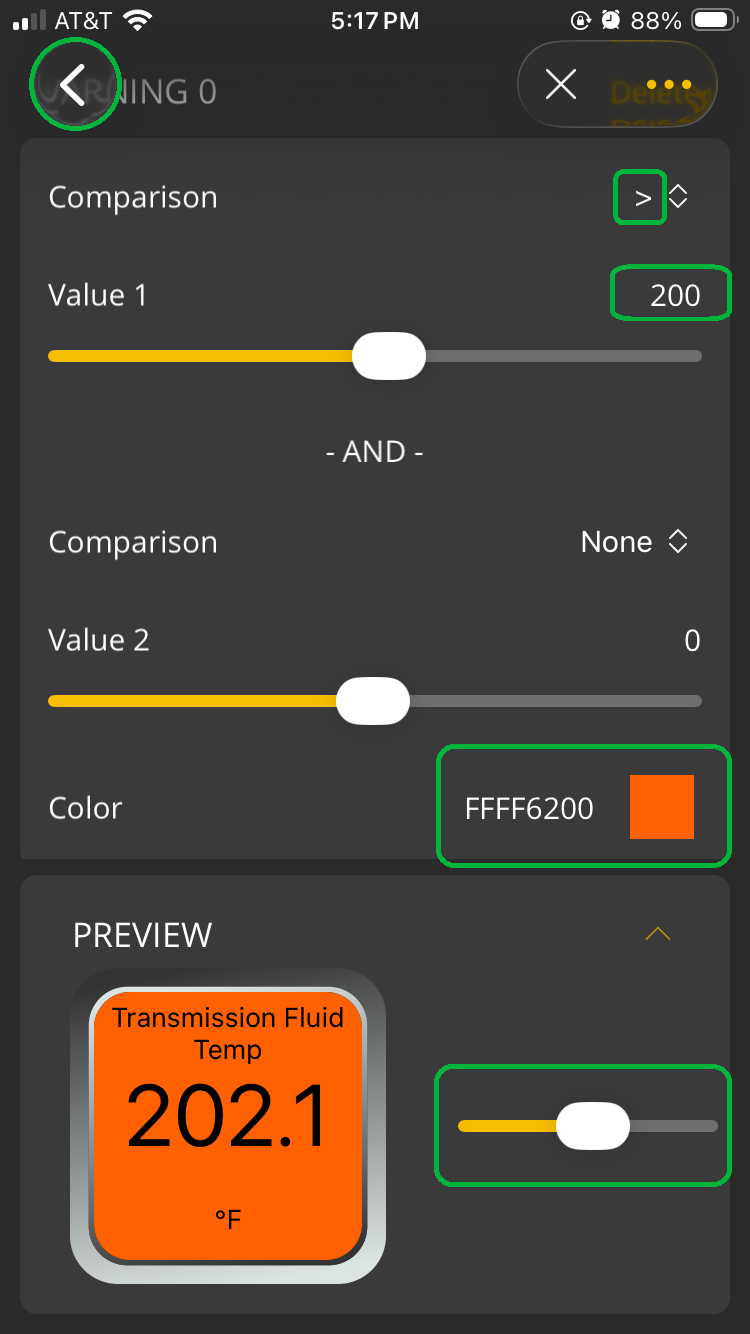
Add alert for transmission temperature PID
In our example, we added an alert to monitor the transmission temperature. The alert will display a notification and create a trip event when the value is greater than 200 °F.
- Confirm that your phone/tablet is Connected to the OBDLink adapter, tap the Settings icon, and navigate to Preferences > Alerts.
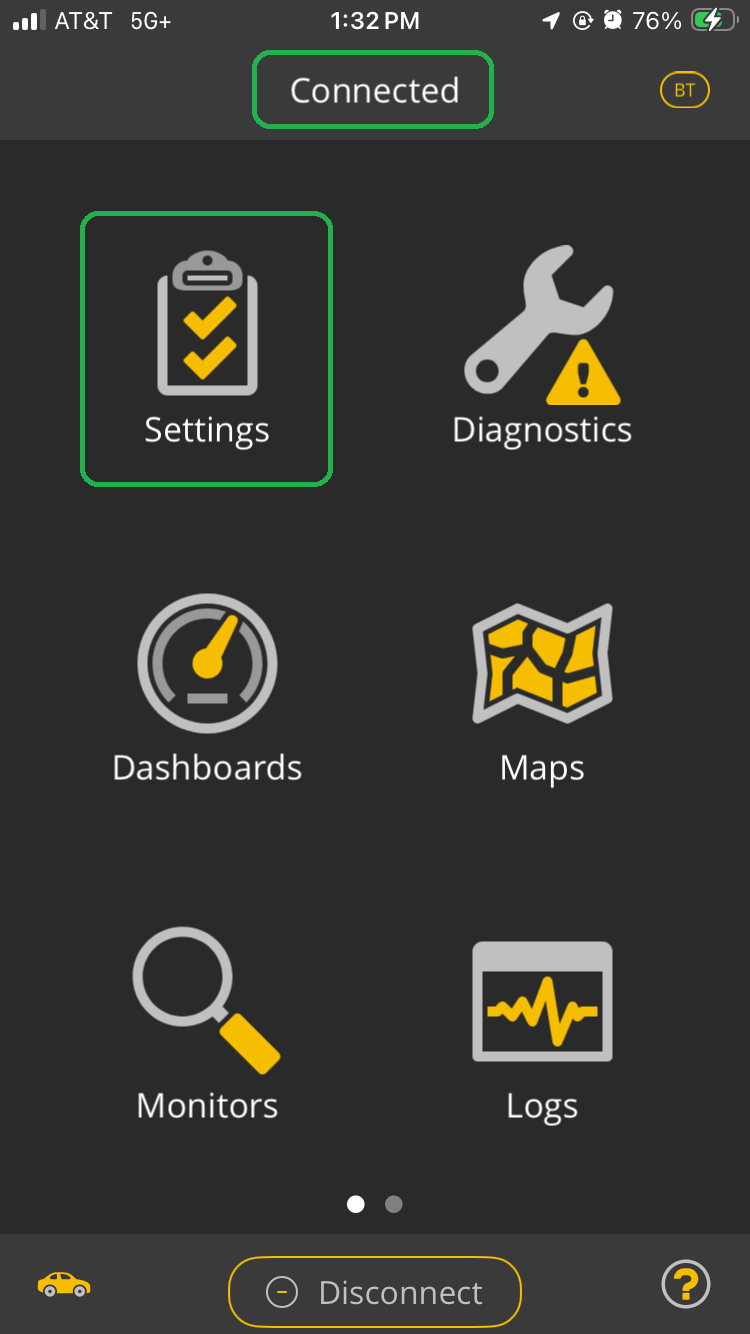
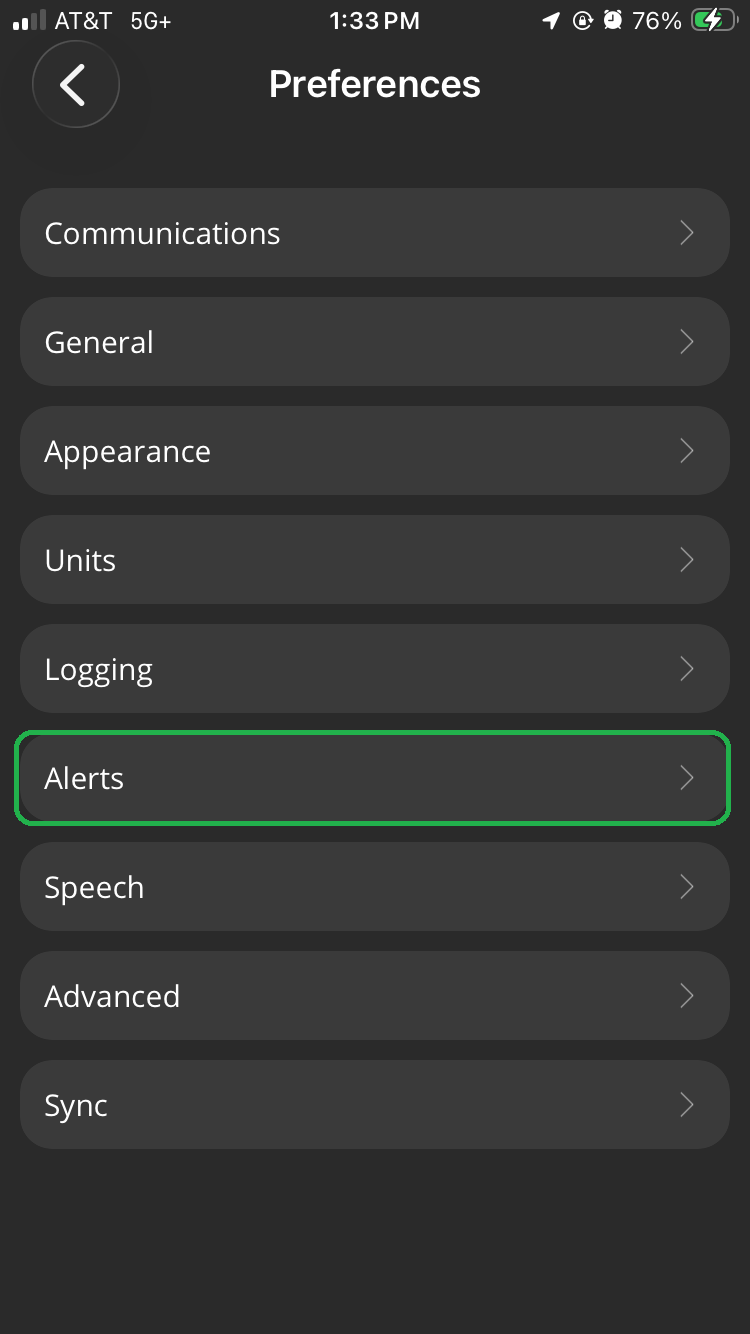
- Choose the Global Actions you want from the displayed lists.
Global Active Actions define actions when an alert becomes active (when the PID value matches the threshold setting). Similarly, Global Inactive Actions define actions when an alert becomes inactive.
In our example, we selected Display Notification and Add Trip Event for both types of actions.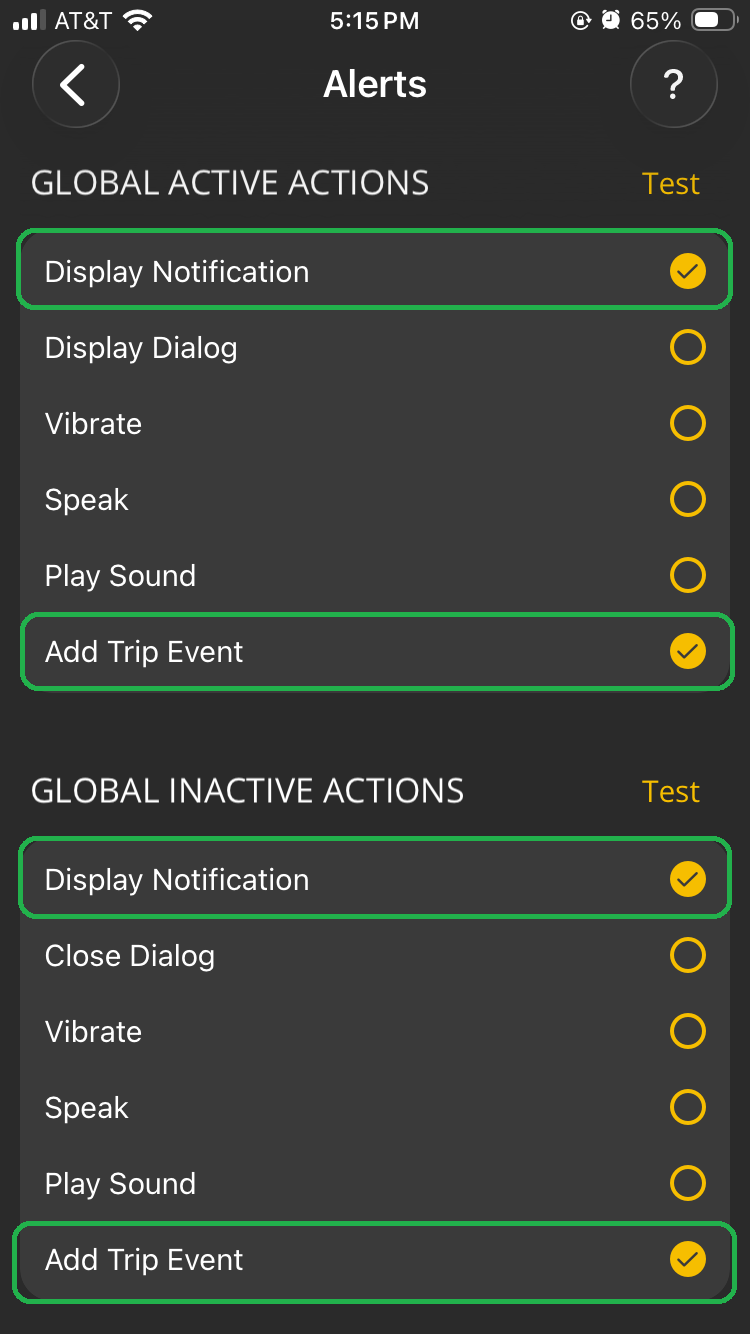
- To add an alert, scroll down to the Alerts section of the screen and tap the forward arrow (>).
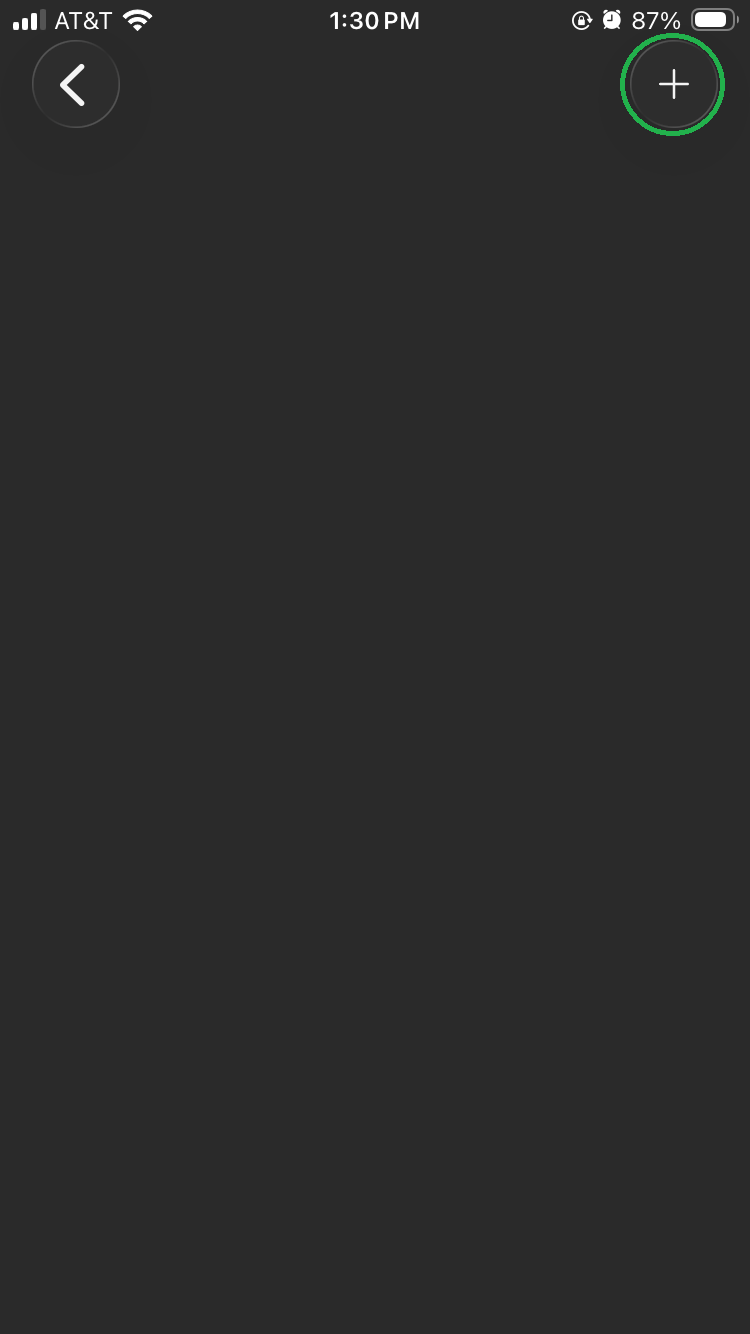
In the next screen, tap the plus symbol (+).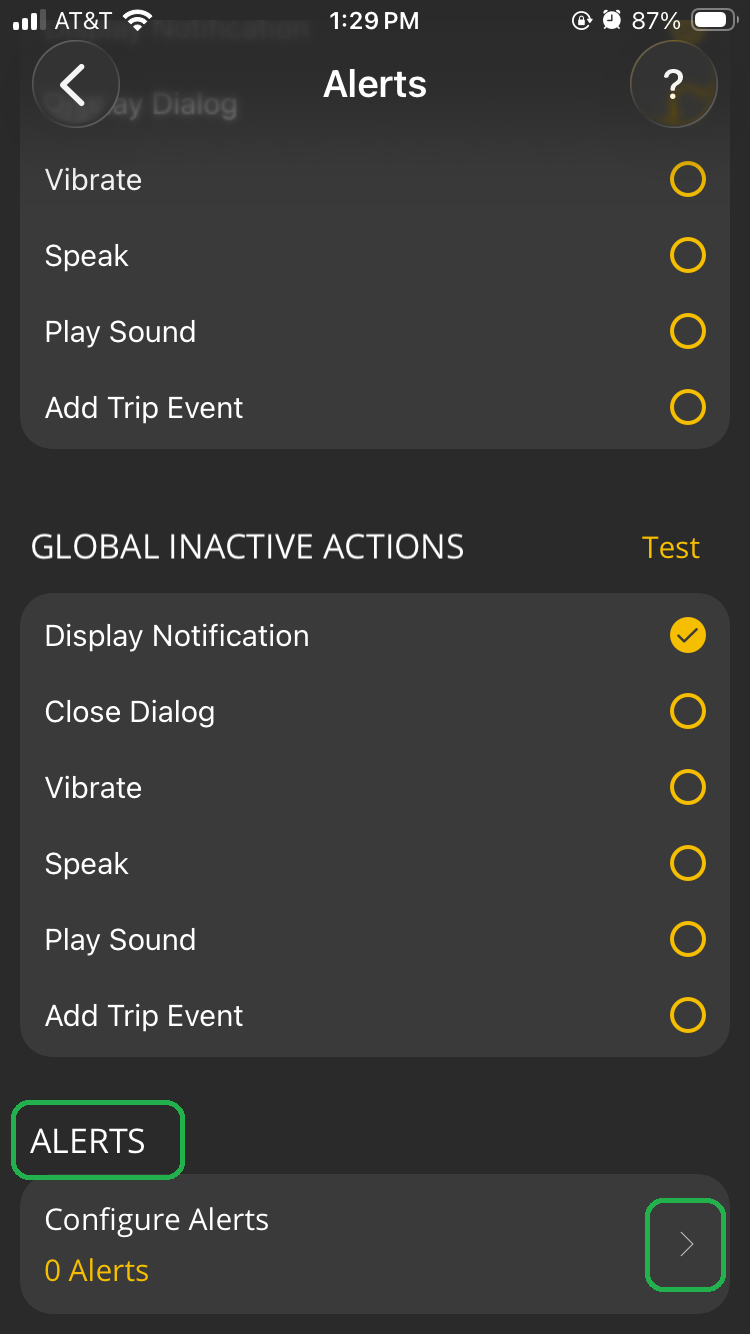
- In the Select PIDs menu, you can type “Transmission” in the search field to quickly find the correct PID.
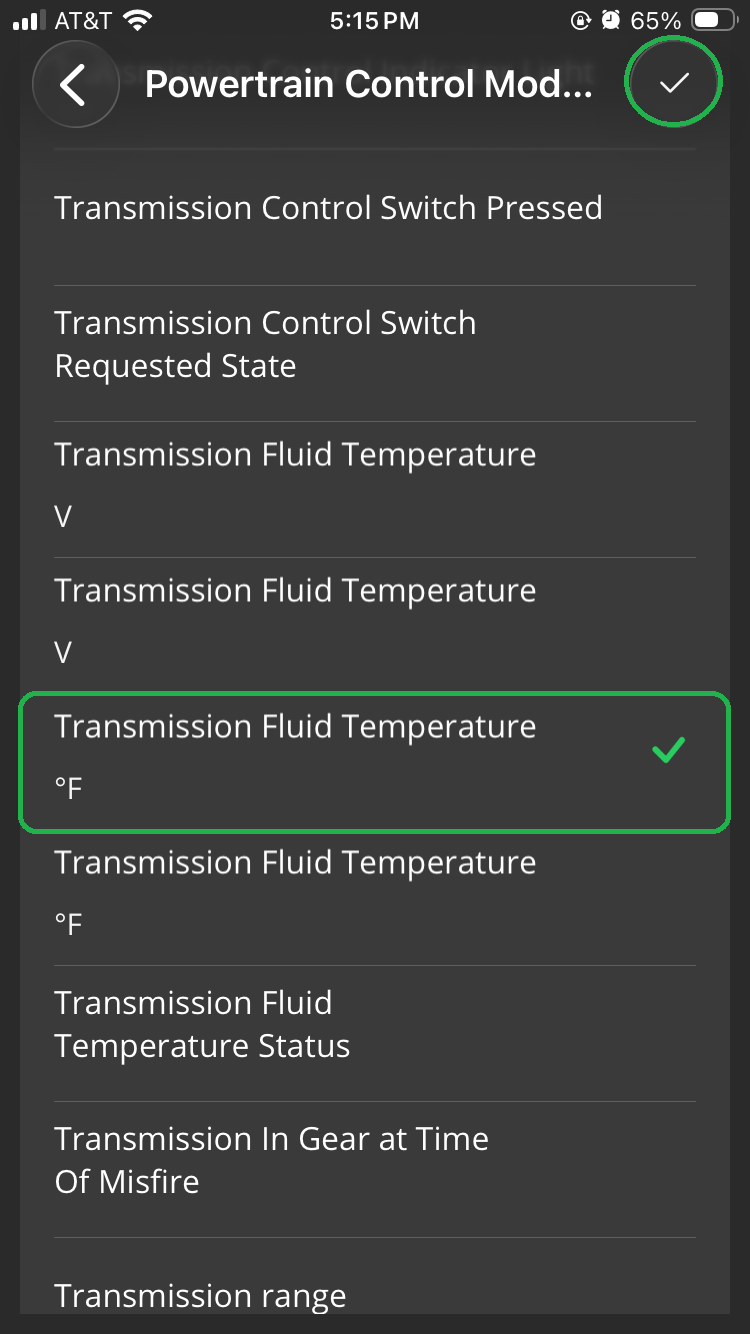
In the Powertrain Control Module category, select the Transmission Fluid Temperature °F PID.
Confirm that the PID you want has a checkmark, then tap the checkmark (✓) in the upper right corner.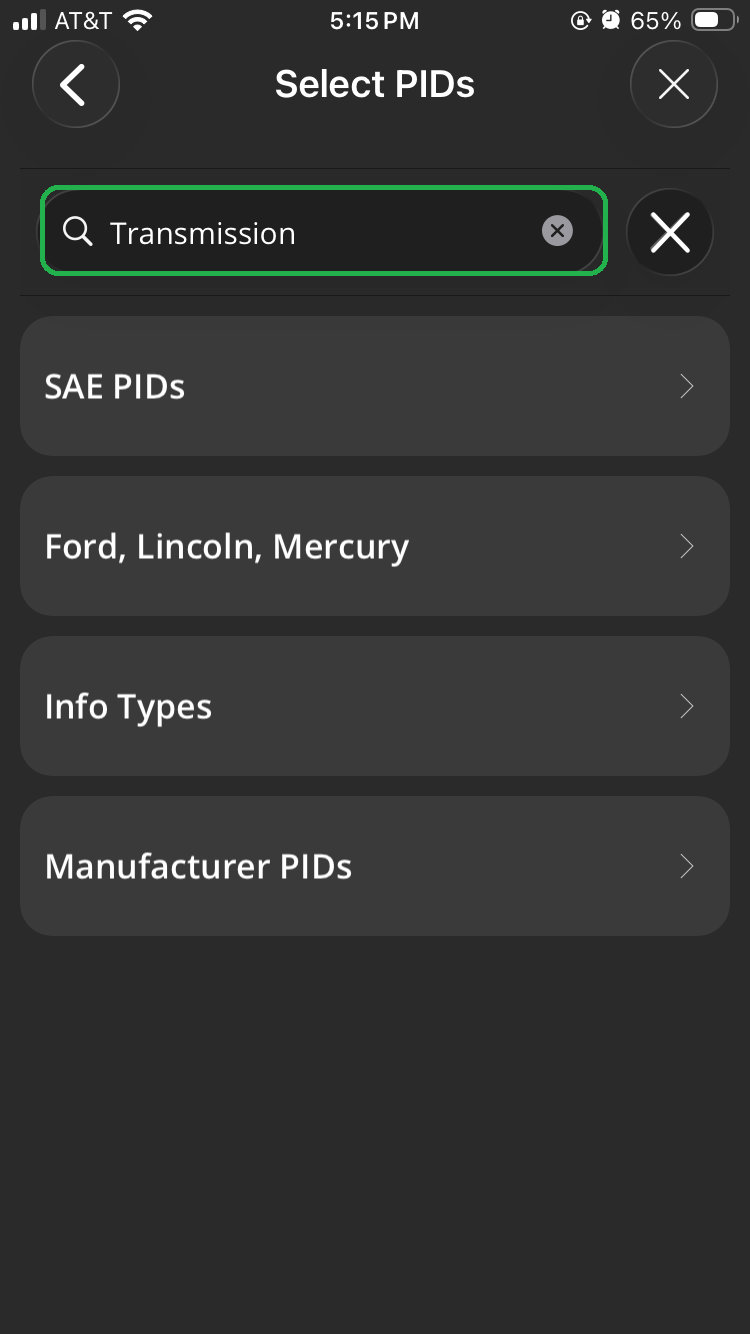
- You will see the Alert configuration screen, which contains these options:
Settings displays whether or not the alert is Enabled.
PID shows which Parameter ID is used for the alert.
Threshold sets the comparison type and the PID value used to make the alert active or inactive.
Active Actions and Inactive Actions have Use Global Actions enabled by default.
In our example, we set up the alert to activate when the Transmission Fluid Temperature is greater than 200 °F.
Confirm that the Alert settings are correct, then tap the back arrow (<) in the upper left corner.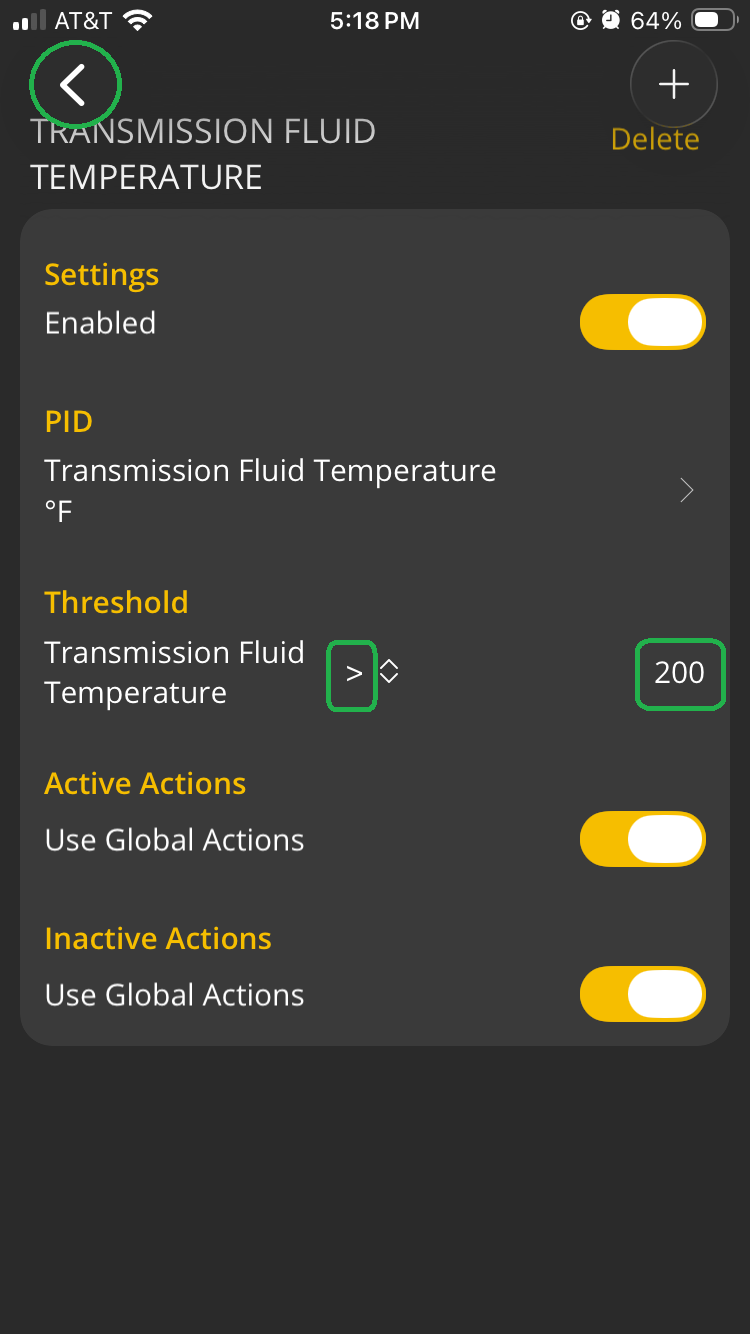
In the main Alerts screen, you will see that 1 alert has been set up (highlighted). You may need to scroll to the bottom of the display.
Tap the back arrow (<) in the upper left corner and tap < two more times to return to the OBDLink app home screen.
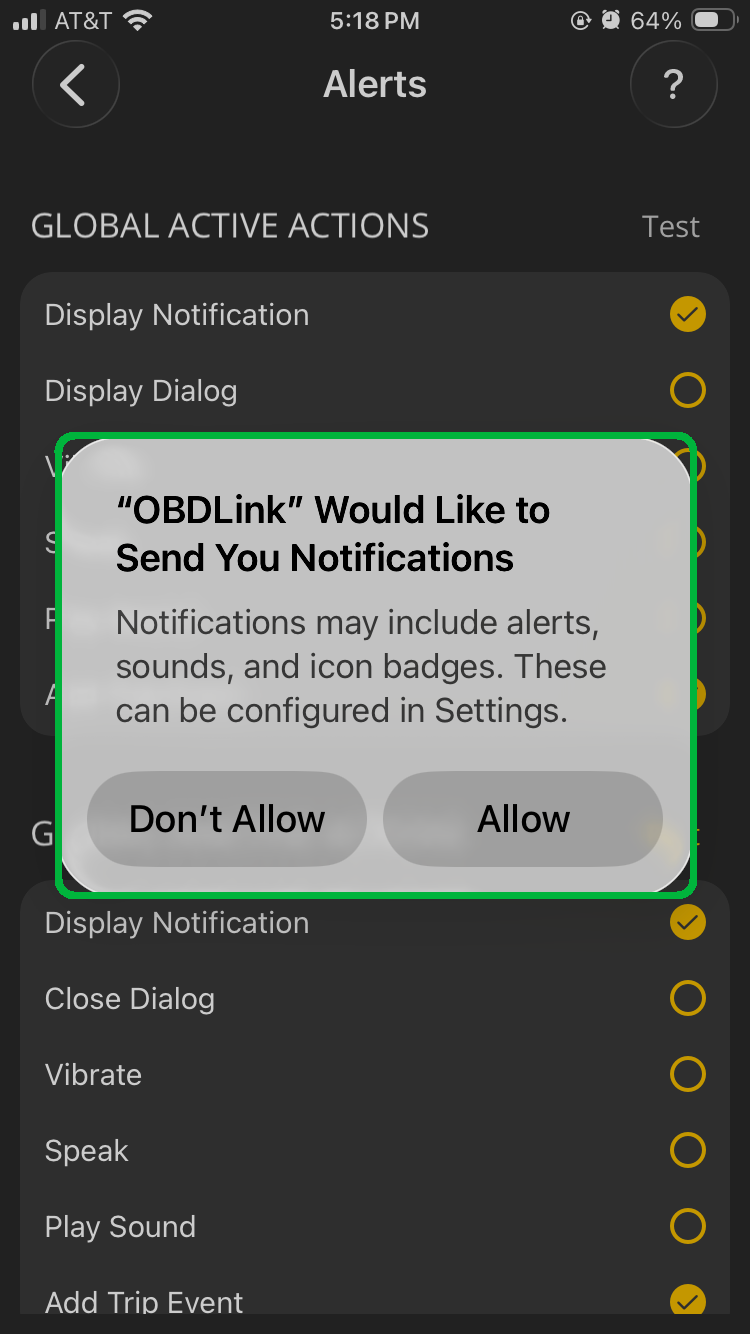
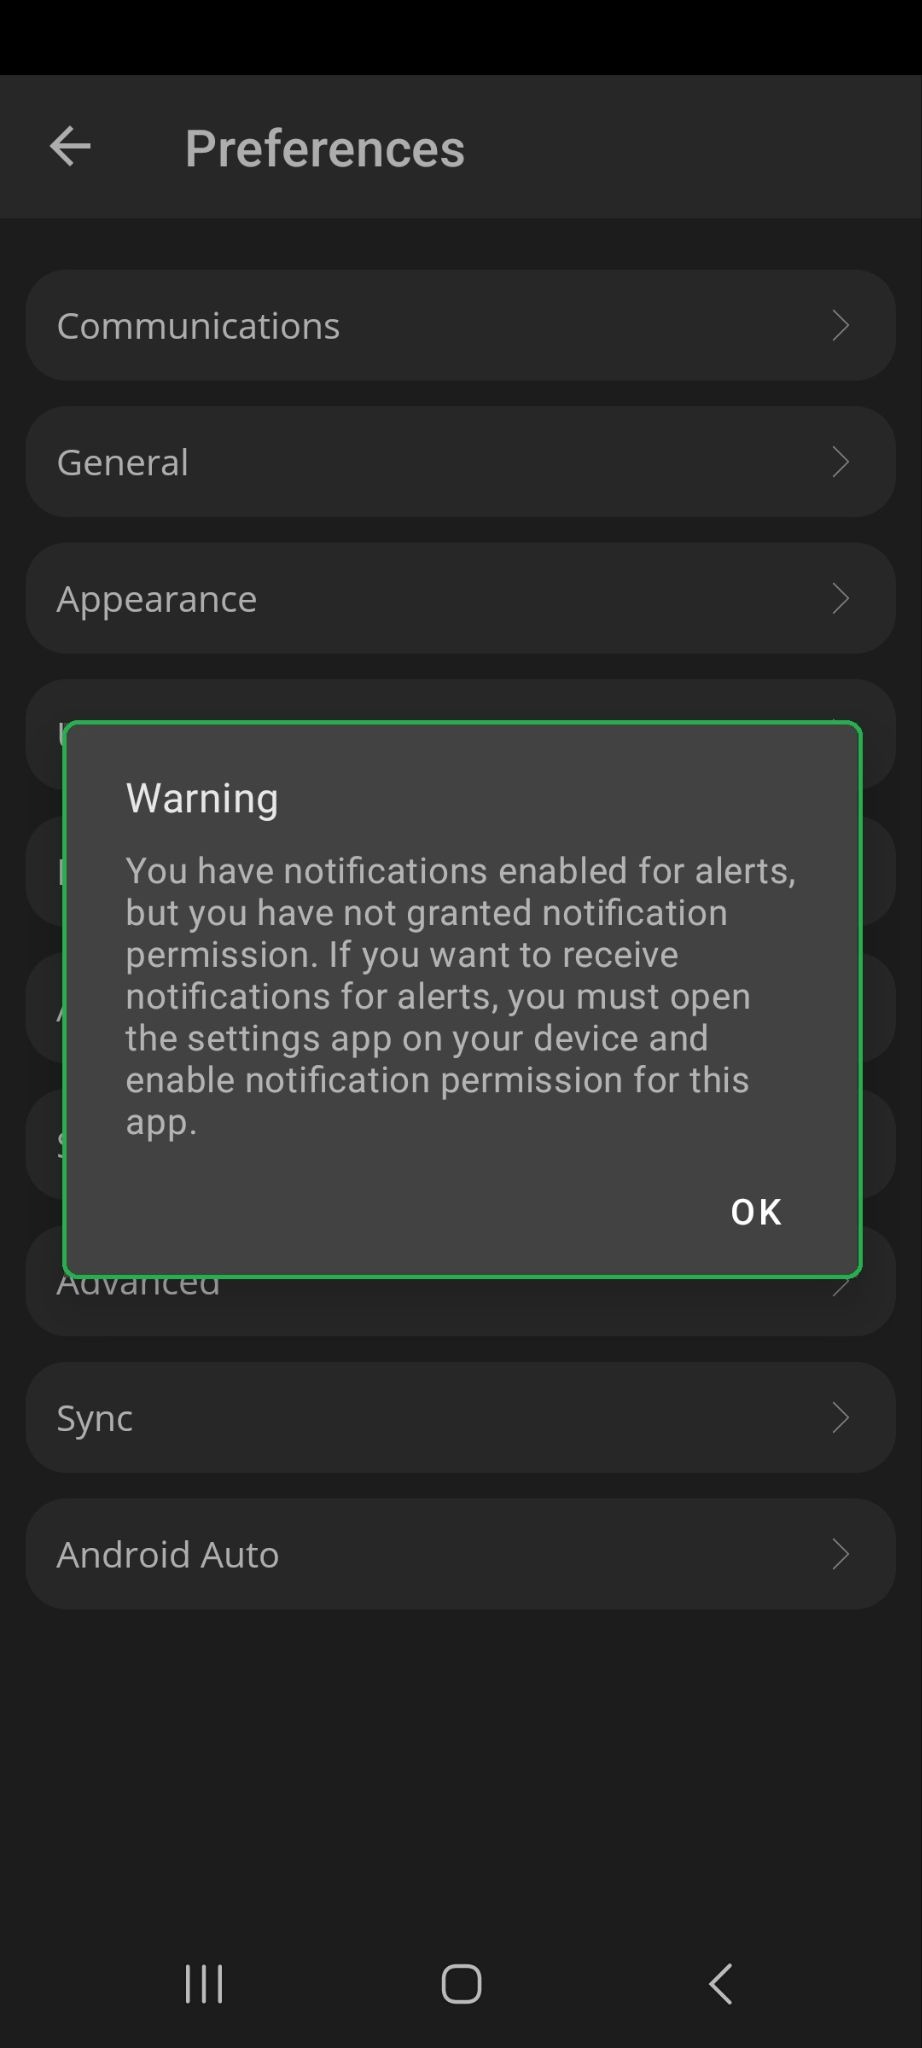
Note: You will see a message (highlighted) if you select Display Notification and notifications aren't enabled for the OBDLink app. Open the Settings menu for your phone/tablet and turn on App Notifications for the OBDLink app.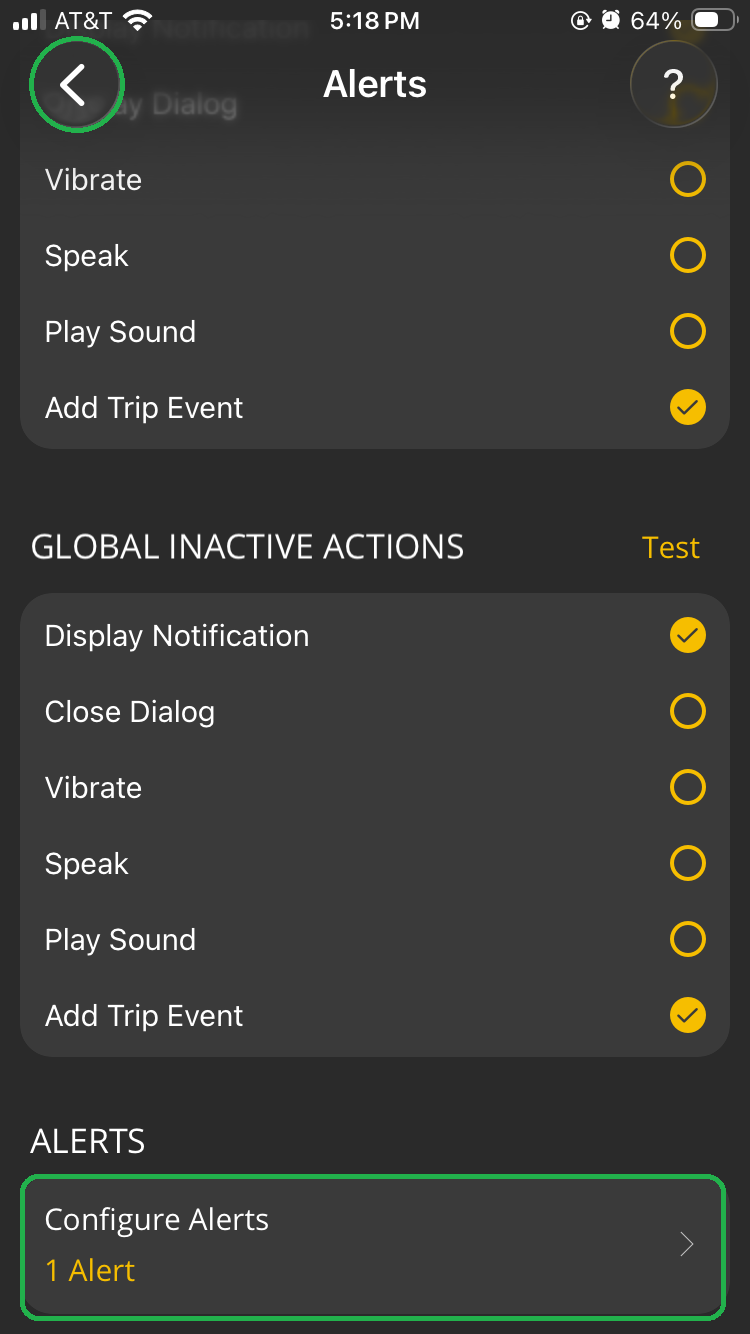
 |
Go for a test drive
- Start your vehicle. On your phone/tablet, open the OBDLink app and connect to your OBDLink adapter.
- Tap the Dashboards icon on the app's main screen so you can view your customized Transmission Temperature gauge.
- Go for a test drive. If the gauge value exceeds the limit you set, the gauge display should have an orange background.
- After your drive, tap the Disconnect button. (Your OBDLink adapter automatically disconnects when you turn off your vehicle engine.)
- Tap the Trips icon on the second page of the app’s main screen. Review the information from your test drive to see if any alerts were detected.
Example 2: 2023 Chevrolet Malibu using Android device
Before you begin, be sure to:
- Start your vehicle.
- On your phone/tablet, open the OBDLink app and connect to your OBDLink adapter.
- Make sure your phone/tablet is not streaming to any other Bluetooth/BLE devices.
Add transmission temperature gauge
In our example, we added a transmission temperature gauge for a GM vehicle.
- In the OBDLink app home screen, confirm that your adapter is Connected and tap the Dashboards icon.
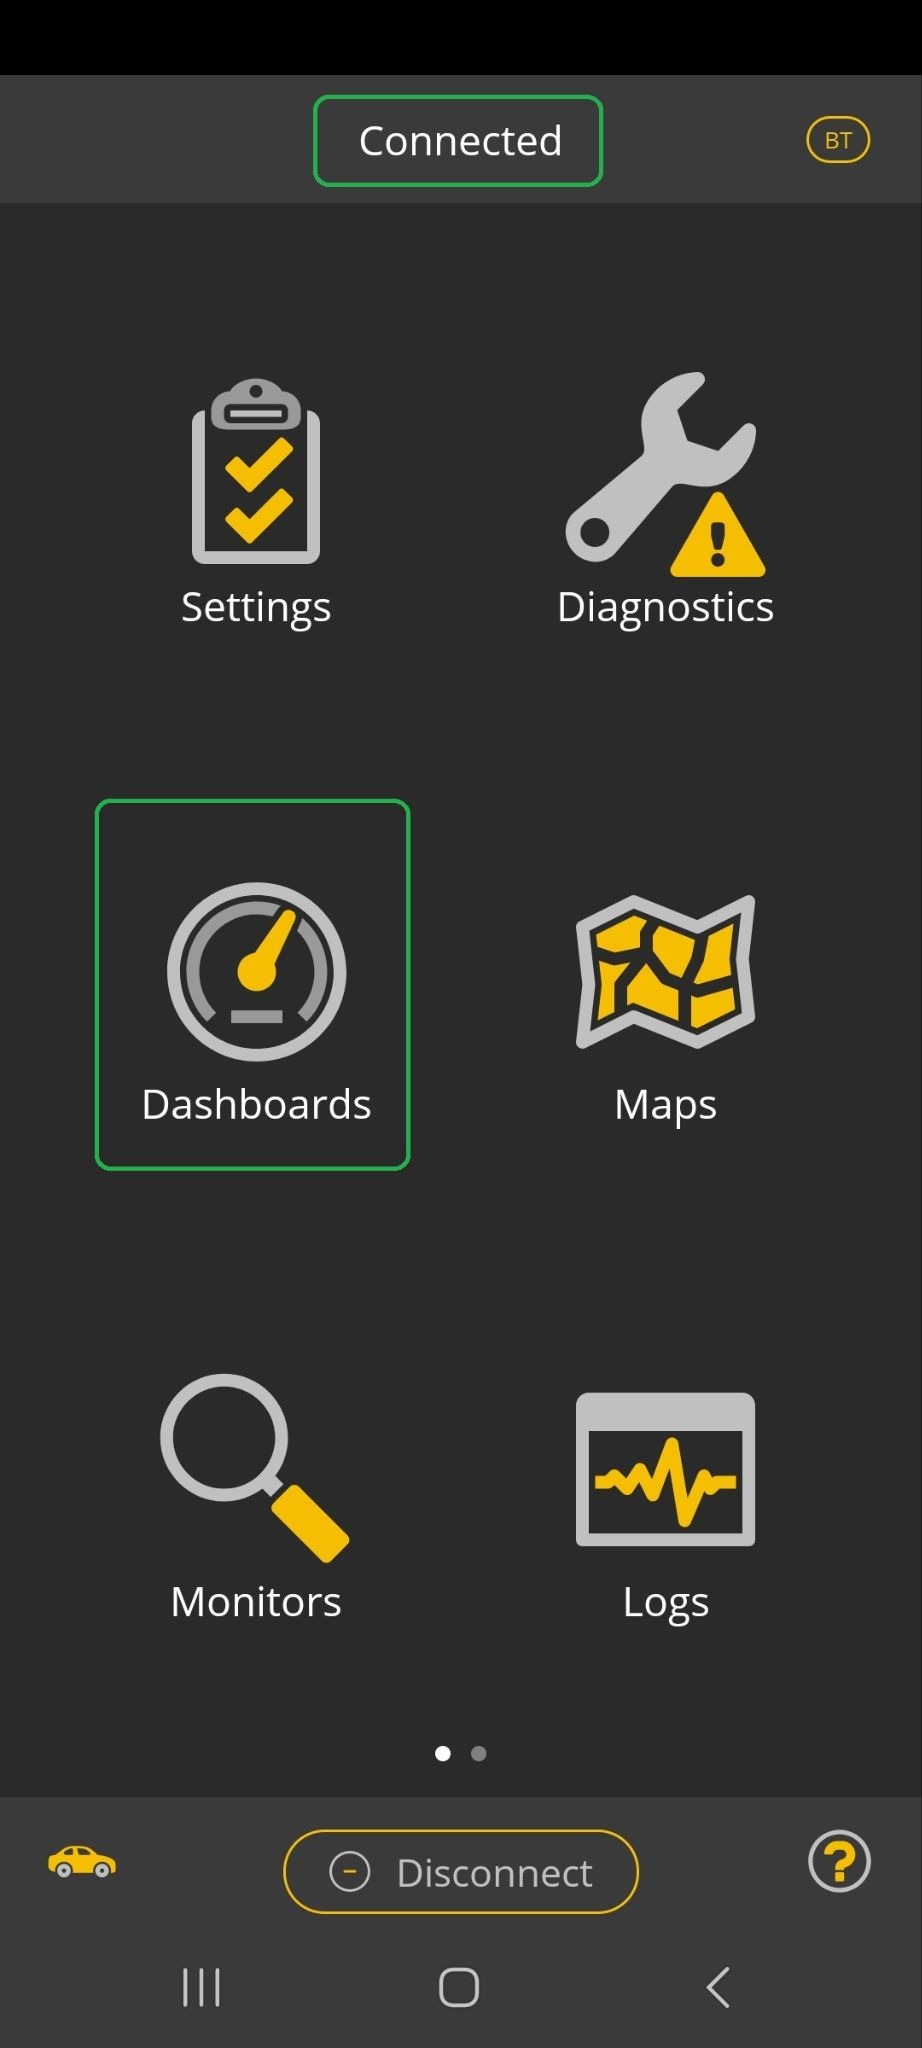
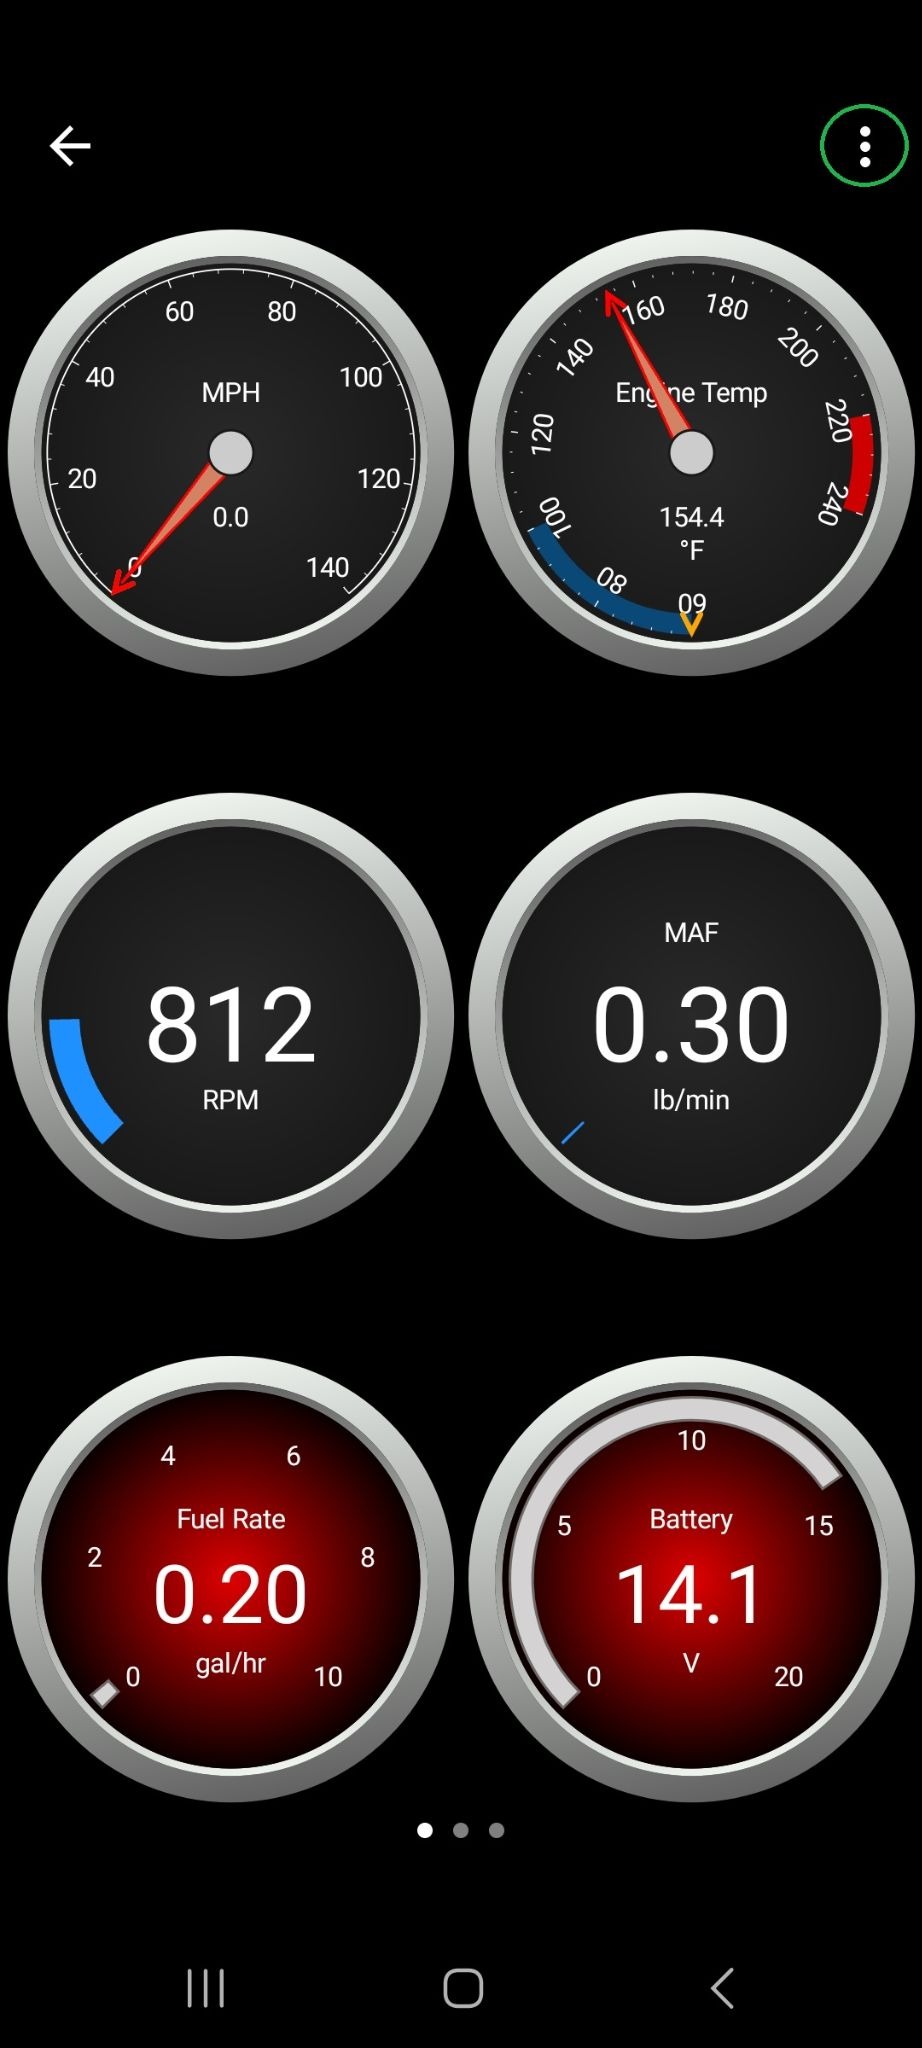
- Tap the 3 dots menu button in the upper right corner.
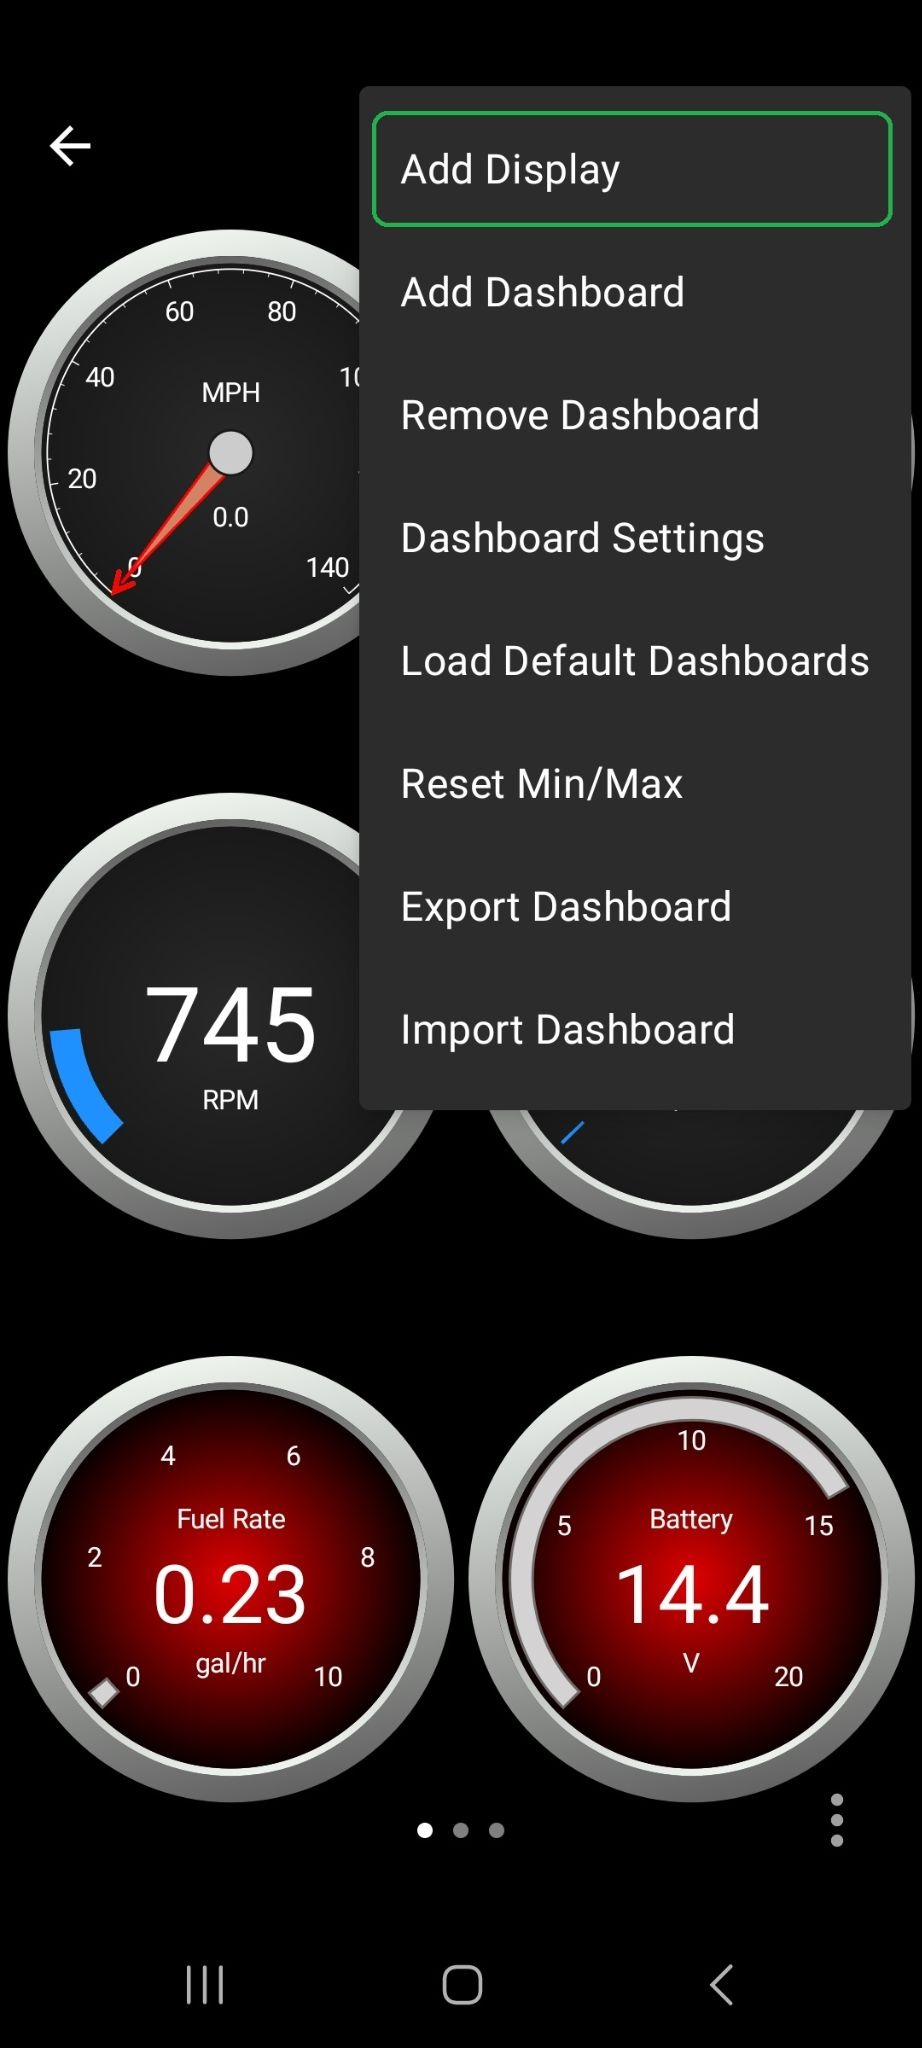
- Tap Add Display to add a new gauge to the current dashboard page.
- Select the gauge type on the Display Type menu, then tap the forward arrow (>).
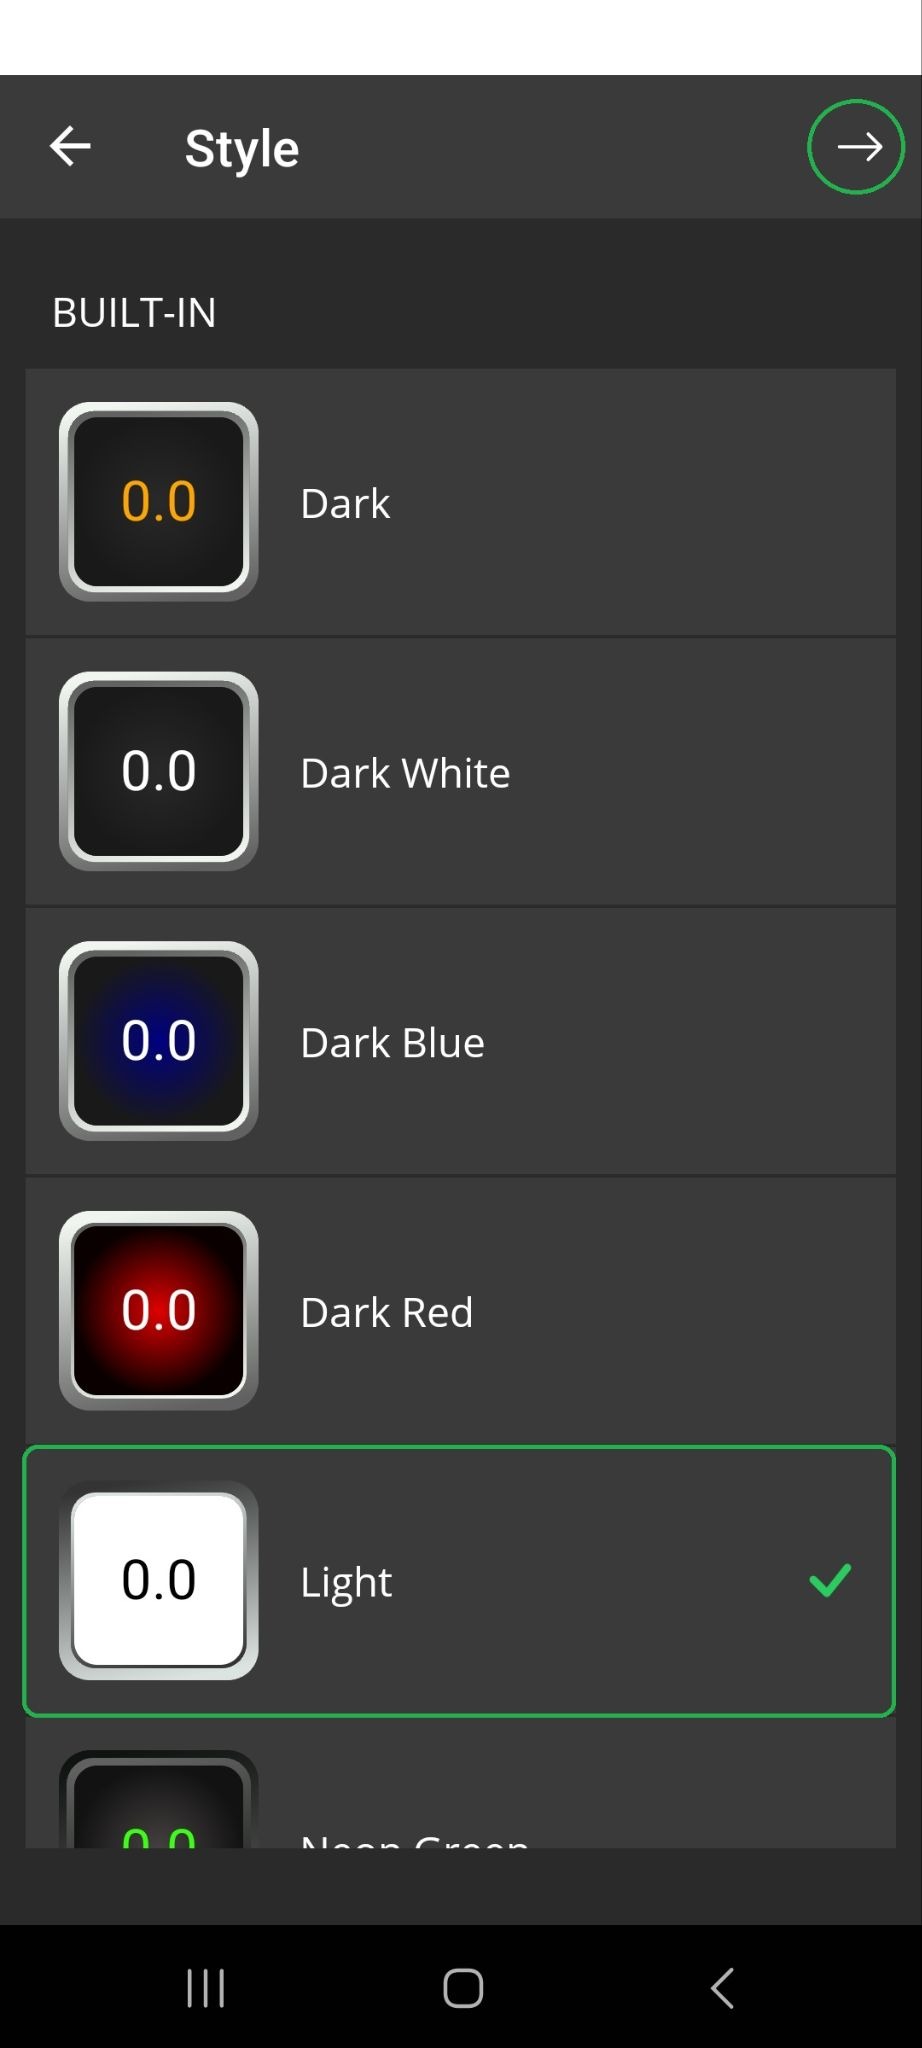
Select the gauge color on the Style menu, then tap the forward arrow (>).
In our example, we selected Digital Gauge and Light.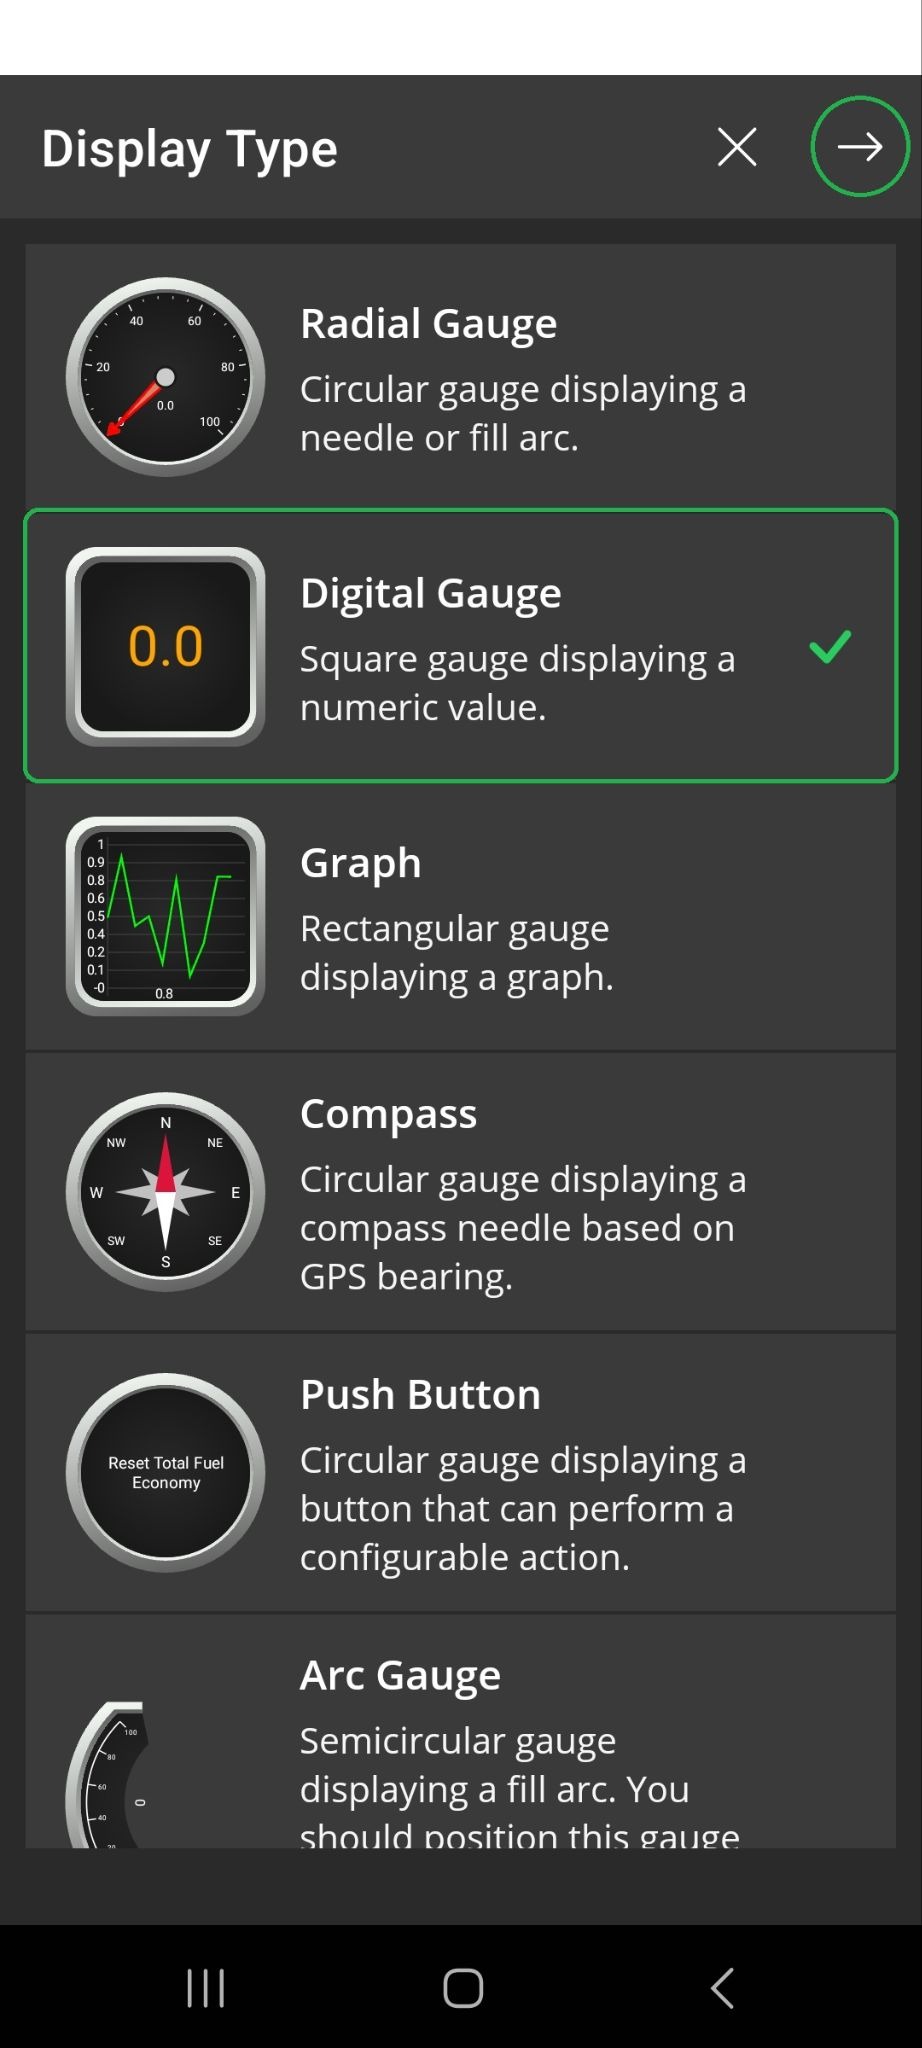
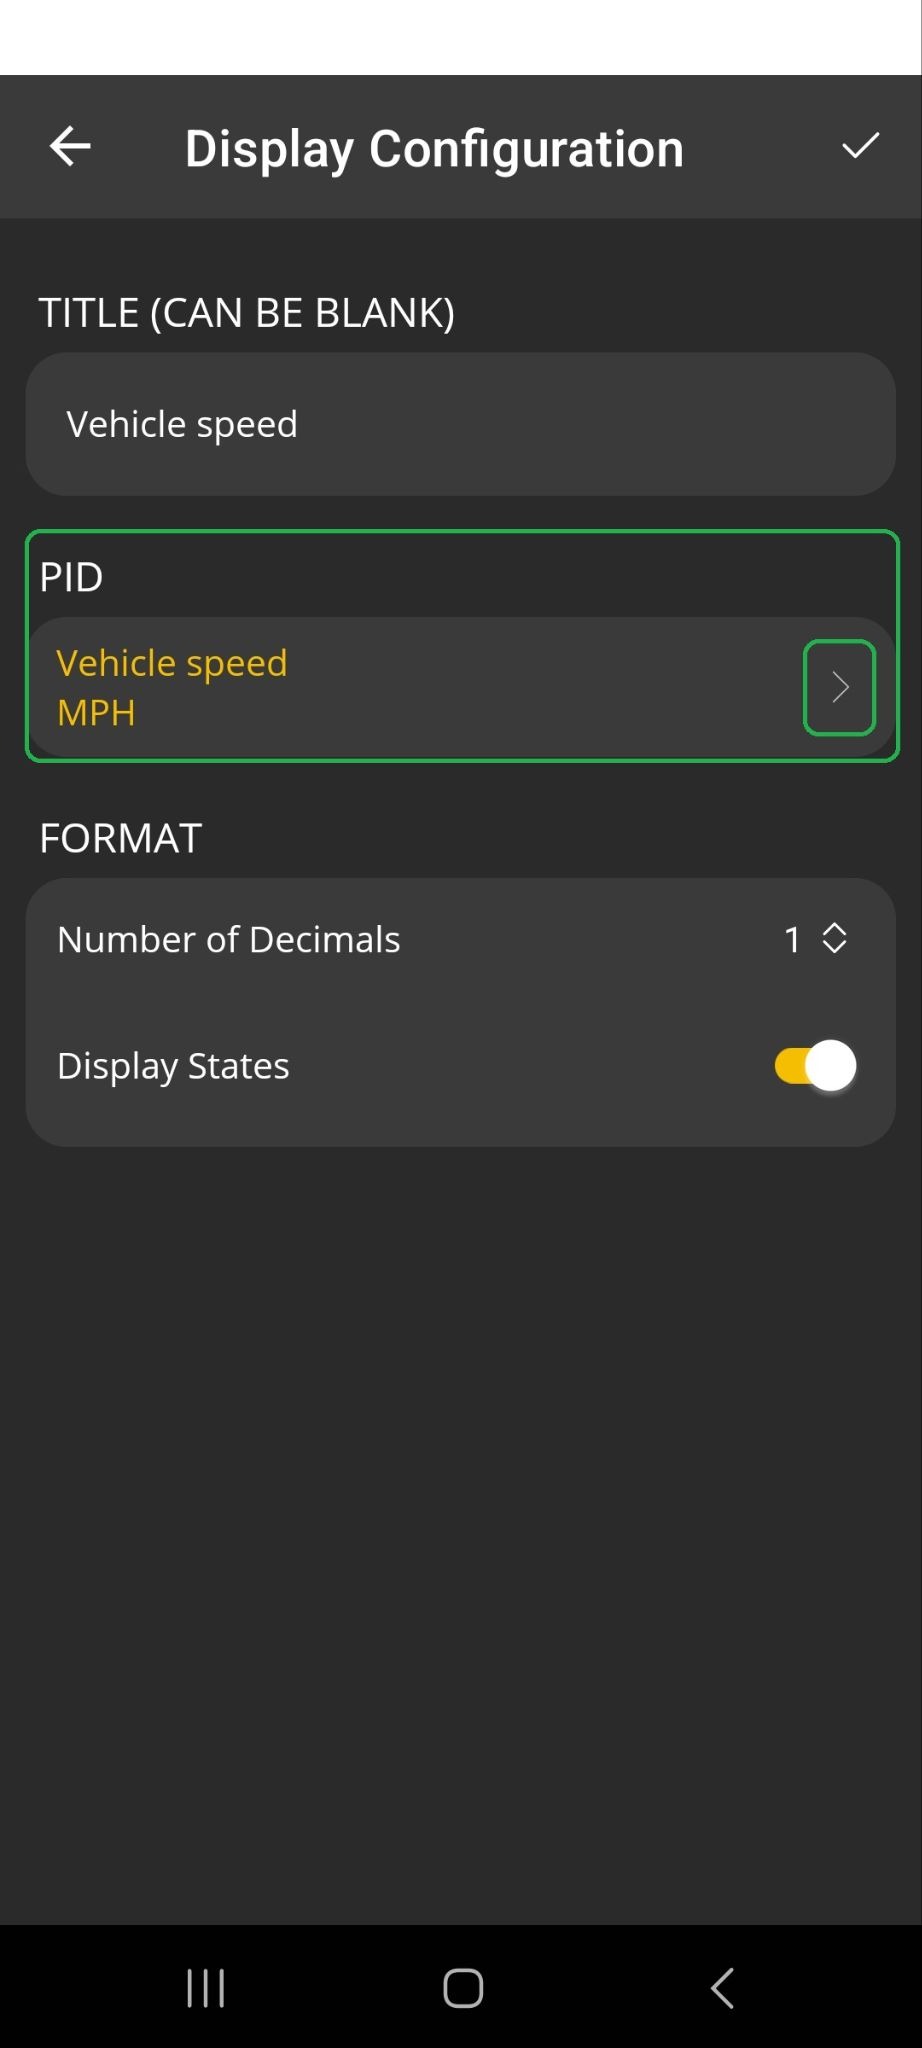
On the Display Configuration menu, tap the forward arrow in the PID section to open the Select PIDs menu.
On the Select PIDs menu, tap Manufacturer PIDs and select GM - CAN vehicles.
Note: The OBDLink app includes some preset Manufacturer PIDs that are not included in the OBD-II standard. If you don’t see this option, then you must update your app version.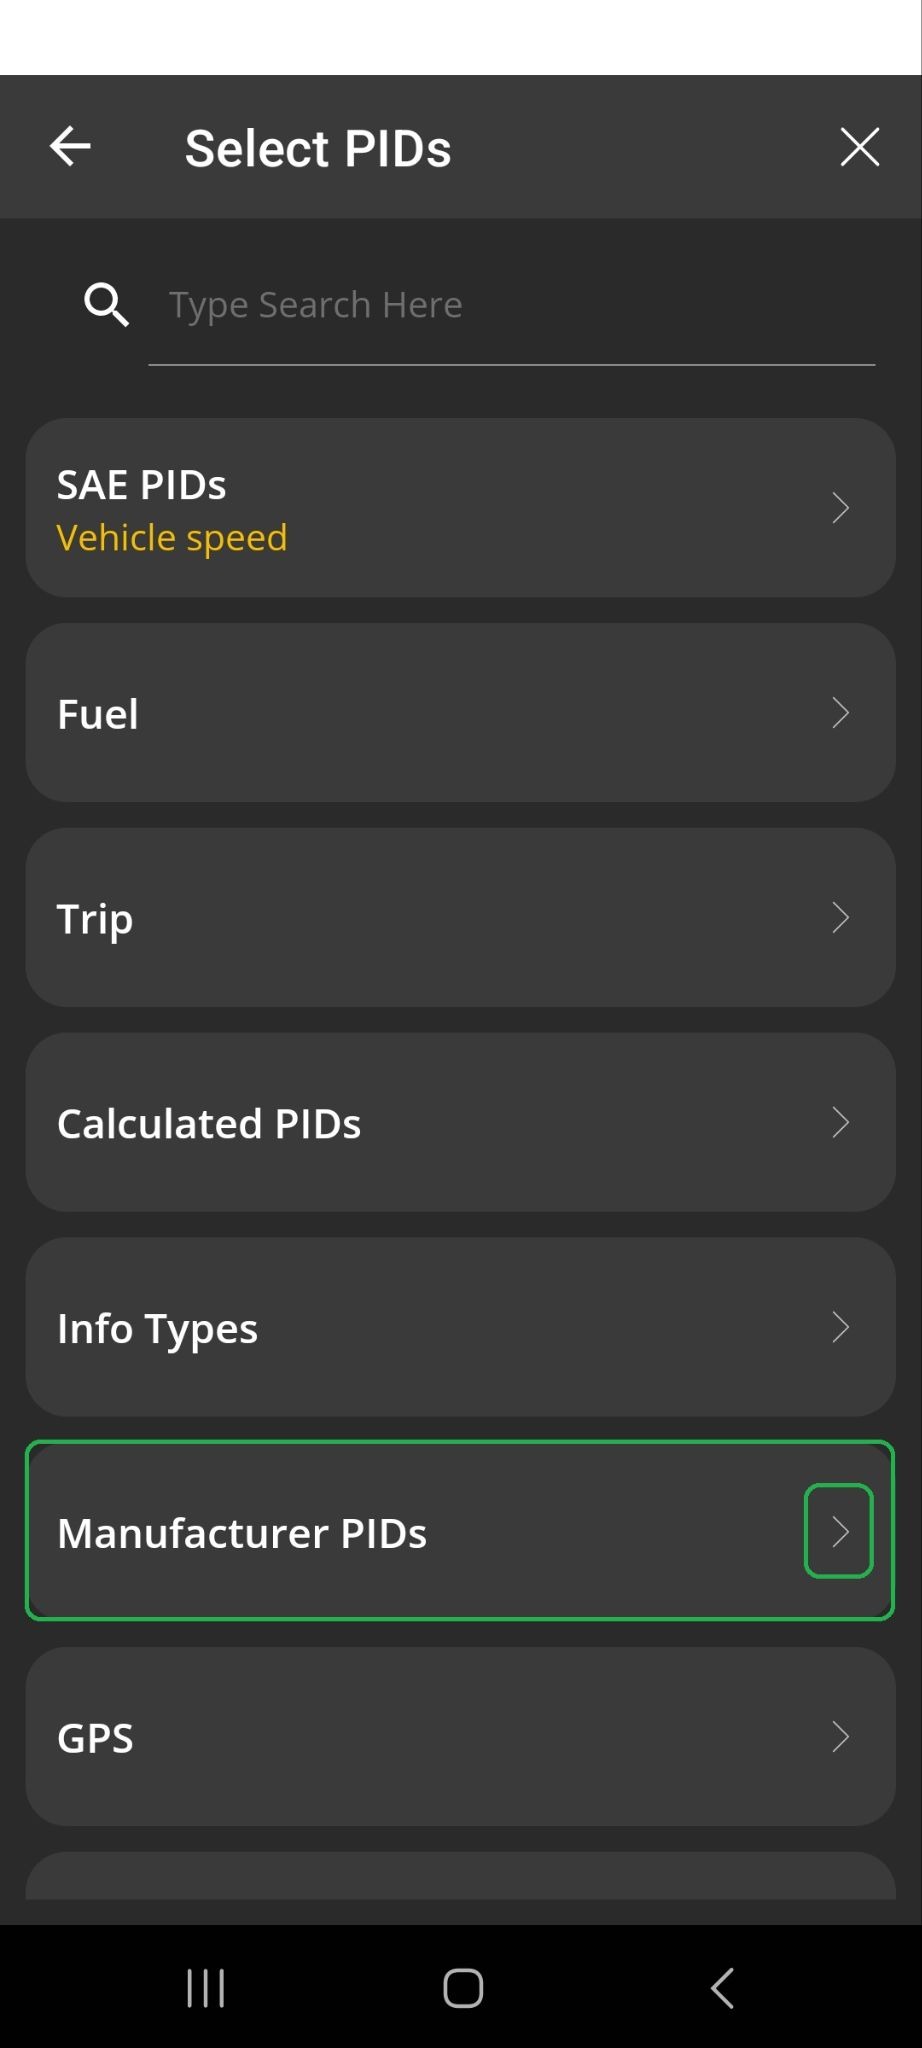
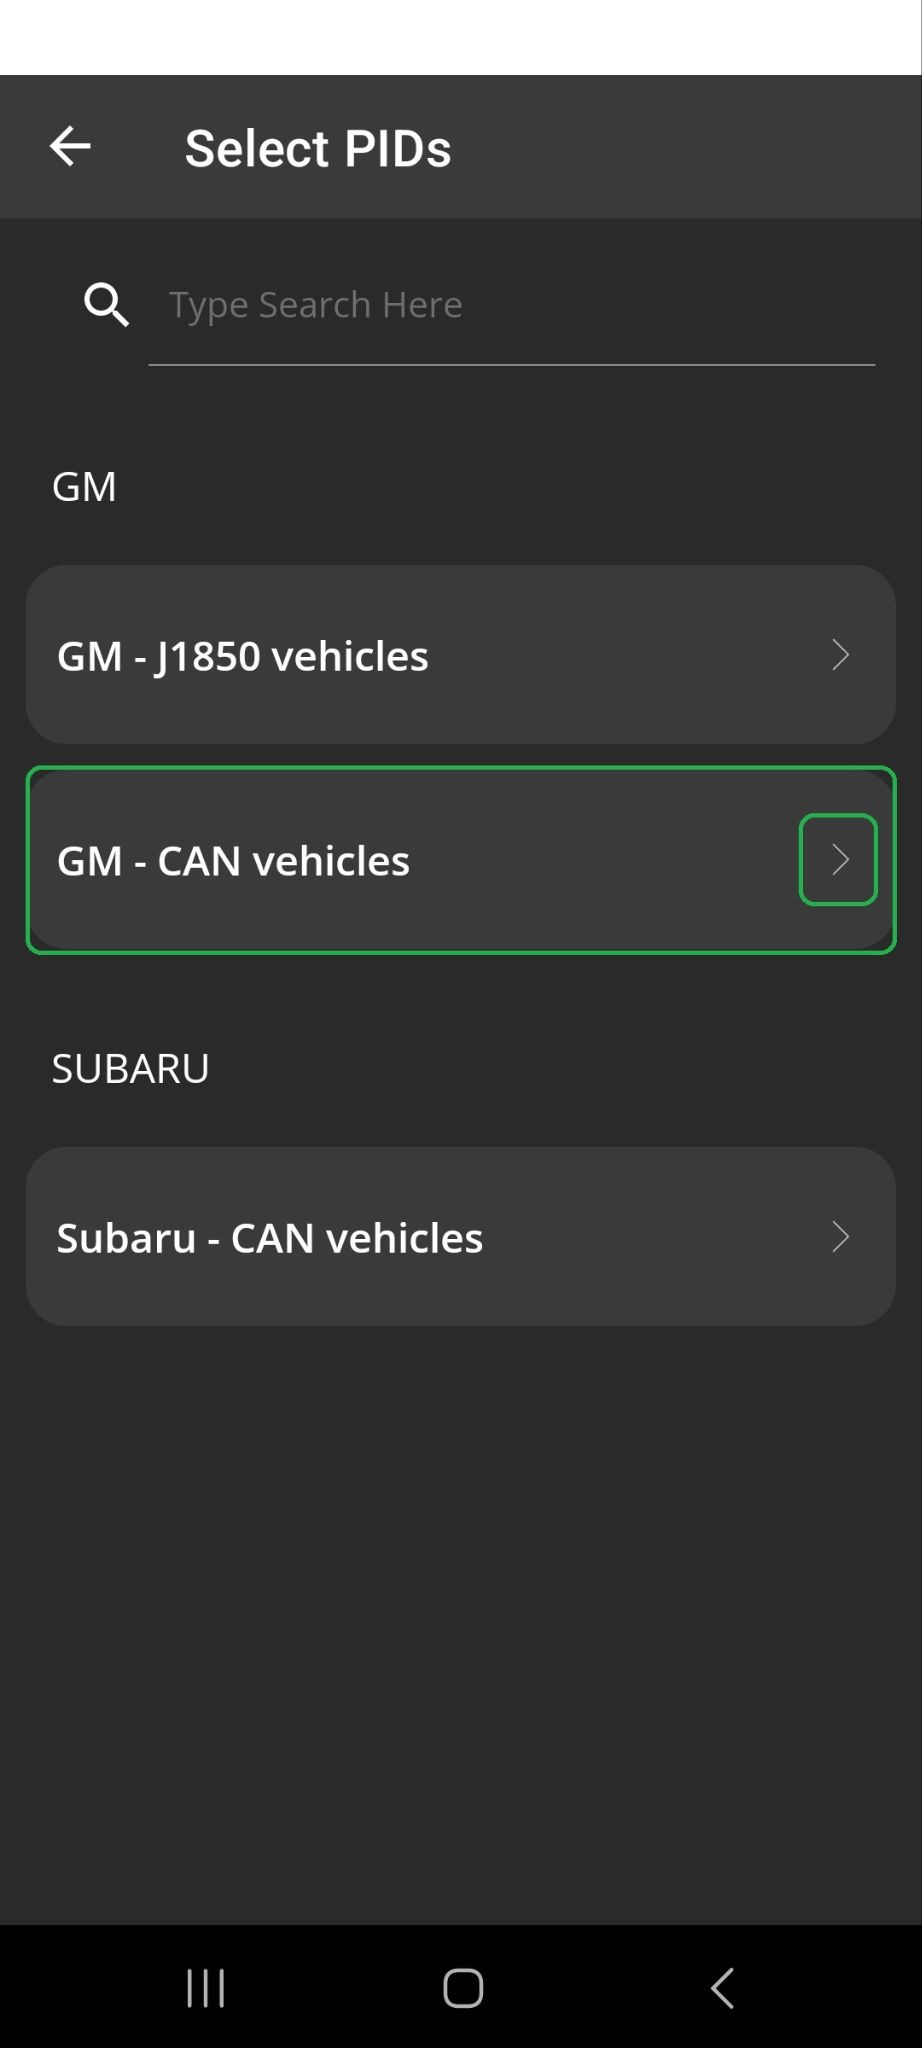
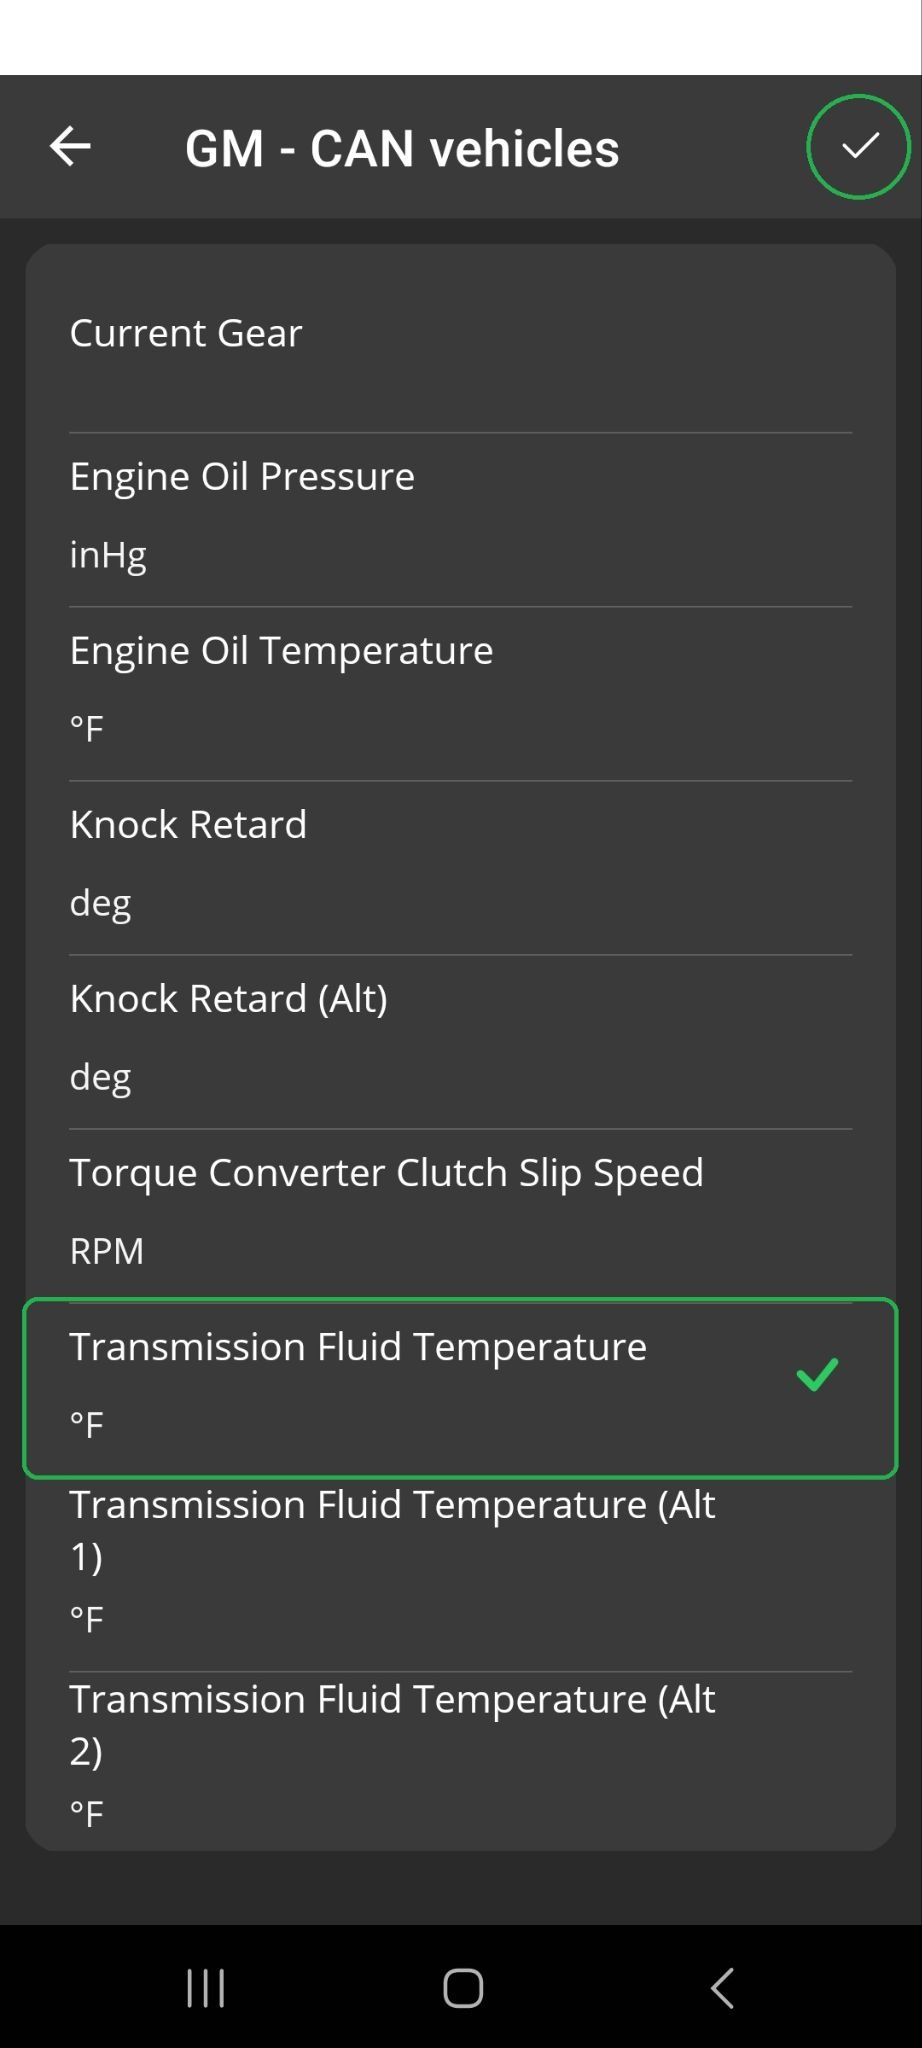
Scroll down to select Transmission Fluid Temperature °F, and tap the checkmark (✓) in the upper right corner to save the display.
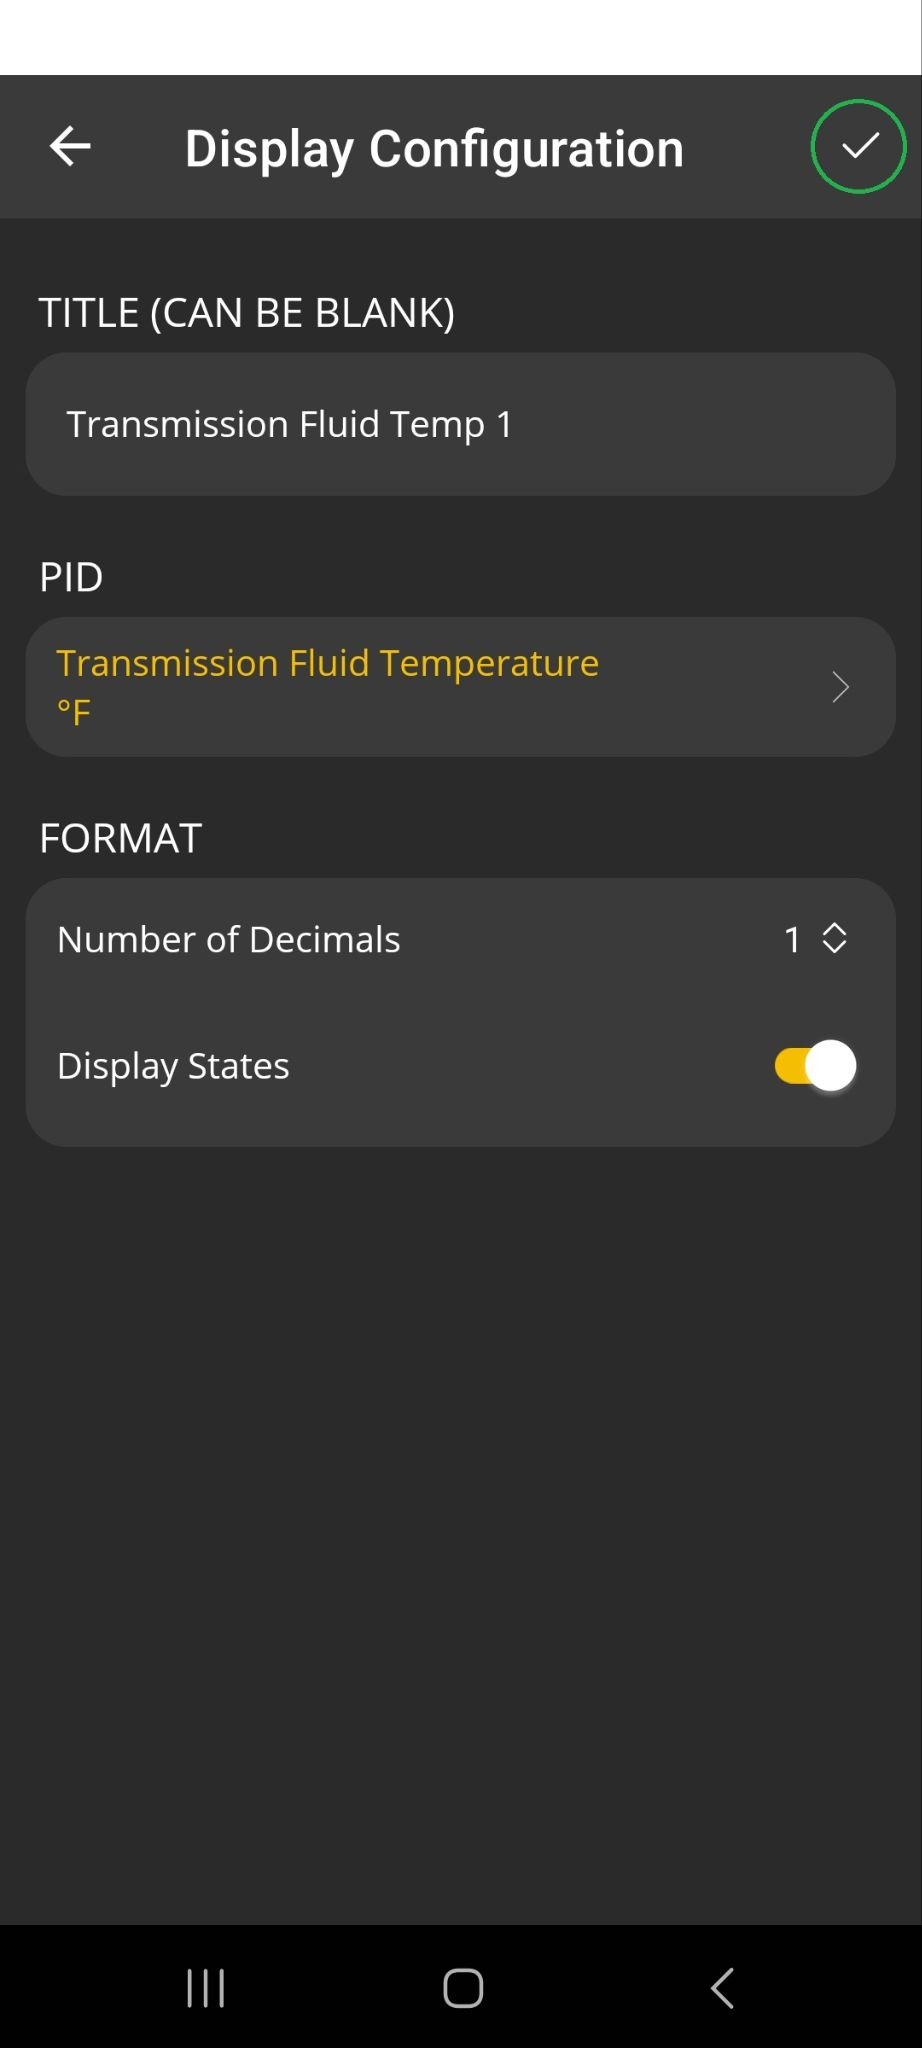
You can edit the gauge title if you’d like, then tap the checkmark (✓) in the upper right corner to save the display.
- Tap the 3 dots menu button in the upper right corner.
You will see the new gauge displayed on the dashboard. Tap and hold the gauge to open the Edit Display menu and tap Drag and Move to move the gauge on the dashboard screen.
In our example, we moved the Transmission Fluid Temperature gauge on top of the MAF gauge.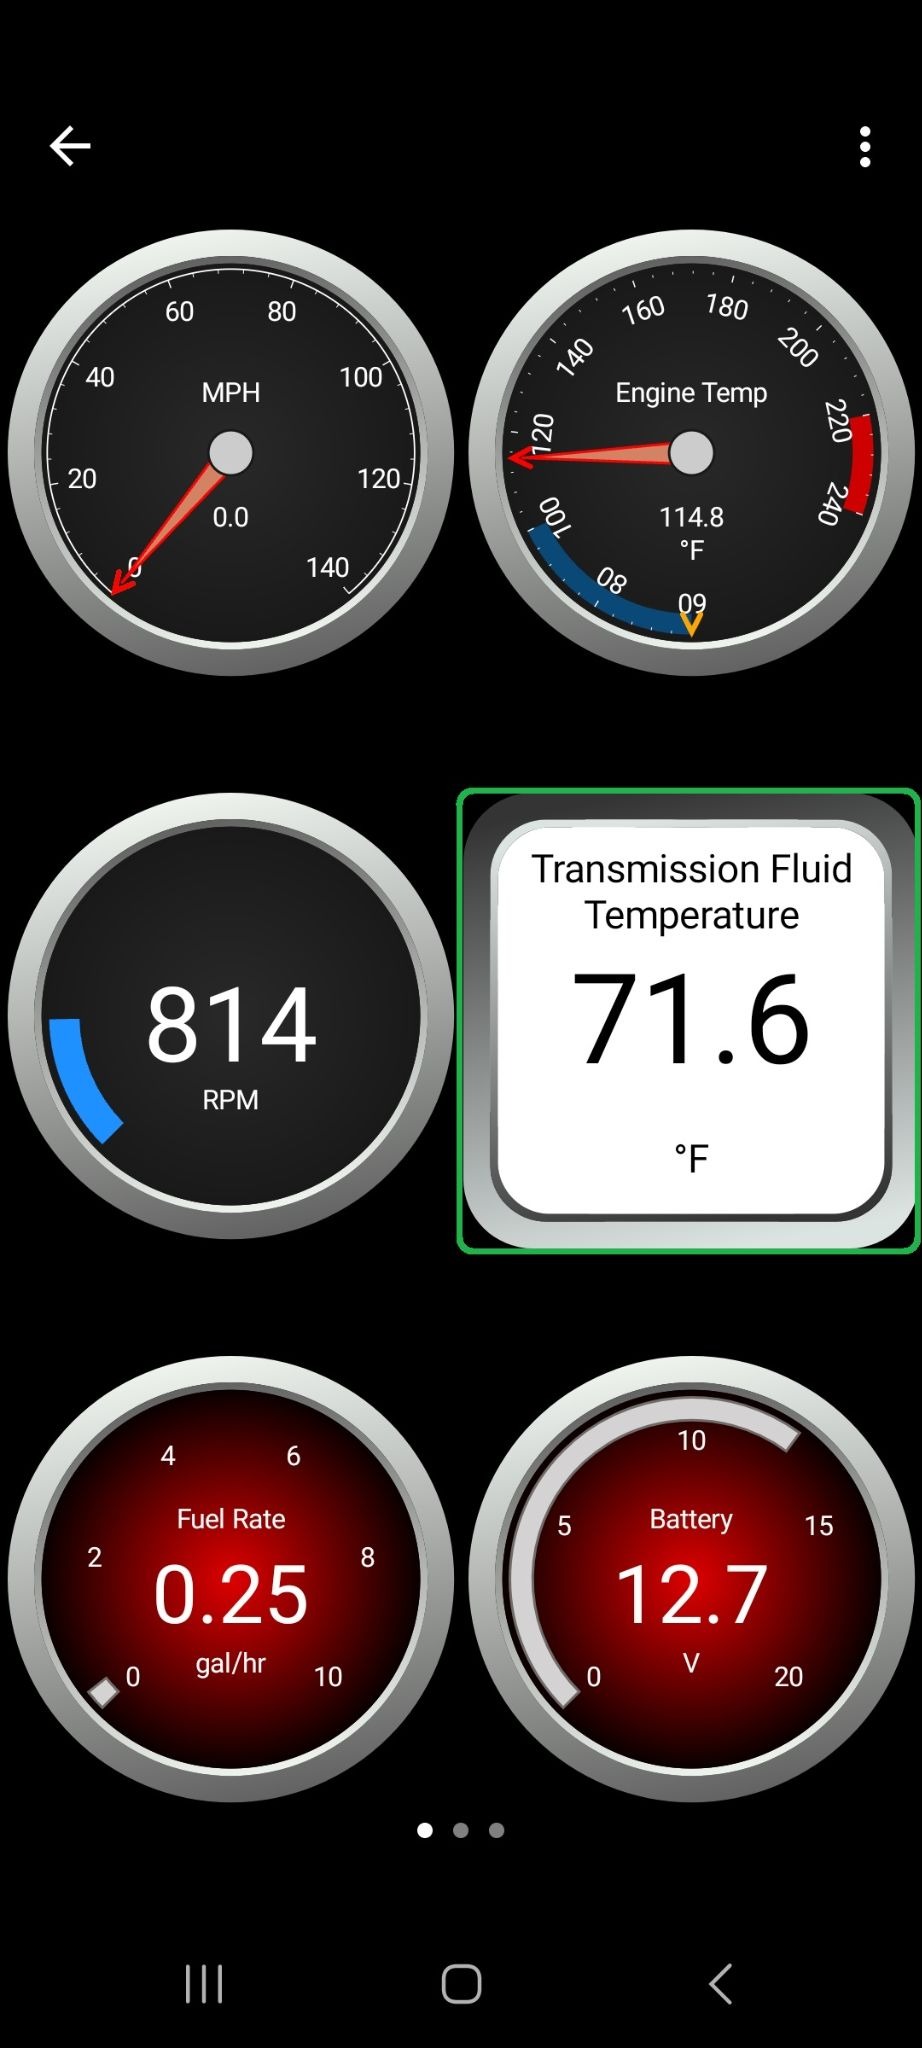
Tip: If the new gauge shows 0.0, try swiping to a different dashboard page, then swipe back. The OBDLink app may load values in the new gauge when it refreshes the page.
For more help, see the Troubleshooting section.
Add visual warning to the new gauge
In our example, we changed the transmission temperature gauge to show an orange background when the PID value is greater than 200 °F.
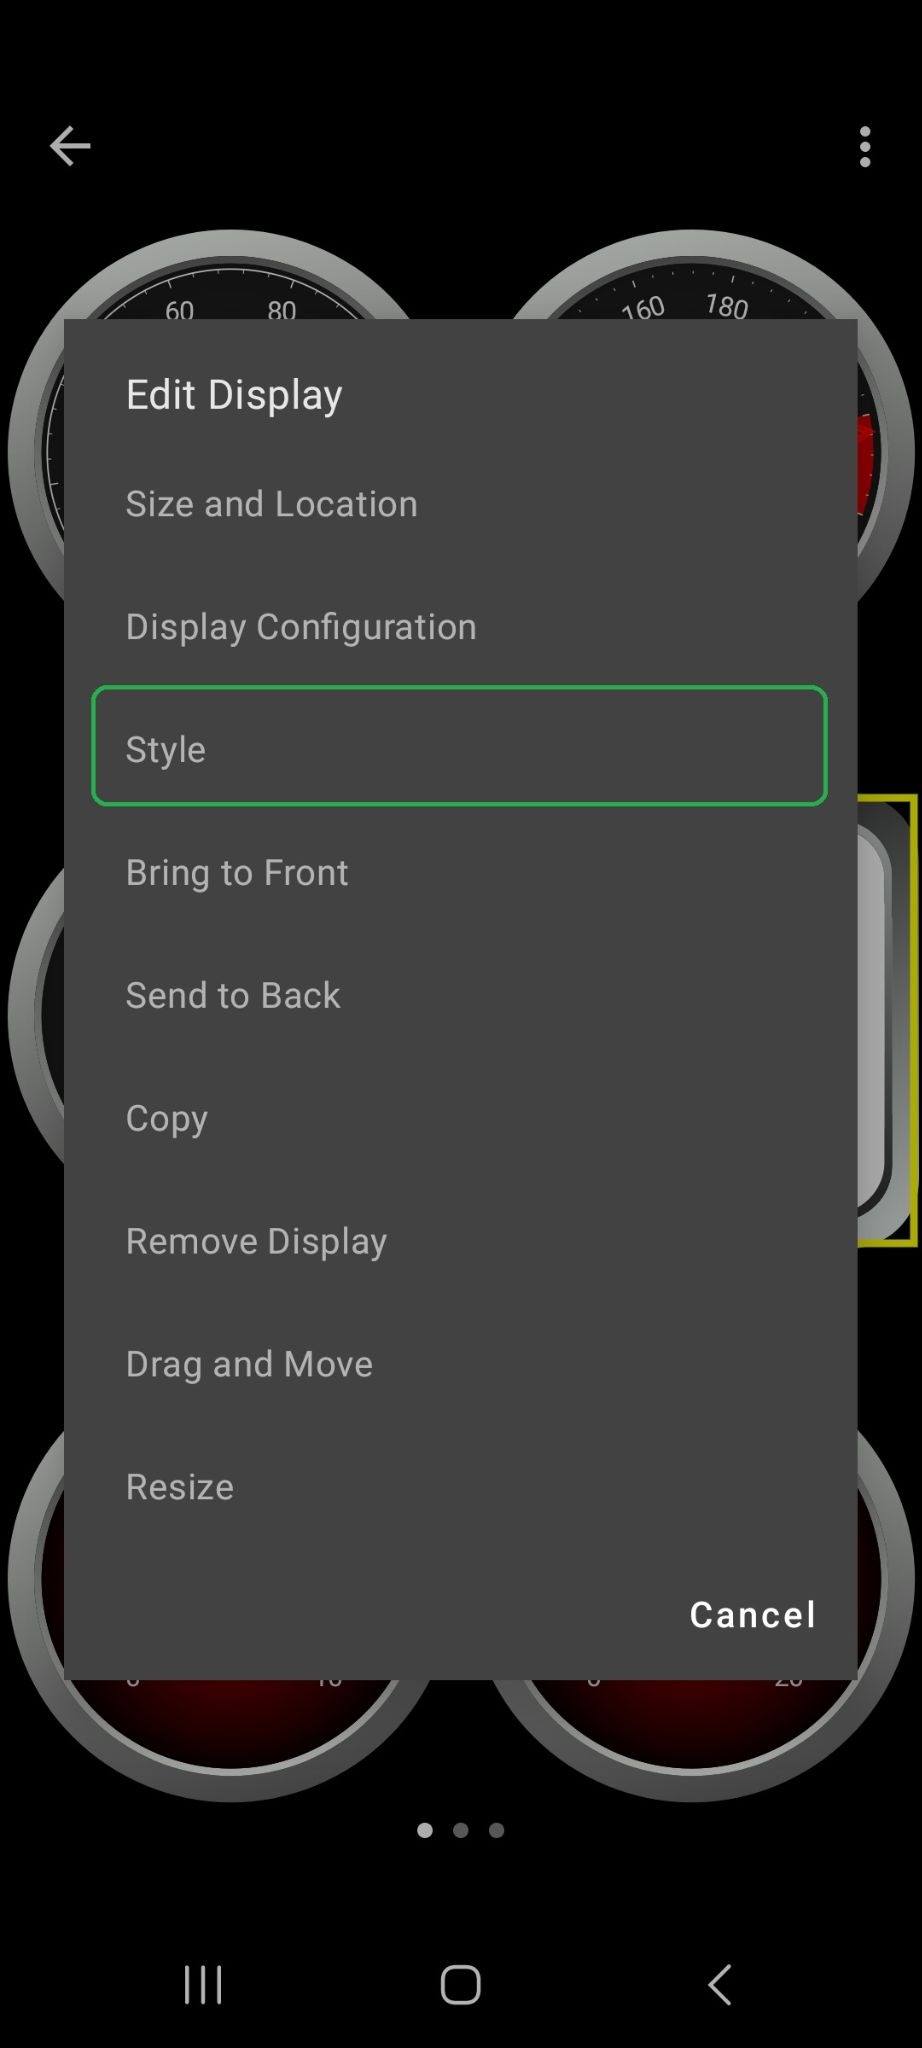
- Press and hold the transmission temperature gauge until the Edit Display menu is shown. Tap Style.
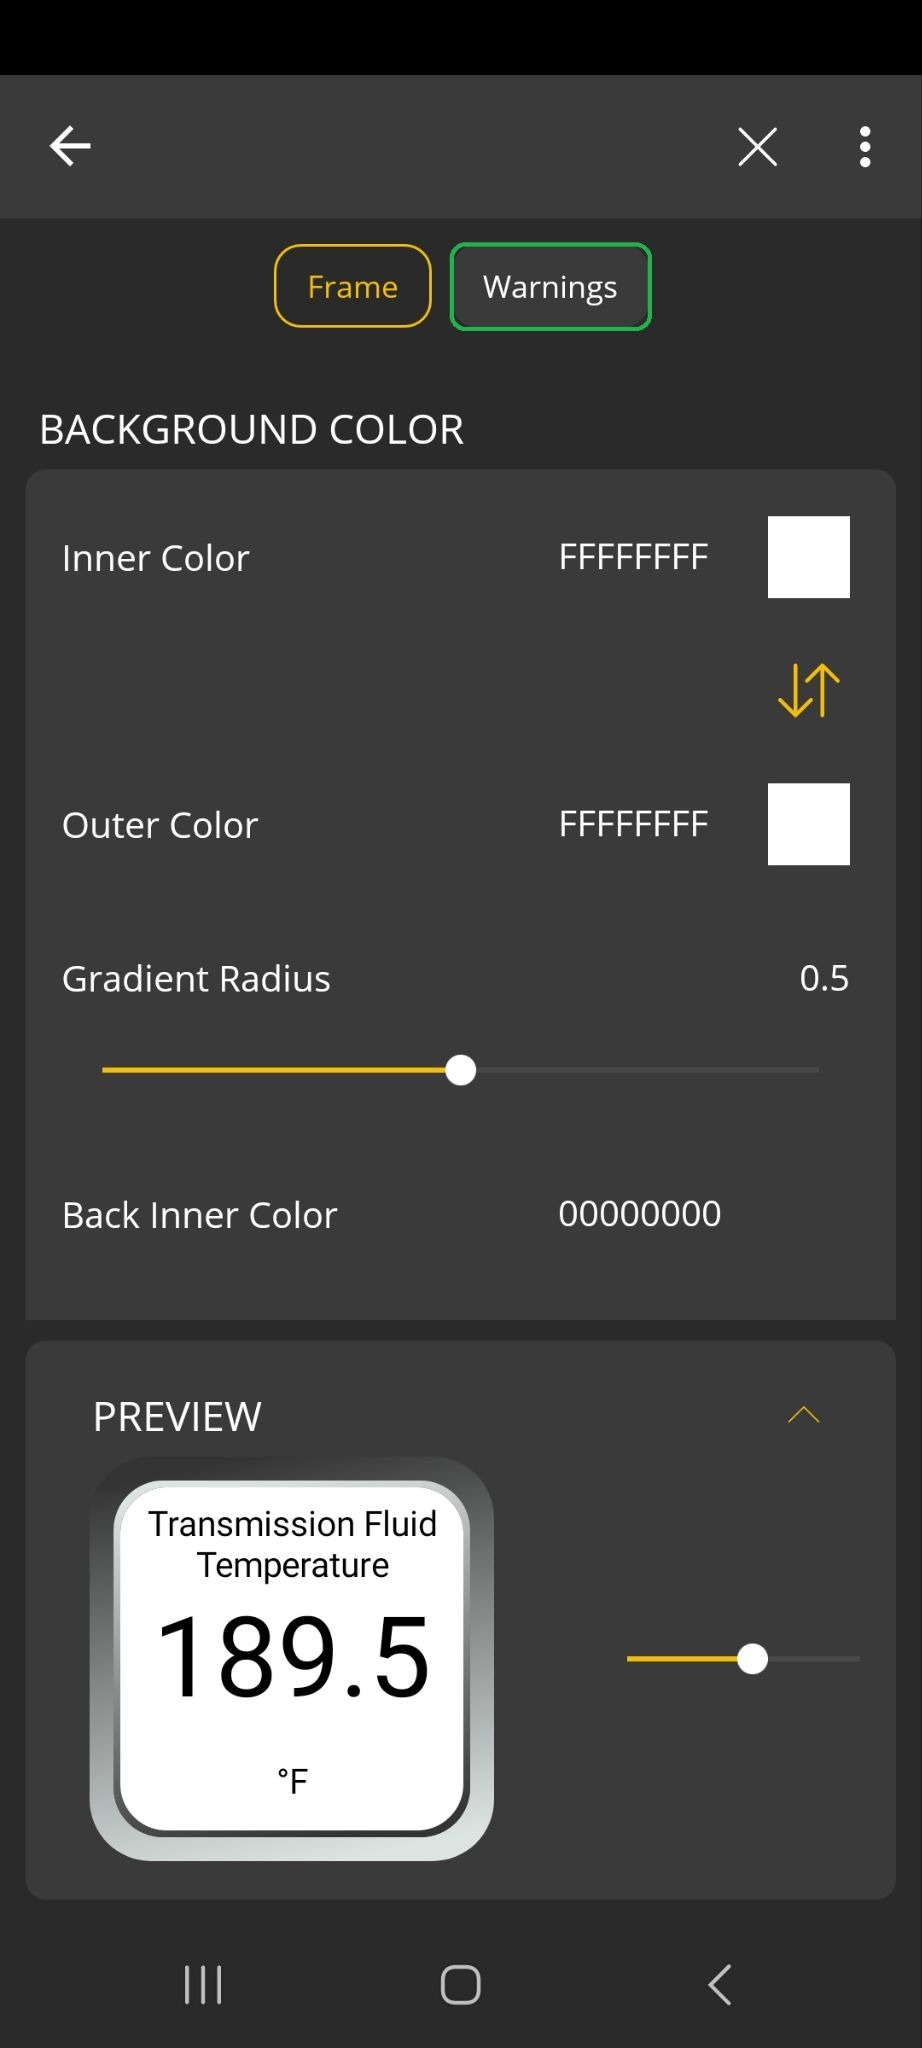
- You will see the Frame tab on the Style menu with the current display settings. Tap the Warnings tab.
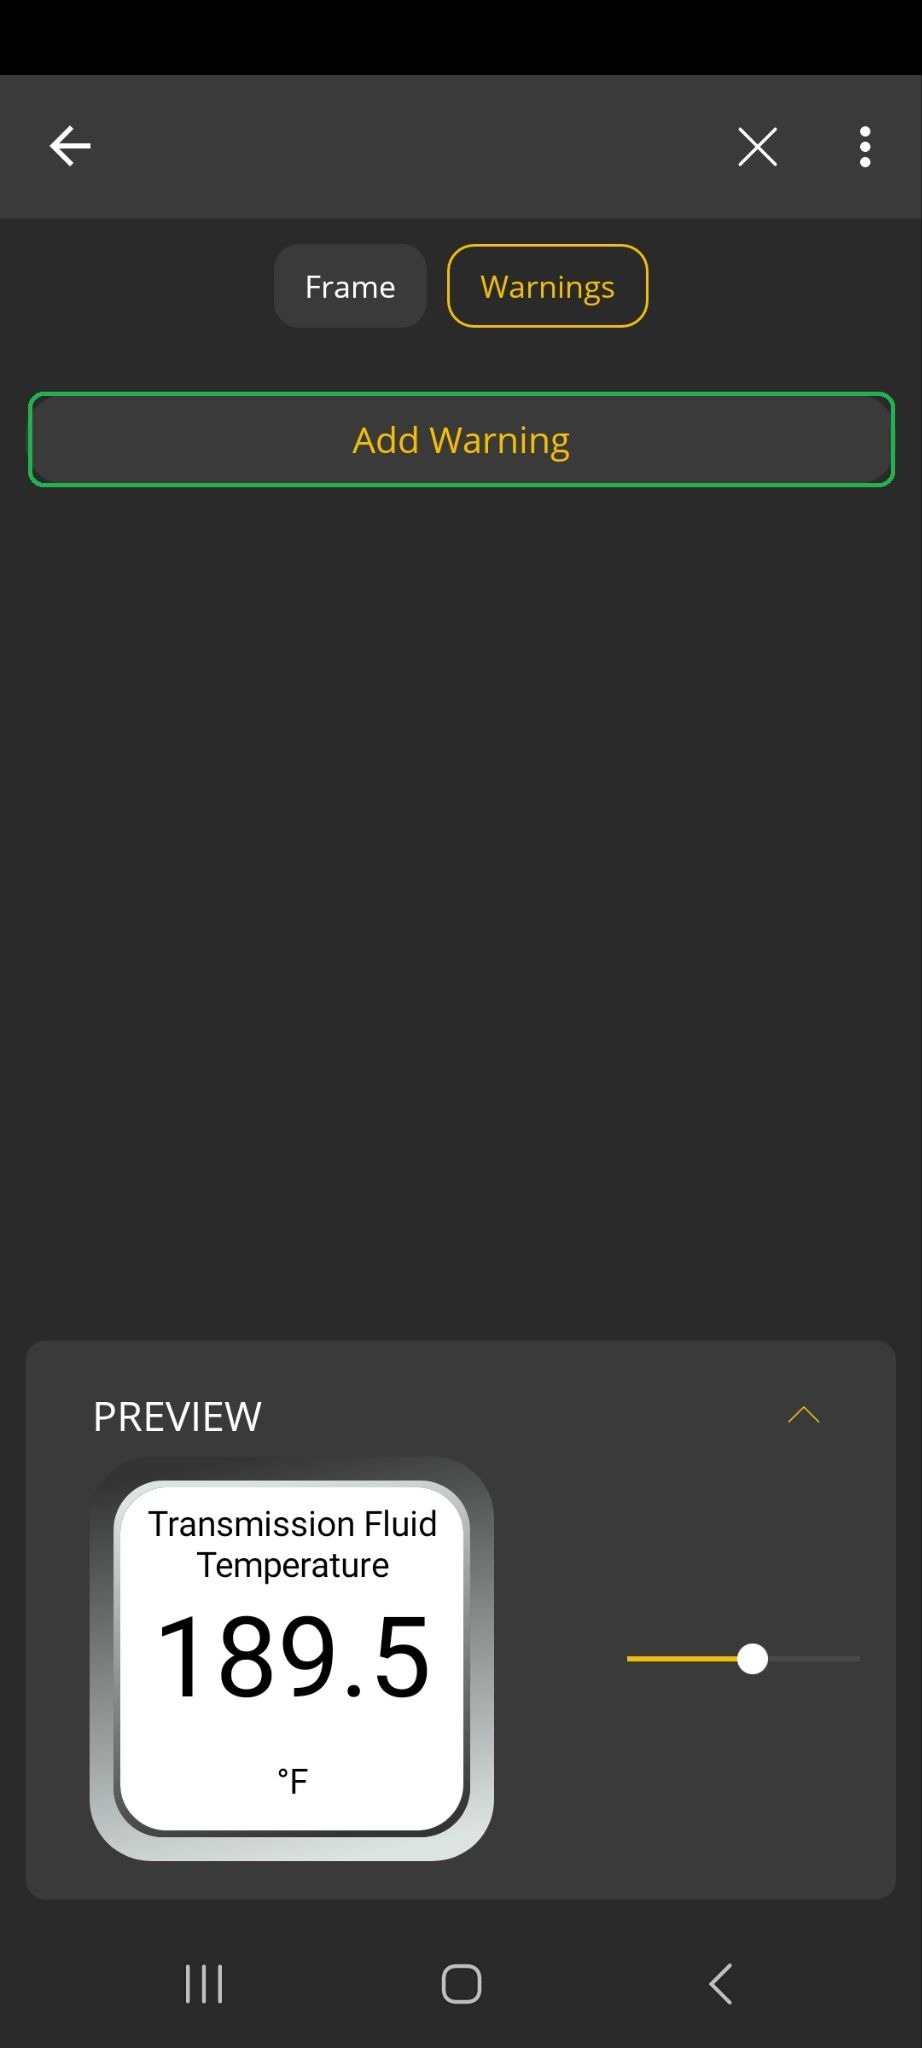
- Tap Add Warning to open the Warnings screen.
- In the Warnings screen, enter the values you want to use, the comparison type (if needed), and the gauge color.
You can move the slider in the Preview section to see how the gauge will behave.
Tap the back arrow (<) to save your selection.
Note: Check your vehicle manufacturer’s guidelines for the recommended range of transmission temperature values.
In our example, we set up a visual warning for a transmission temperature greater than 200 °F. We chose orange for the display color.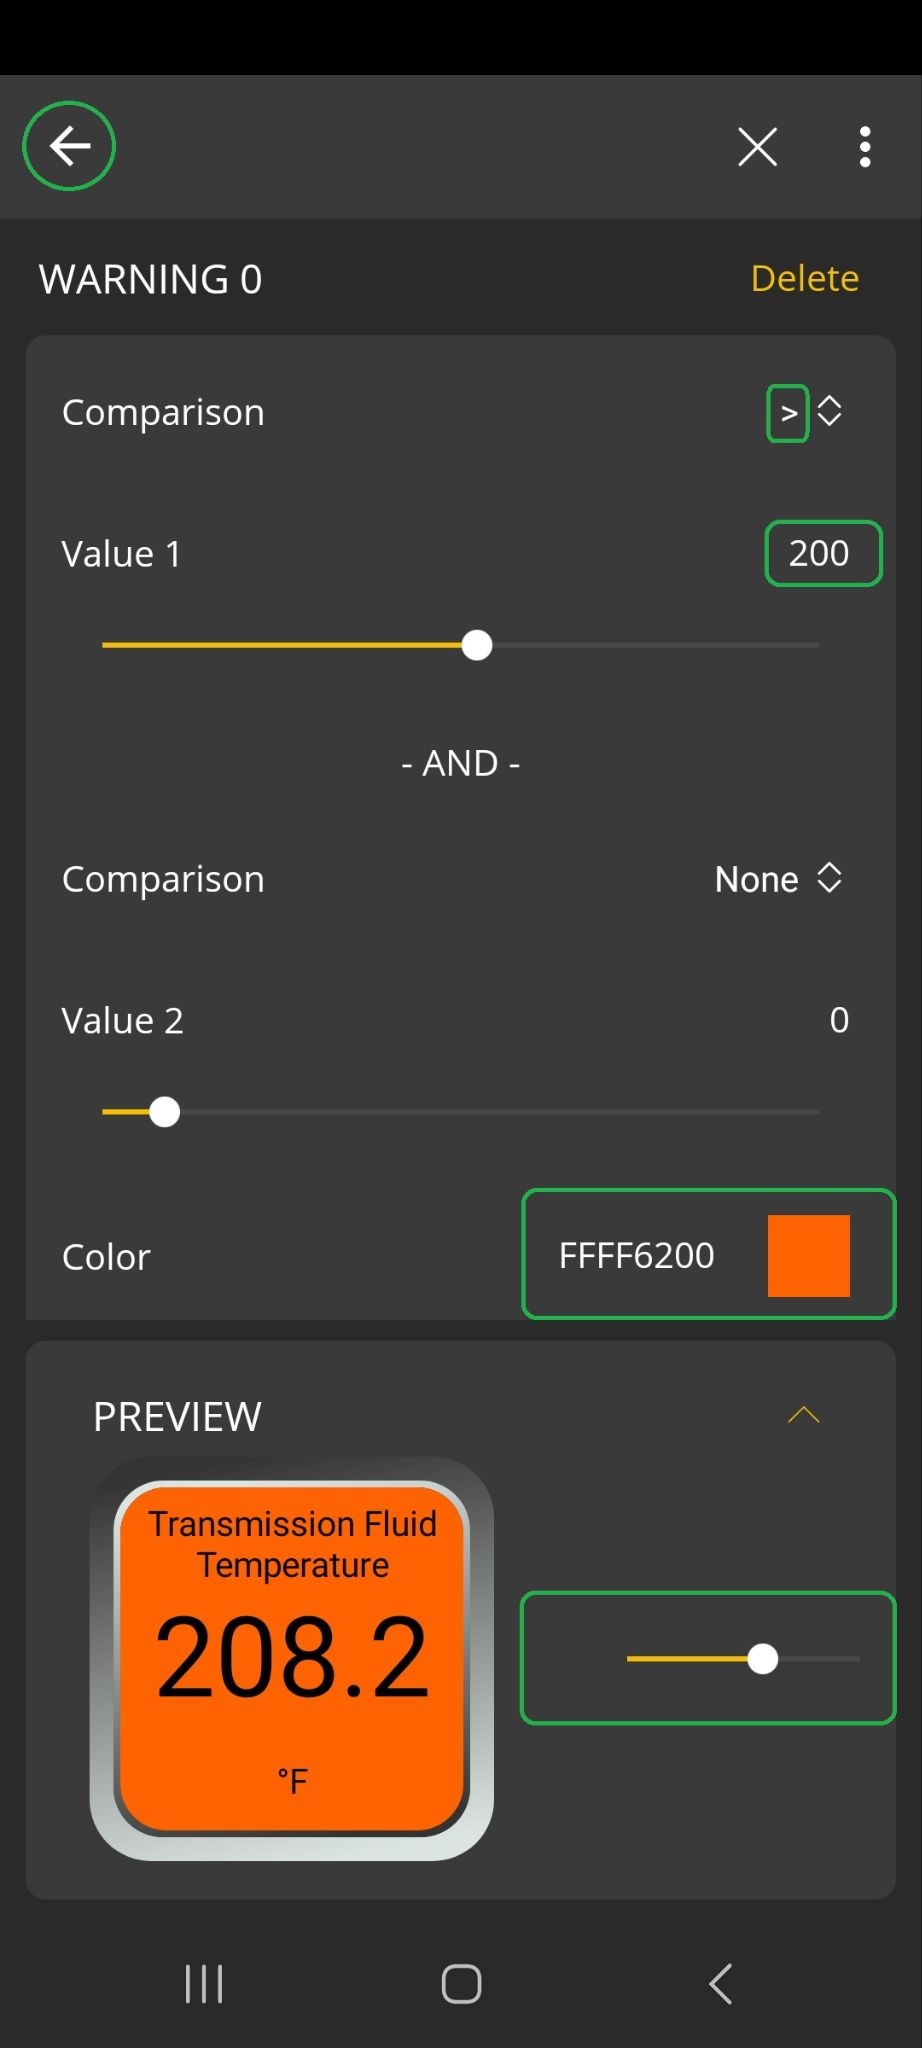
Add alert for transmission temperature PID
In our example, we added an alert to monitor the transmission temperature. The alert will display a notification and create a trip event when the value is greater than 200 °F.
- Confirm that your phone/tablet is Connected to the OBDLink adapter, tap the Settings icon, and navigate to Preferences > Alerts.
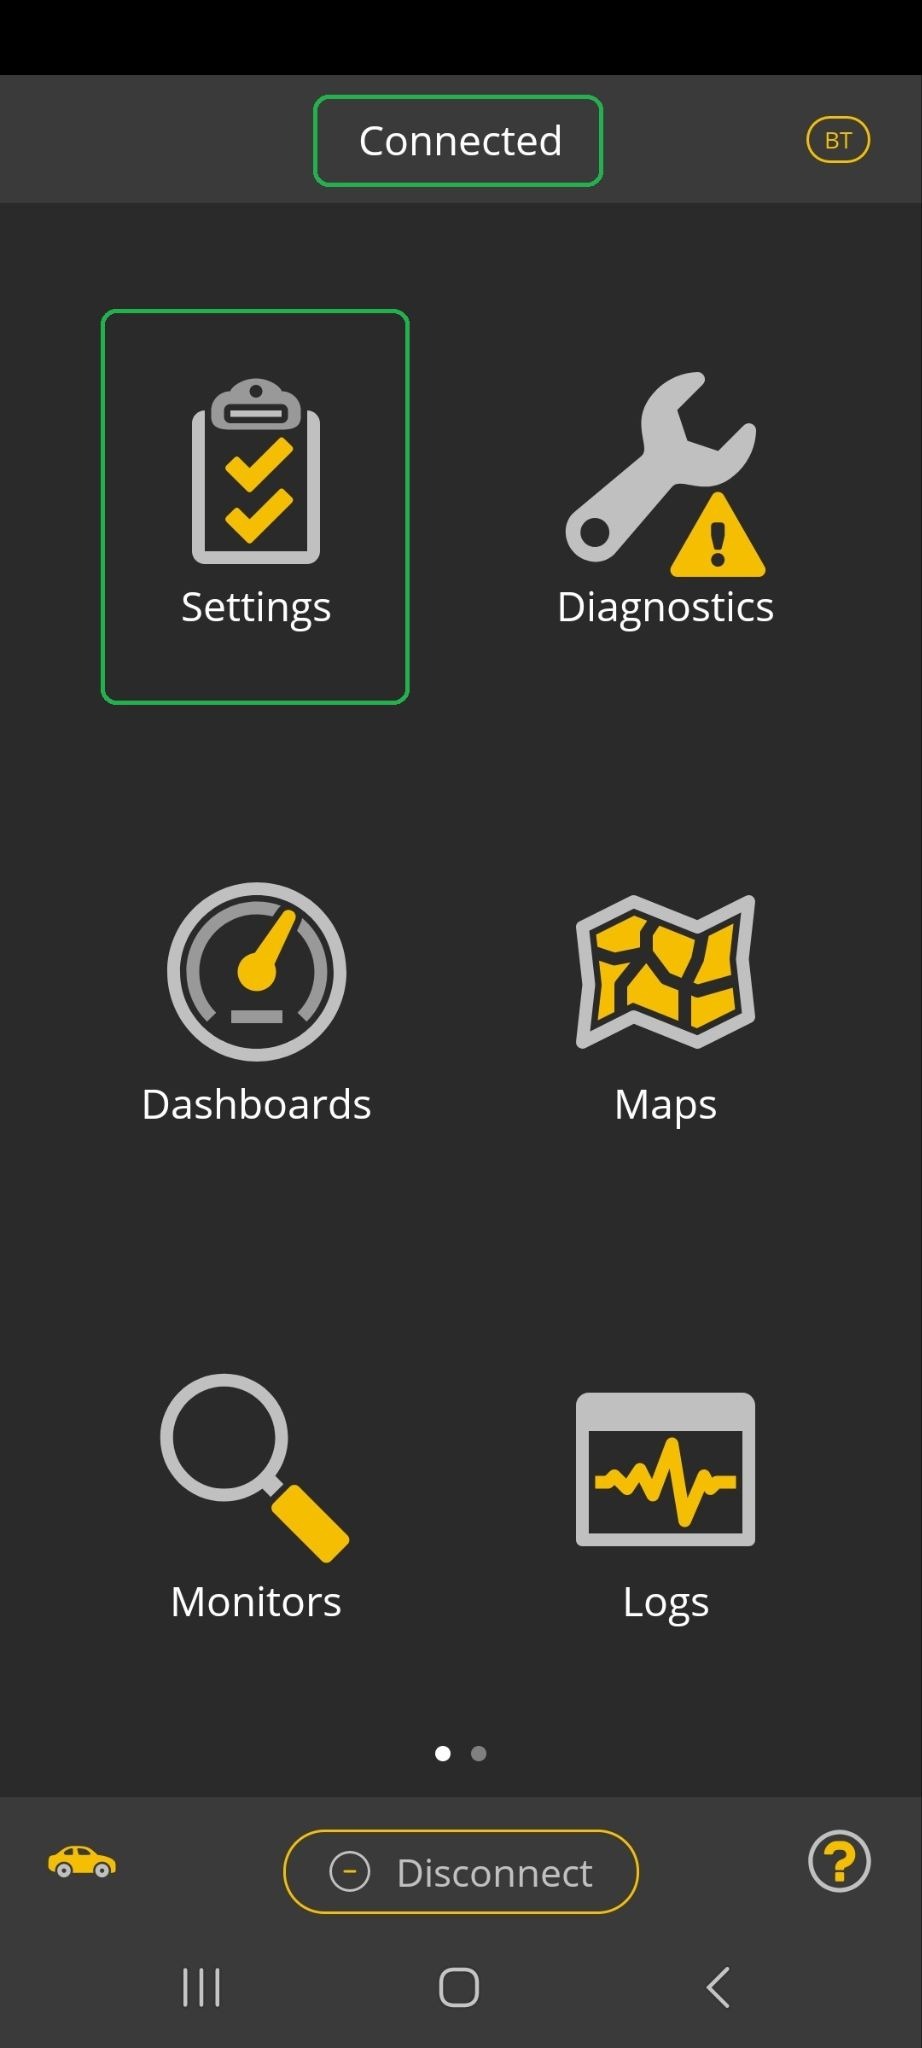
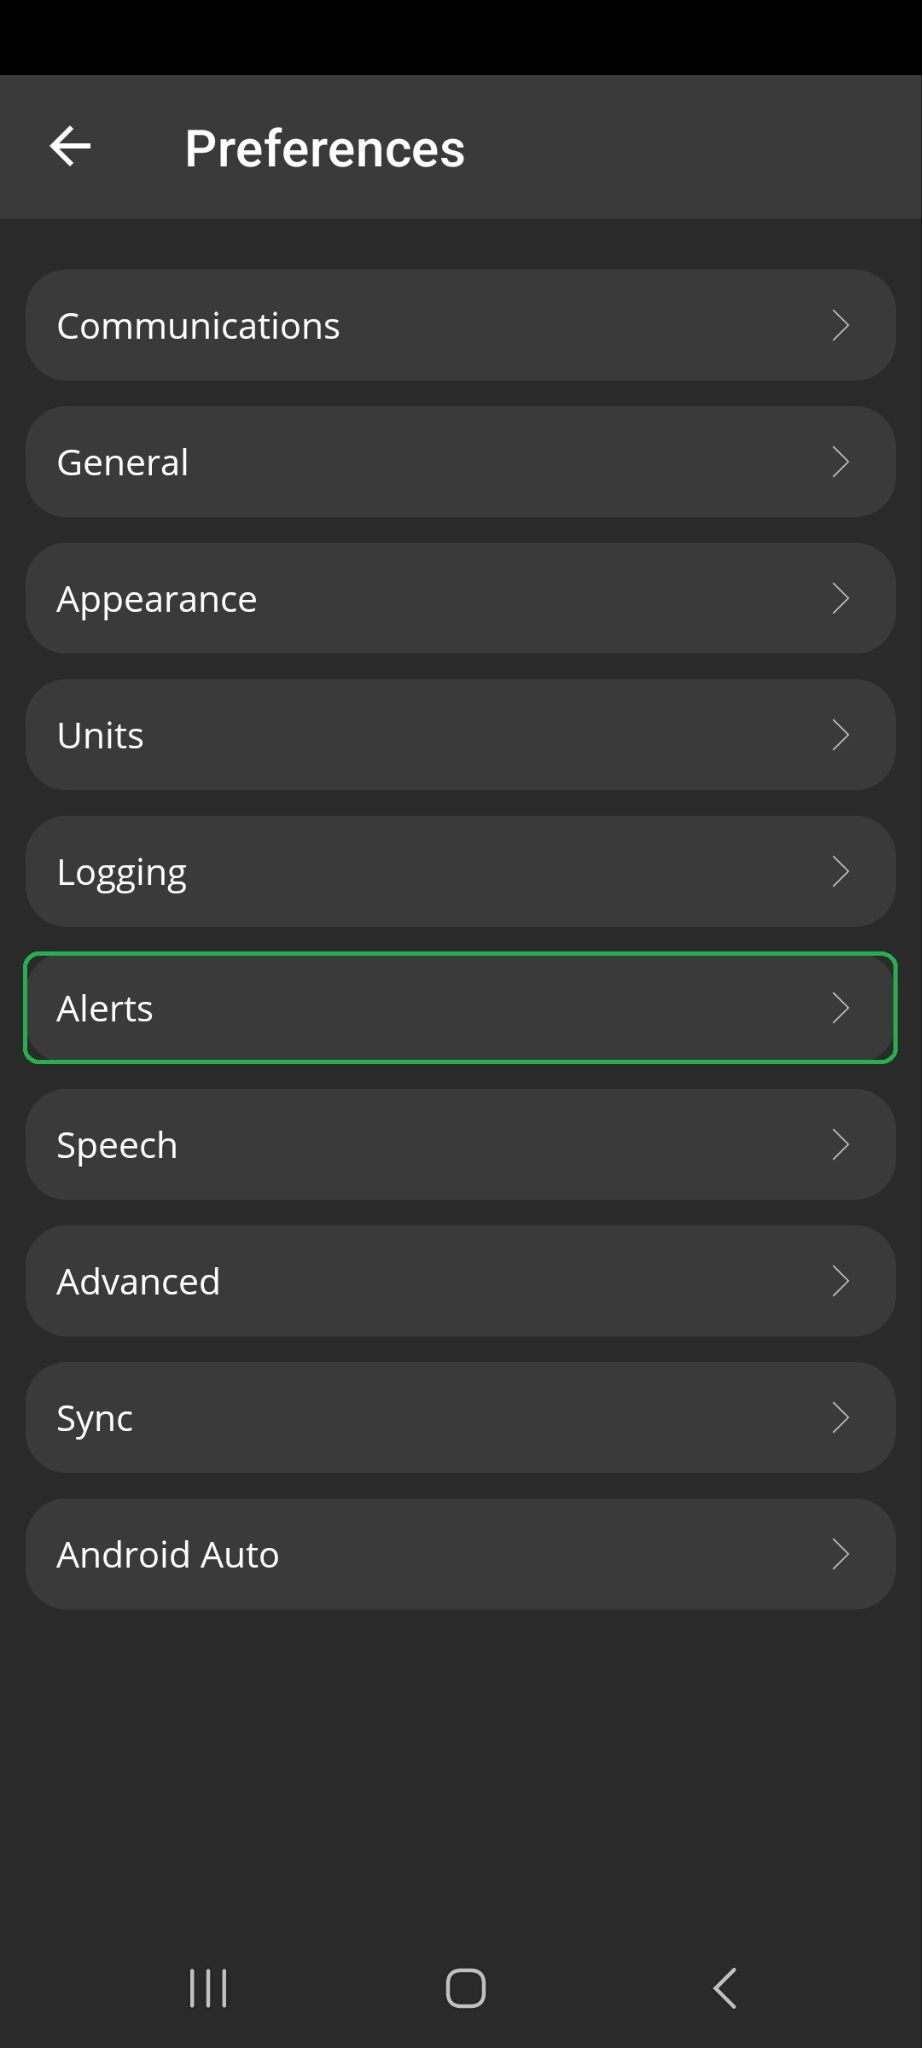
- Choose the Global Actions you want from the displayed lists.
Global Active Actions define actions when an alert becomes active (when the PID value matches the threshold setting). Similarly, Global Inactive Actions define actions when an alert becomes inactive.
In our example, we selected Display Notification and Add Trip Event for both types of actions.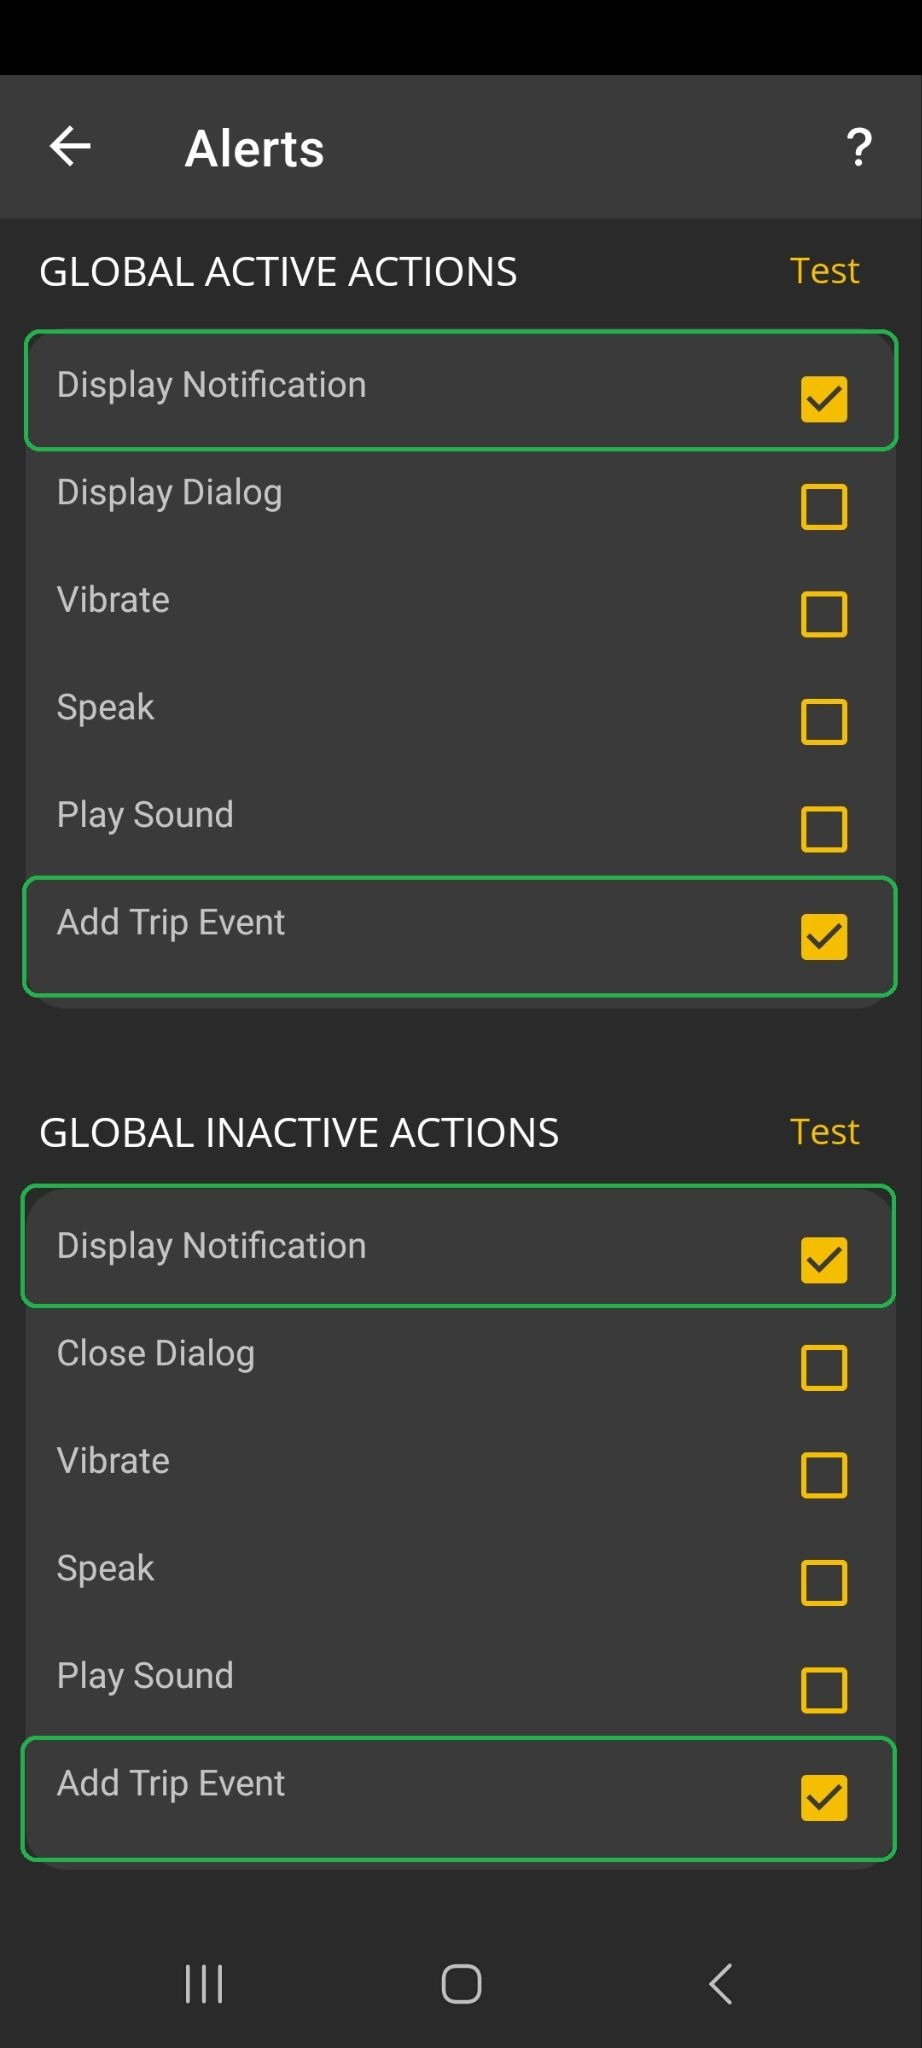
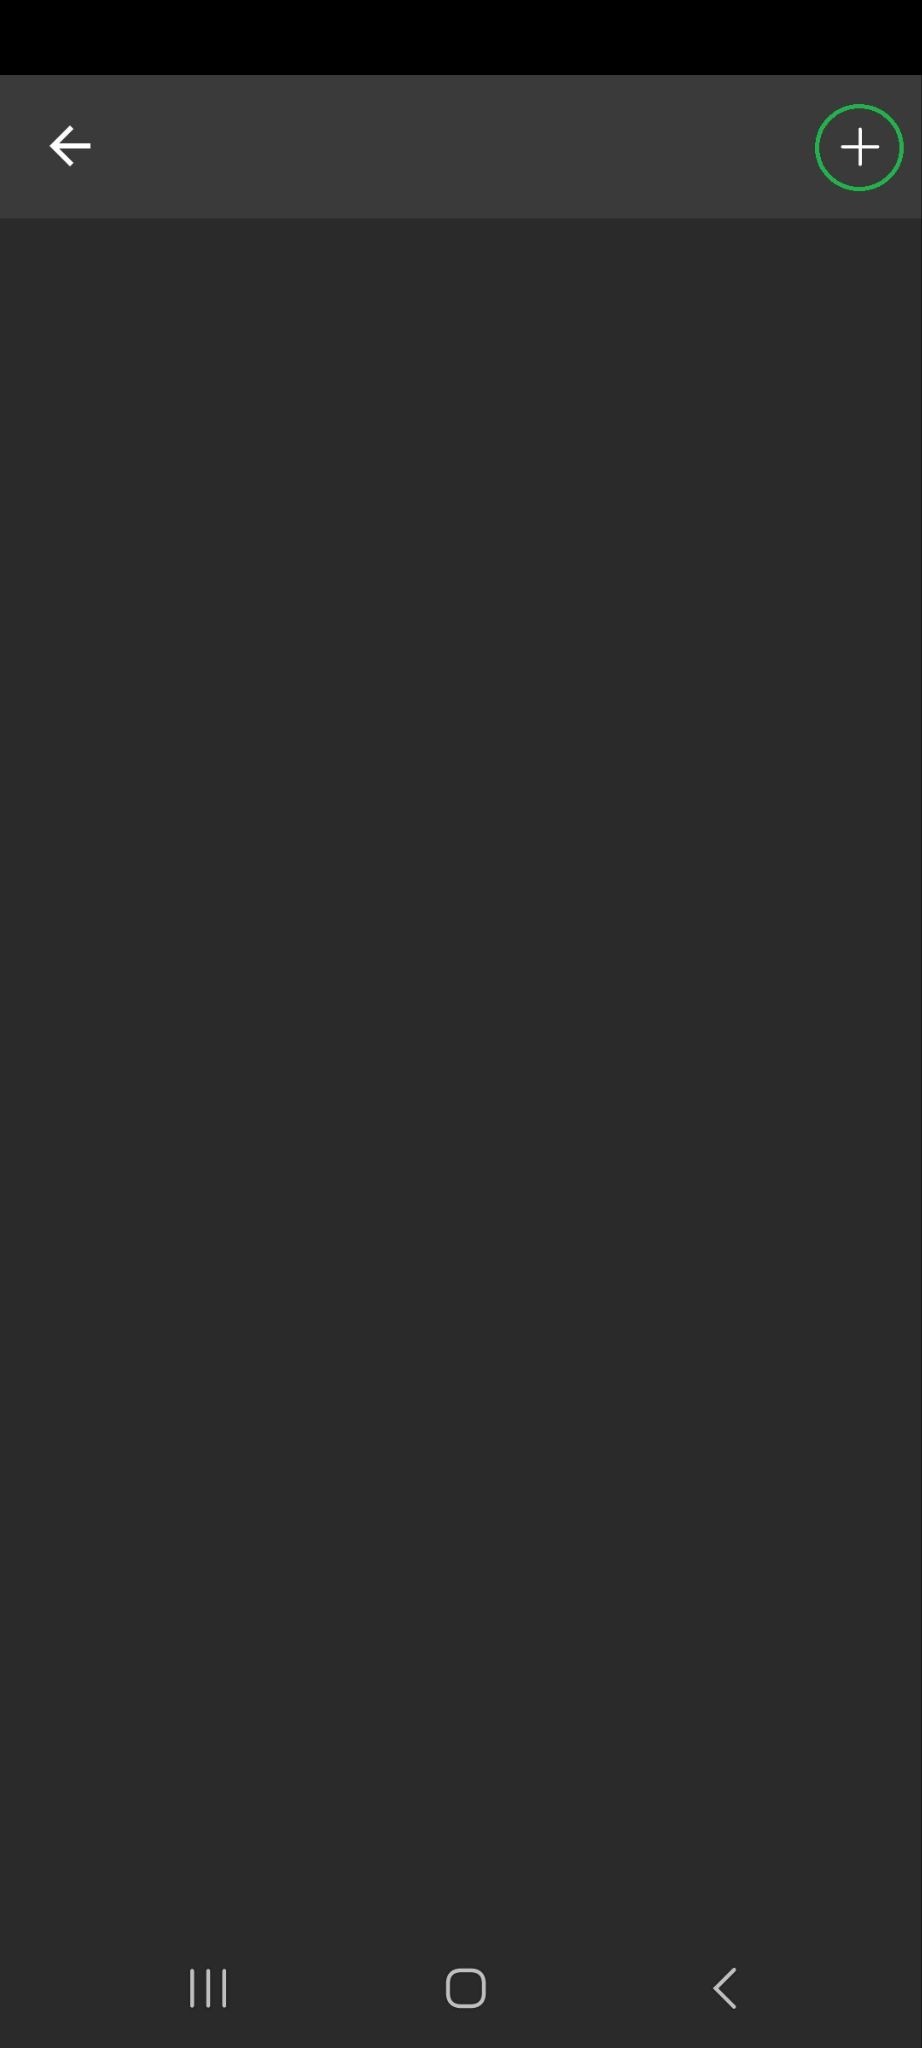
- To add an alert, scroll down to the Alerts section of the screen and tap the forward arrow (>).
In the next screen, tap the plus symbol (+).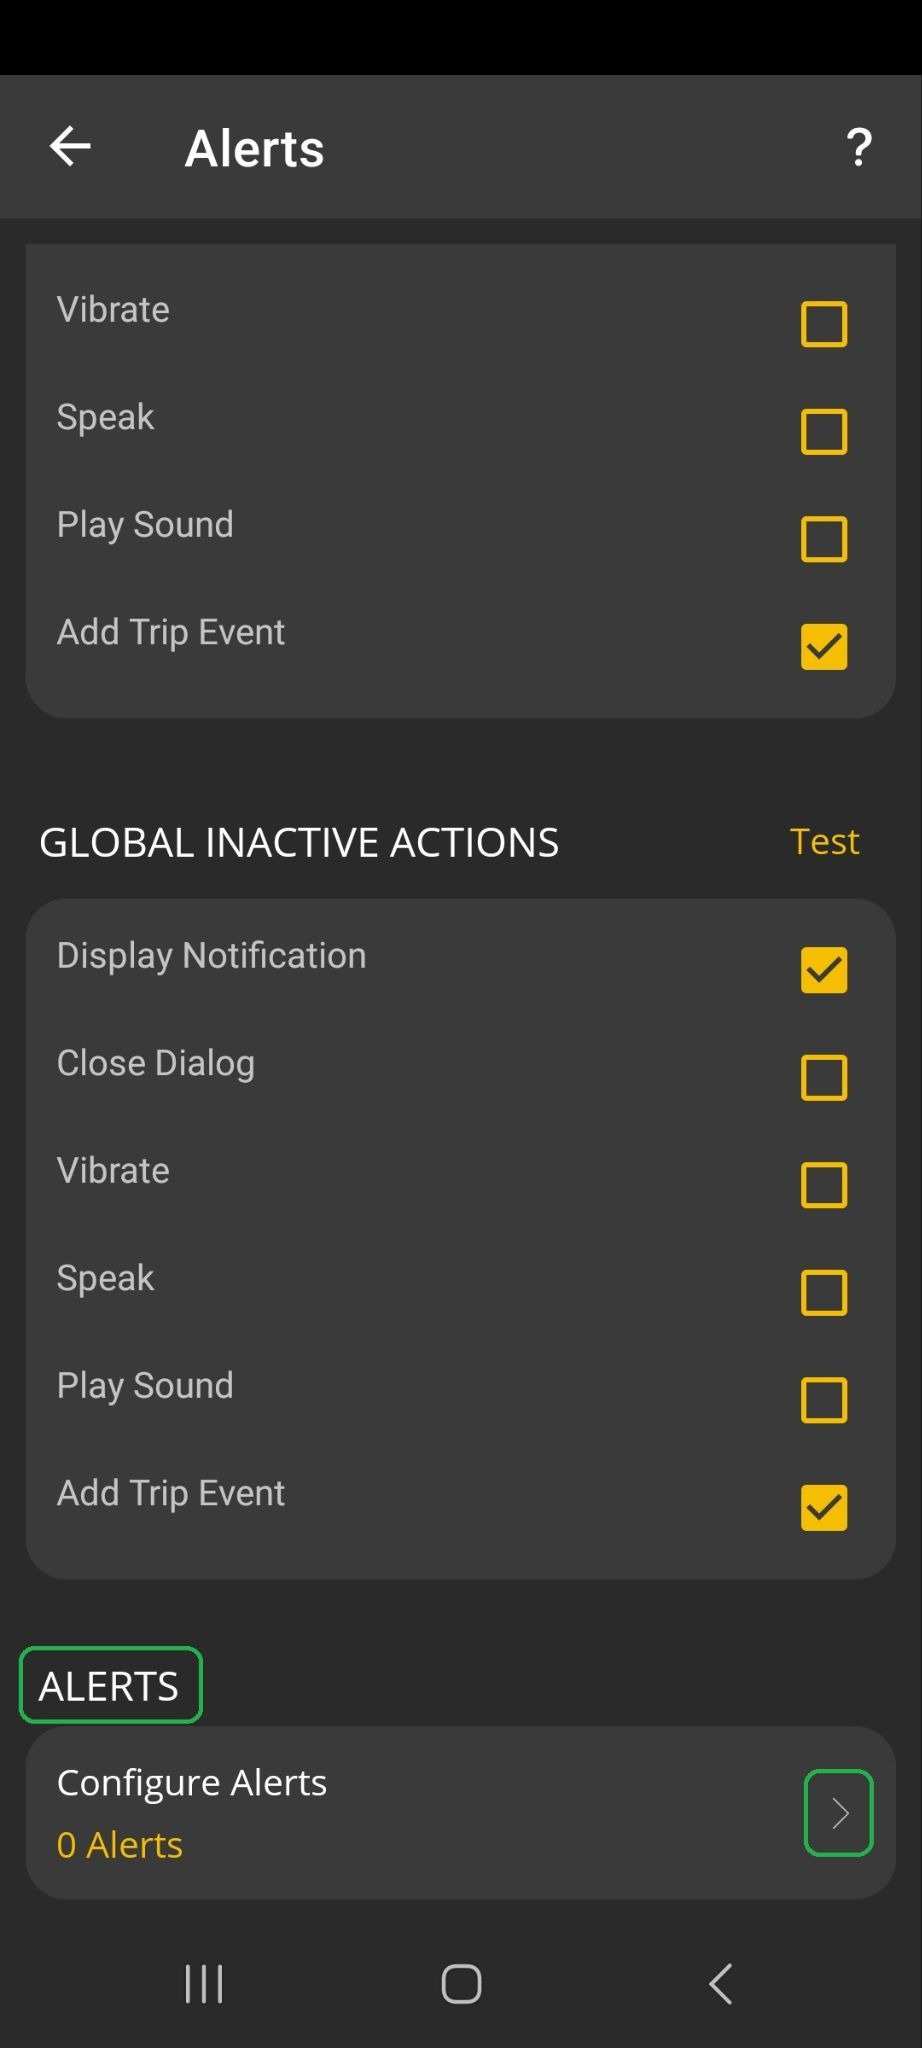
- In the Select PIDs menu, you can type “transmission” in the search field to quickly find the correct PID.
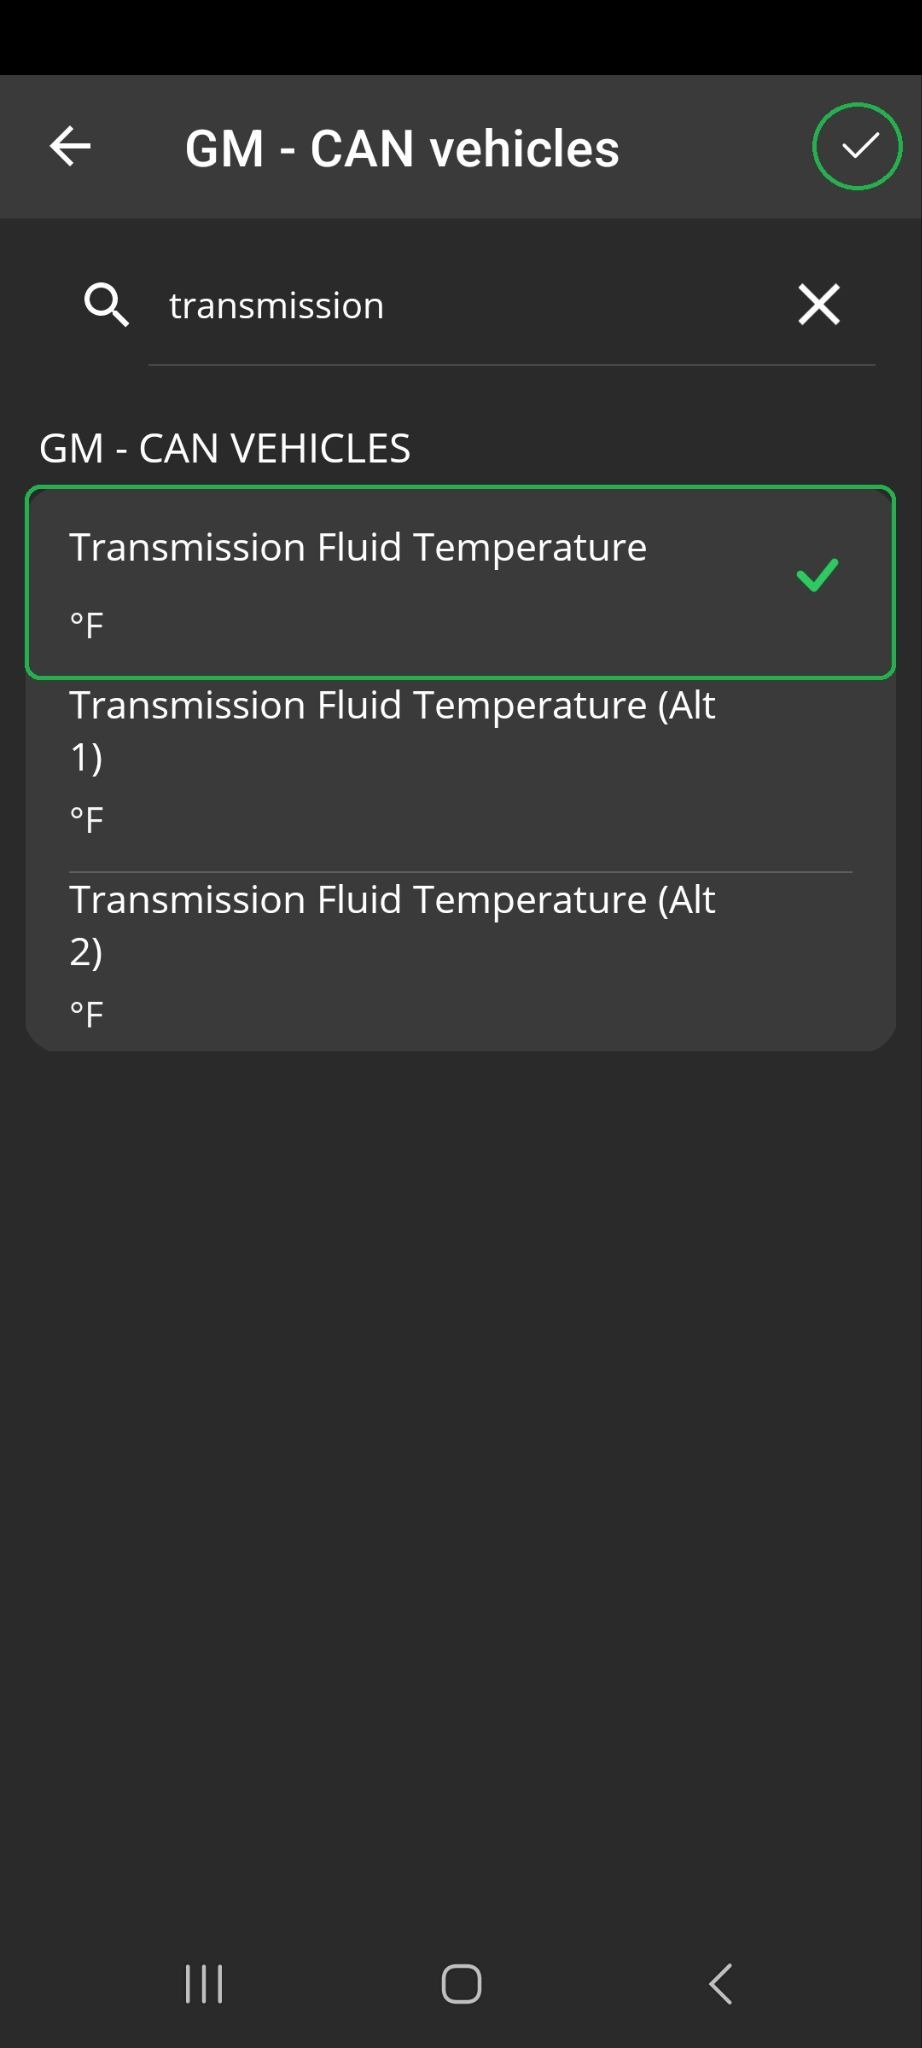
In the Manufacturer PIDs > GM - CAN vehicles category, select the Transmission Fluid Temperature °F PID.
Confirm that the PID you want has a checkmark, then tap the checkmark (✓) in the upper right corner.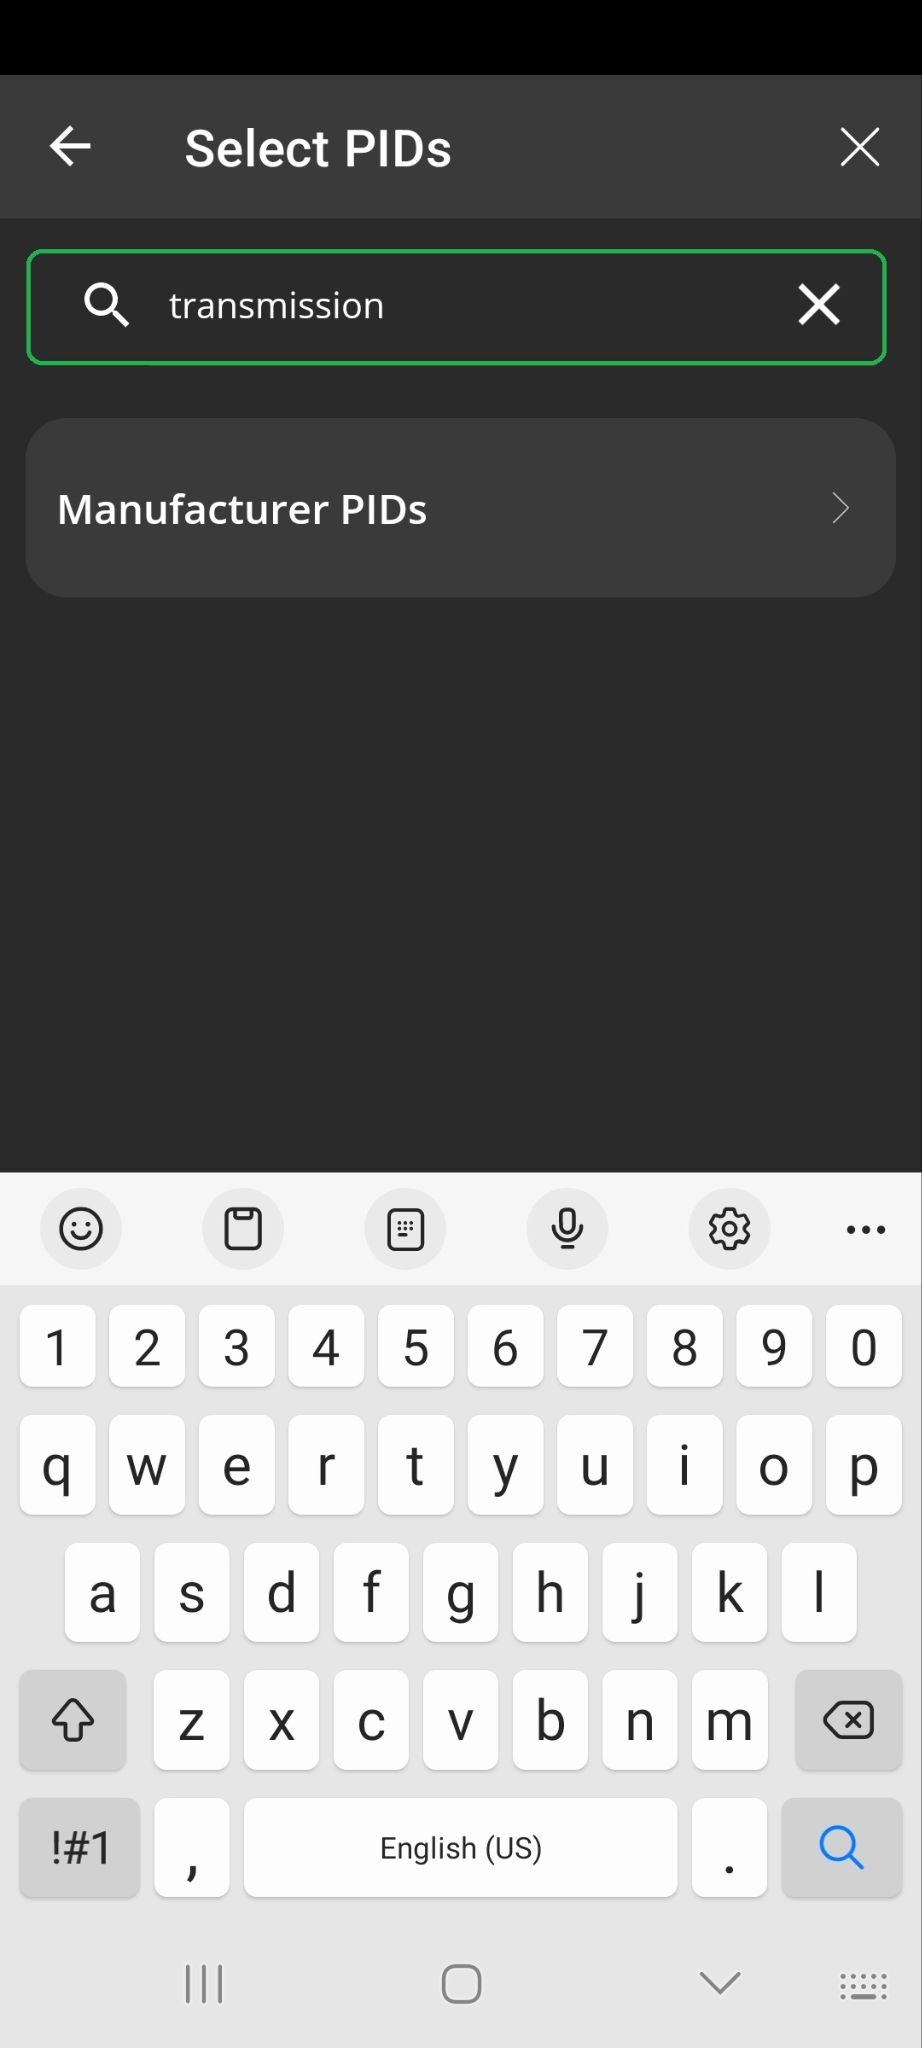
- You will see the Alert configuration screen, which contains these options:
Settings displays whether or not the alert is Enabled.
PID shows which Parameter ID is used for the alert.
Threshold sets the comparison type and the PID value used to make the alert active or inactive.
Active Actions and Inactive Actions have Use Global Actions enabled by default.
In our example, we set up the alert to activate when the Transmission Fluid Temperature is greater than 200 °F.
Confirm that the Alert settings are correct, then tap the back arrow (<) in the upper left corner.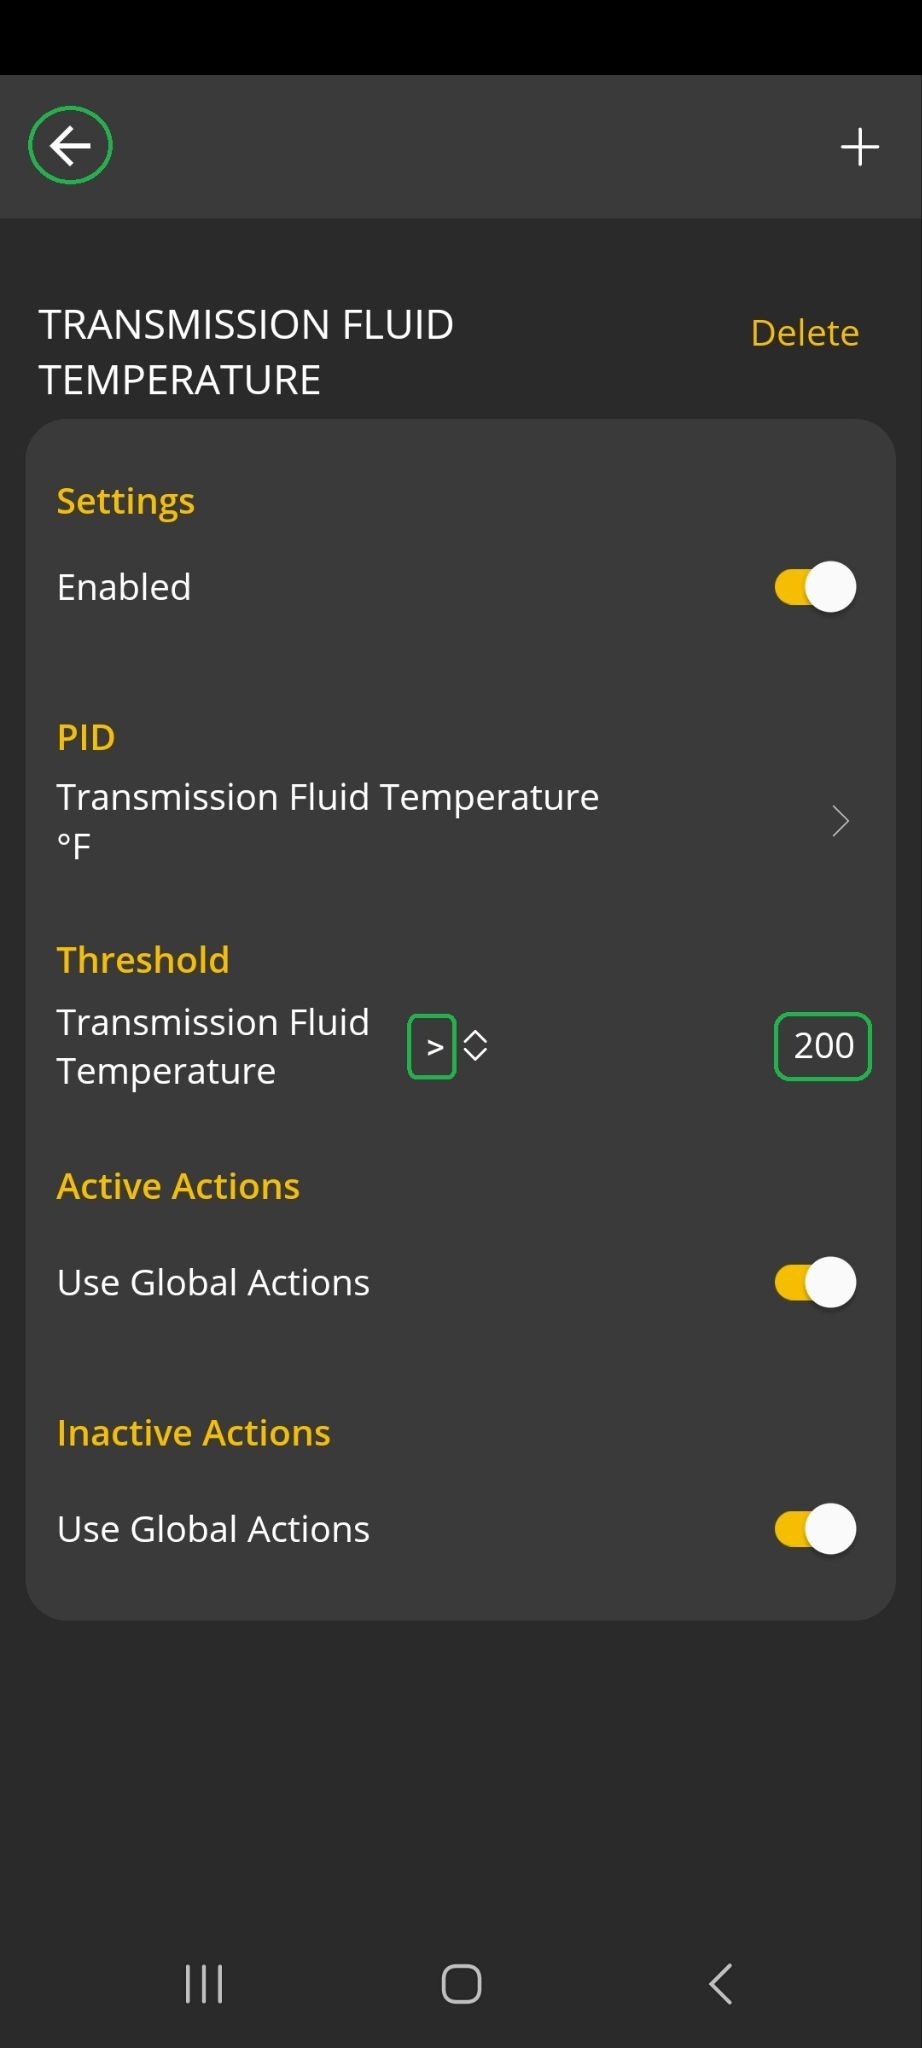
In the main Alerts screen, you will see that 1 alert has been set up (highlighted). You may need to scroll to the bottom of the display.
Tap the back arrow (<) in the upper left corner and tap < two more times to return to the OBDLink app home screen.
Note: You will see a message (highlighted) if you select Display Notification and notifications aren't enabled for the OBDLink app. Open the Settings menu for your phone/tablet and turn on App Notifications for the OBDLink app.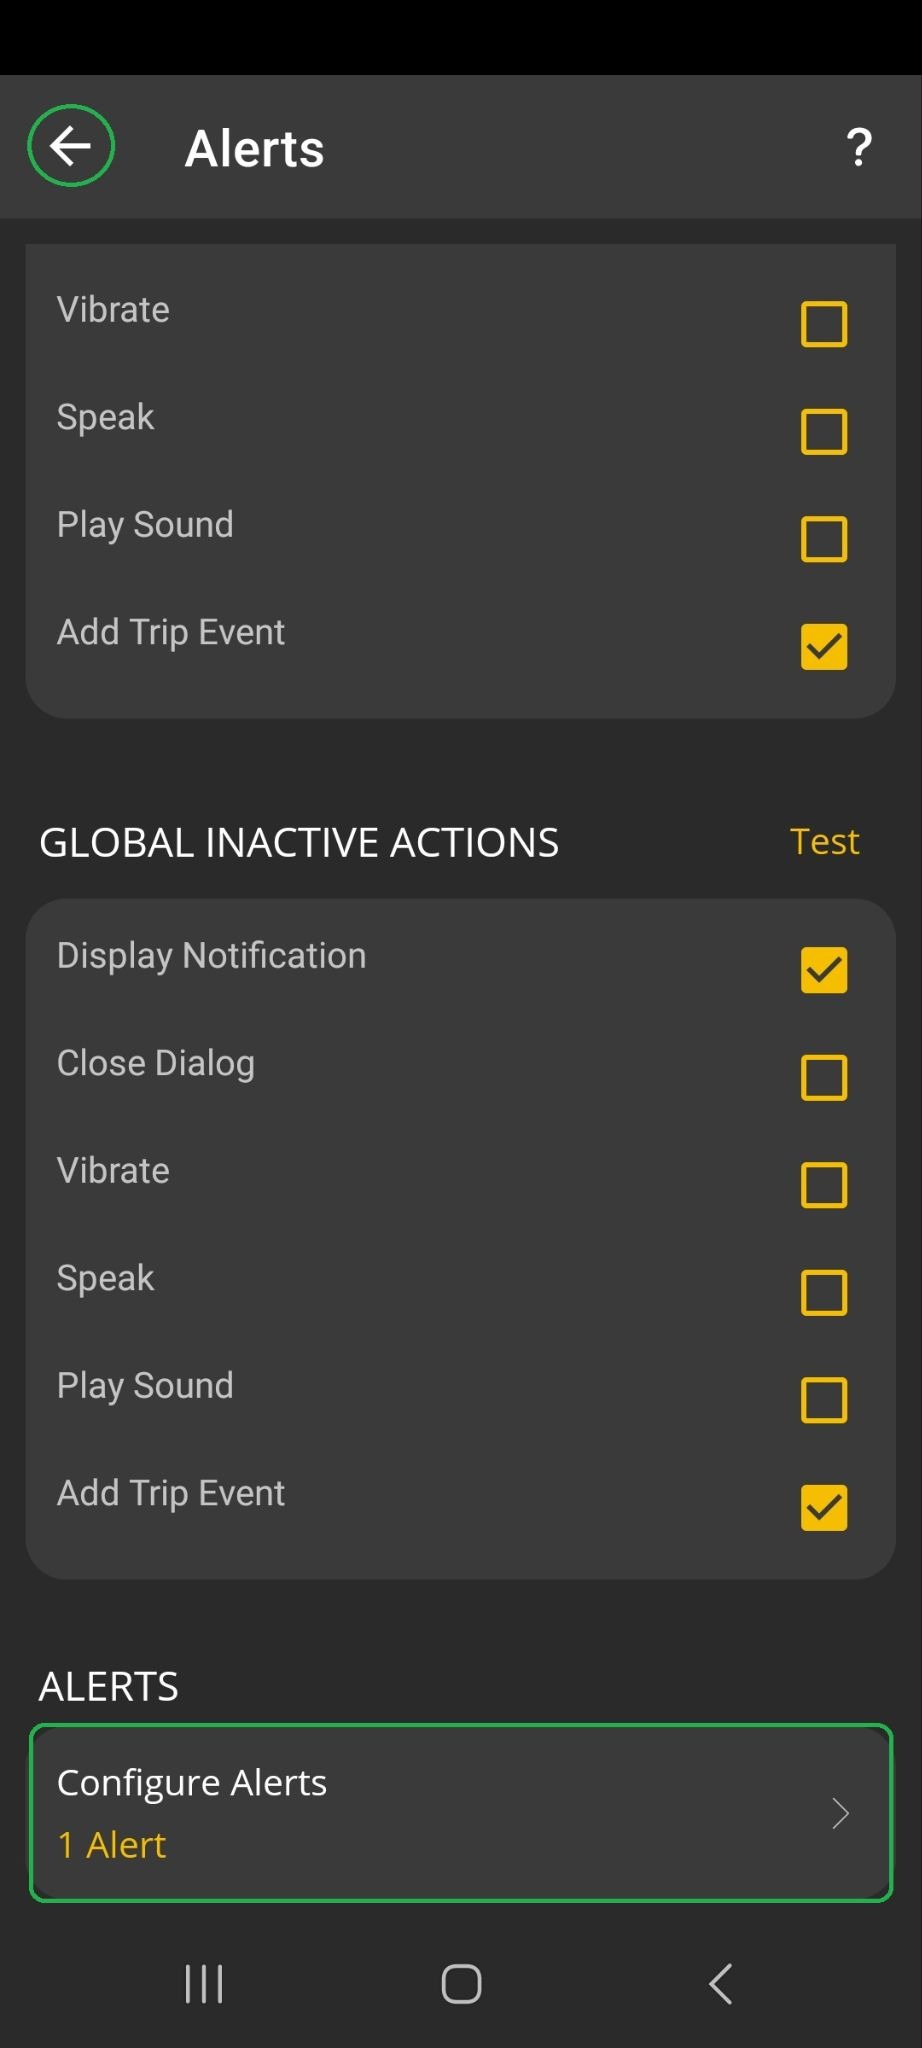
 |
Go for a test drive
- Start your vehicle. On your phone/tablet, open the OBDLink app and connect to your OBDLink adapter.
- Tap the Dashboards icon on the app's main screen so you can view your customized Transmission Temperature gauge.
- Go for a test drive. If the gauge value exceeds the limit you set, the gauge display should have an orange background.
- After your drive, tap the Disconnect button. (Your OBDLink adapter automatically disconnects when you turn off your vehicle engine.)
- Tap the Trips icon on the second page of the app’s main screen. Review the information from your test drive to see if any alerts were detected.
Troubleshooting
The articles listed below have detailed troubleshooting sections:
- Display Transmission Temperature Gauge - Troubleshooting section
- Add and Edit Dashboard Gauges - Troubleshooting section
- Configure Alerts for Vehicle PIDs - Troubleshooting section
Learn more
- Customize the default gauges and dashboards using the steps in the Add and Edit Dashboard Gauges article.
- Review several detailed examples of how to show a vehicle’s transmission temperature in the article: Display Transmission Temperature Gauge
- For step-by-step details on setting up OBDLink alerts, see the Configure Alerts for Vehicle PIDs article.
- Read more about Trips in the Get Started with Trips article.
- You can explore other OBDLink features and functionality using our support article knowledge base.
- For descriptions of terms used in this article, see the Glossary of Acronyms and Terms.
Need more help?
OBDLink® is a registered trademark of OBD Solutions, LLC.